• Home
  • Suggest A DIY
  • DIY Newsletter

Bath and Body

Soap Making, Oils and Recipes

  • About CraftGossip
  • Our Network
    • Bath & Body Crafts
    • Candle Making Ideas
    • Crochet Ideas
    • Cross Stitch
    • Edible Crafts
    • Felting Patterns
    • Glass Art
    • Home & Garden Ideas
    • Indie Crafts
    • Jewelry Making
    • Kids Crafts
    • Knitting Patterns
    • Lesson Plans
    • Needlework
    • Party Ideas
    • Polymer Clay
    • Quilting Ideas
    • Recycled Crafts
    • Scrapbooking
    • Sewing Patterns
    • Card Making
    • DIY Weddings
    • Not Craft Ideas
  • Giveaways
  • Roundups
  • Store
  • Search

Turmeric and Honey Glow Melt and Pour Soap Recipe

March 18, 2026 by Shellie Wilson Leave a Comment

Let’s talk skin—because mine has been going through it lately. Perimenopause hit, and suddenly my complexion went from ‘glowy mum’ to ‘washed-out school pickup zombie.’ Sound familiar? I needed something quick, natural, and gentle. That’s when I rediscovered turmeric—not in curry this time, but in my DIY soap kit.

Turmeric has been used for centuries in Ayurvedic skincare for its brightening, anti-inflammatory, and antibacterial properties. Combine that with raw honey (a natural humectant that draws moisture into the skin), and you’ve got a powerhouse bar that actually does something—and smells lovely doing it.

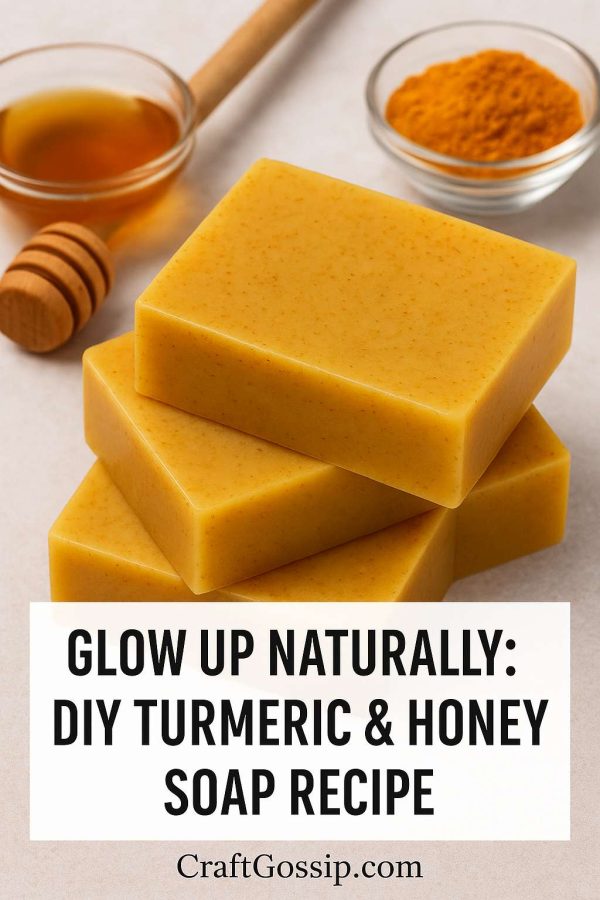
Benefits of Turmeric & Honey for Skin

  • Brightens dull skin naturally without harsh chemicals 
  • Soothes inflammation and redness (great for mature, hormonal skin) 
  • Raw honey keeps skin hydrated and glowing 
  • Goat’s milk base adds a creamy, gentle lather perfect for dry or sensitive skin 

Ingredients You’ll Need

  • 1 lb goat’s milk melt and pour soap base 
  • 1 tbsp raw honey 
  • 1 tsp organic turmeric powder 
  • ½ tsp vitamin E oil 
  • Optional: 10 drops lemon or sweet orange essential oil 
  • Rubbing alcohol in a spray bottle (to remove surface bubbles) 
  • Silicone soap mold 

How to Make Turmeric Honey Soap

  1. Chop the soap base into small chunks and melt it in the microwave in 30-second bursts, stirring in between. 
  2. Once fully melted, stir in honey, turmeric powder, vitamin E, and essential oils. Mix well until evenly combined. 
  3. Carefully pour the mixture into your soap molds. 
  4. Spritz the top with rubbing alcohol to pop any bubbles. 
  5. Let the soap cool and harden for 1–2 hours. 
  6. Remove from molds and let cure for 24 hours before use or gifting. 

Pro Tips

  • Use a small mesh strainer when pouring to prevent turmeric clumps. 
  • Store soap in a cool, dark place to prevent turmeric fading. 
  • Makes a gorgeous gift wrapped in wax paper with jute string! 

15 Turmeric Beauty Recipes [Bath and Body]

DIY – Turmeric Face Mask [Bath and Body]

How To Make Turmeric and Ginger Tea For Cold And Flu Season – Free Recipe [Edible Crafts]


Related Posts:

  • DIY Makeup Remover Recipes For Every Skin Type
  • How to Make an Anxiety Calm Down Pouch (Also Called…
«
»

Have you read?

DIY Sore Muscle Relief Balm with Essential Oils – Natural Comfort in a Jar

When your back’s tight, your shoulders are screaming, and even stretching feels like too much effort—sometimes, you just need a little help in a jar.

Enter this soothing DIY Sore Muscle Relief Balm. It’s warming, nourishing, and infused with essential oils known for easing tension and boosting circulation. Whether you’re dealing with post-gardening aches, a long day on your feet, or that stubborn neck kink from sleeping funny (again), this balm is a natural way to say goodbye to muscle misery.

I keep a tin of this on my bedside table and another in the kitchen drawer. It’s a go-to remedy in our house for everything from growing pains to post-walk stiffness—and trust me, with a big dog like Aloo dragging me around, I know sore calves!

Why Make Your Own Muscle Balm?

Commercial rubs often contain synthetic fragrances, petroleum byproducts, or ingredients that can be too harsh on sensitive skin. When you make your own, you’re in full control—and it doesn’t have to be complicated or time-consuming.

This DIY balm is:

  • Petroleum-free and non-toxic 
  • Packed with anti-inflammatory oils 
  • Warming without the burn 
  • Gentle on sensitive or mature skin 
  • Perfect for gifting 

Ingredients You’ll Need

Base Oils & Butters:

  • ¼ cup shea butter – rich in vitamins and helps deeply hydrate skin 
  • 2 tbsp beeswax pellets – thickens the balm and adds a protective barrier 
  • ¼ cup coconut oil – light carrier oil with natural anti-inflammatory properties 
  • 2 tbsp magnesium oil (optional but recommended for extra relief) 

Essential Oils Blend:

  • 10 drops peppermint essential oil – cooling and refreshing 
  • 8 drops eucalyptus essential oil – helps reduce inflammation 
  • 6 drops rosemary essential oil – boosts circulation 
  • 5 drops lavender essential oil – calming and soothing 
  • 4 drops ginger essential oil – gentle warming effect (skip if sensitive to heat) 

Note: Always do a patch test before slathering it on.

How to Make It – Step-by-Step

  1. Melt Your Base
    In a double boiler (or a heat-safe bowl over simmering water), melt together the shea butter, beeswax, and coconut oil until fully liquified. 
  2. Add Magnesium Oil (Optional)
    Remove from heat and stir in magnesium oil if using. This may cause some bubbling—that’s normal! 
  3. Cool Slightly
    Let the mixture cool for a couple of minutes. You want it warm but not hot to avoid damaging the essential oils. 
  4. Stir in Essential Oils
    Add your essential oils and mix thoroughly with a wooden stick or glass stirrer. 
  5. Pour into Tins or Jars
    Carefully pour the balm intometal balm tins or glass jars. Let cool uncovered until set. 
  6. Label & Store
    Store in a cool place away from direct sunlight. It should last 6–12 months. 

How to Use Your Homemade Muscle Rub

  • Massage a small amount into sore muscles after a shower or bath. 
  • Use it before bed to help loosen tight areas and promote deeper sleep. 
  • Rub into feet and calves after long days of standing or walking. 
  • Warm it between your hands for easier spreading on cold days. 

Bonus tip: Rub a bit onto temples and neck during tension headaches—peppermint works wonders.

Customize Your Balm

Want to make it your own? Here are a few add-ins:

  • Arnica oil – great for bruises and swelling 
  • Cayenne pepper oil – for extra heat (only a drop or two!) 
  • Menthol crystals – adds a deep cooling sensation, use sparingly 
  • Comfrey-infused oil – old-school remedy for joint pain and strains 

Gift It!

This balm makes a thoughtful gift for:

  • Gym-goers 
  • Gardeners 
  • Grandparents 
  • Stressed-out teachers 
  • Care packages for new mums or anyone in recovery 

Pair it with a cozy pair of socks or a DIY rice heat pack for a full self-care bundle.

Making your own sore muscle balm isn’t just about saving money or going natural—it’s about putting a little love and intention into your self-care. This balm smells divine, feels luxurious, and actually works. No mystery ingredients. No overpriced tubes. Just natural, handmade relief whenever you need it.


Leave a Reply

Your email address will not be published. Required fields are marked *

RSS More Articles

  • Designer Spotlight: Unique Stitch Crafts
  • Peyote Stitch Pendants And Necklaces: 10 Seed Bead Jewelry Projects To Make
  • Free Dotted Lines Embroidery Pattern Review
  • Choose Your Own Brioche Knitting Adventure with this Shawl Knitting Pattern
  • How to Make a Masculine Folio Album
  • Courtyard Garden Quilt Kit Review – A Classic Floral Quilt with Vintage Garden Charm
  • Free Loving Life Crochet Blanket – Free Crochet Pattern
  • Book Review: The Royal School of Needlework Book of Embroidery
  • Learning about Finland for Kids
  • How Craft Bloggers Can Use AI Without Losing Their Handmade Voice

Copyright © 2026 · CraftGossip | Start Here | Contact Us | Link to Us | Your Editors | Privacy and affiliate policy