• Home
  • Suggest A DIY
  • DIY Newsletter

Bath and Body

Soap Making, Oils and Recipes

  • About CraftGossip
  • Our Network
    • Bath & Body Crafts
    • Candle Making Ideas
    • Crochet Ideas
    • Cross Stitch
    • Edible Crafts
    • Felting Patterns
    • Glass Art
    • Home & Garden Ideas
    • Indie Crafts
    • Jewelry Making
    • Kids Crafts
    • Knitting Patterns
    • Lesson Plans
    • Needlework
    • Party Ideas
    • Polymer Clay
    • Quilting Ideas
    • Recycled Crafts
    • Scrapbooking
    • Sewing Patterns
    • Card Making
    • DIY Weddings
    • Not Craft Ideas
  • Giveaways
  • Roundups
  • Store
  • Search

12 Soaps You Can DIY That Look Like Crystals

August 1, 2021 by Shellie Wilson Leave a Comment


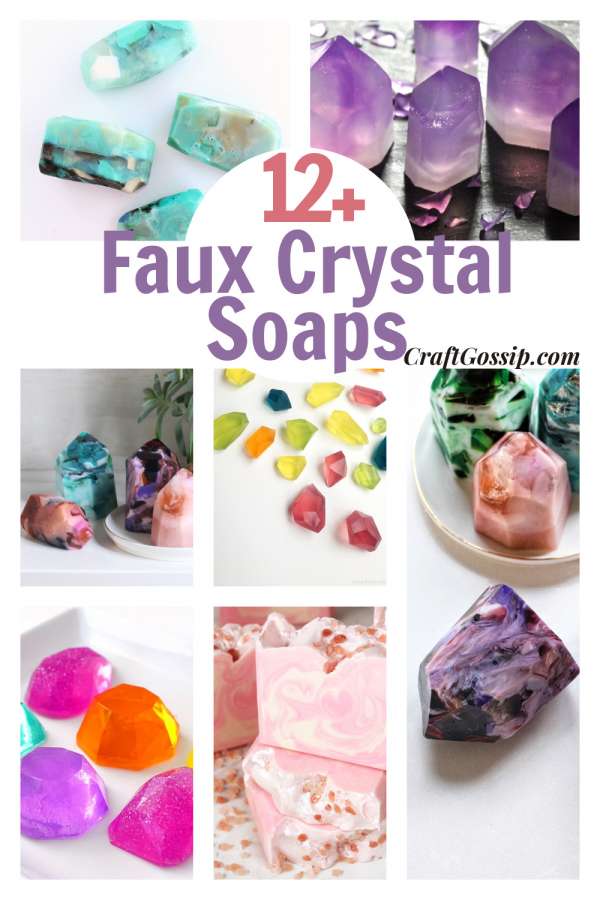
Crystals are the new unicorn when it comes to home decor, and thank goodness I was starting to get over all the foxes, llamas, and unicorns. Time for something a little more down-to-earth, literaly.

I have included 12 simple DIY soap-making tutorials that all produce crystal-like or crystal-inspired soap. These would make amazing gifts.  You can use gemstone silicone molds or carve your soap for a natural larger chunk of crystal soap.

Crystals are all about intentions and intuition, so pick a crystal that appeals to you and design your soap around it. Personally of all these soap recipes below for crystal soaps, I love the rose quartz one using pink rock salt. It is simple but effective. You could add these rocks salts to any basic melt and pour soap and get the same desired effect for minimal skill and effort.


Soap Queen Rose Quartz Cold Process Soap Tutorial

Agate Spin Swirl Soap Project

Gemstone Soap DIY (Two Ways!)

Make Your Own Crystal Soaps

DIY Glycerine Soap Gem Stones

Amethyst Crystal Soap Tutorial

10-Minute DIY Gemstone Soaps

DIY Gemstone Soaps + My MakersKit Collaboration

Easy DIY Crystal Gemstone Soaps ? Dream a Little Bigger

Gorgeous Geode Soap Tutorial

Geode Soap Tutorial for Valentine’s Day Gifts or Just Because


Related Posts:

  • DIY Makeup Remover Recipes For Every Skin Type
  • How to Make an Anxiety Calm Down Pouch (Also Called…
«
»

Have you read?

DIY Herbal Vapor Rub Balm – A Natural Vicks-Style Decongestant for Cold and Flu Relief

When someone in the house starts sniffling, you just know it’s going to make the rounds. That’s when I reach for this homemade herbal vapor rub—our family’s go-to chest balm for easing congestion, coughs, and that heavy-headed sick feeling.

Made with gentle yet powerful essential oils, this balm works just like the classic Vicks rub (but without the synthetic stuff). It’s safe, effective, and smells like a eucalyptus grove with a hint of grandma’s medicine chest—in the best possible way!

Whether you’re treating a toddler’s sniffles or trying to head off a man cold, this DIY vapor rub will be your winter wellness MVP.

Why You’ll Love This Natural Decongestant Balm

  • No petroleum or nasties – A clean, green homemade Vicks alternative 
  • Gentle enough for kids – With optional adjustments for littlies 
  • Nourishing balm texture – Melts into skin without being greasy 
  • Essential oils – Provide cooling, clearing, and comforting support 
  • Customizable – Make it stronger for adults or extra-gentle for babies 

Ingredients

Base:

  • 1/4 cup coconut oil (or olive oil for a softer balm) 
  • 2 tbsp shea butter or mango butter 
  • 2 tbsp beeswax pellets 

Essential Oil Blend (for adults):

  • 10 drops eucalyptus essential oil 
  • 8 drops peppermint essential oil 
  • 6 drops rosemary essential oil 
  • 4 drops tea tree essential oil 
  • 4 drops lavender essential oil 

Optional for kids under 5:
Replace eucalyptus and peppermint with fir needle and cedarwood atlas, and halve the total essential oil amount.

How to Make Your Own Vapor Rub

  1. Melt the base:
    In a double boiler (or a bowl over simmering water), gently melt the coconut oil, shea butter, and beeswax together. Stir until smooth and liquid. 
  2. Cool slightly:
    Remove from heat and let cool just a few minutes—enough that it’s no longer scalding hot but still liquid. 
  3. Add essential oils:
    Stir in your essential oil blend. Don’t add them too early or the heat will evaporate their goodness. 
  4. Pour into tins or jars:
    Carefully pour into a small glass jar or metal balm tin. Let cool completely before putting the lid on. 
  5. Label & store:
    Store in a cool place away from sunlight. Balm will keep for up to 6 months. 

How to Use Your Herbal Chest Rub

  • For chest and back: Rub a small amount onto chest, upper back, and soles of the feet during cold or flu season. 
  • For steam relief: Add a pea-sized amount to a bowl of steaming water, cover your head with a towel, and inhale. 
  • For headaches: Dab a touch on temples and neck (use caution and avoid eyes). 

Mum Tips

  • Patch test first if you’re unsure about sensitivities. 
  • Keep a tiny jar in your handbag during winter for on-the-go sniffles. 
  • For a nighttime version, add a few drops of Roman chamomile or lavender for extra sleep support. 


Leave a Reply

Your email address will not be published. Required fields are marked *

RSS More Articles

  • FIFA Soccer Crafts For Kids, Crochet Fans And Game-Day Makers
  • Cross Stitch Ice Cream and Frozen Treats
  • Sunflower Ribbon Embroidery Tutorials and Kits to Brighten Your Hoop
  • 15 Charity Sewing Projects That Let You Sew Something Useful For A Good Cause
  • Decorating Mistakes That Make Your Living Room Feel Cluttered
  • Remembering Jill Smokler, Founder Of Scary Mommy
  • In the Garden Layer Cake – A Bloom-Filled Fabric Collection for Spring Sewing
  • How To Do Kitchener Stitch: A Beginner-Friendly Guide To Grafting Knitting Seamlessly
  • Pattern Review: Georgie Granny Square Bucket Hat Crochet Pattern
  • Free Giant Squishy Octopus Crochet Pattern

Copyright © 2026 · CraftGossip | Start Here | Contact Us | Link to Us | Your Editors | Privacy and affiliate policy