• Home
  • Suggest A DIY
  • DIY Newsletter

Bath and Body

Soap Making, Oils and Recipes

  • About CraftGossip
  • Our Network
    • Bath & Body Crafts
    • Candle Making Ideas
    • Crochet Ideas
    • Cross Stitch
    • Edible Crafts
    • Felting Patterns
    • Glass Art
    • Home & Garden Ideas
    • Indie Crafts
    • Jewelry Making
    • Kids Crafts
    • Knitting Patterns
    • Lesson Plans
    • Needlework
    • Party Ideas
    • Polymer Clay
    • Quilting Ideas
    • Recycled Crafts
    • Scrapbooking
    • Sewing Patterns
    • Card Making
    • DIY Weddings
    • Not Craft Ideas
  • Giveaways
  • Roundups
  • Store
  • Search

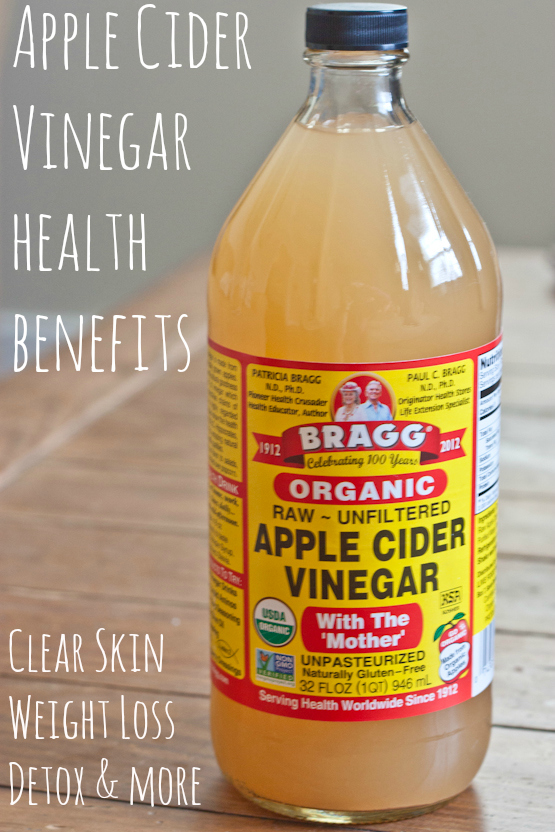
Apple Cider Vinegar For Weightloss and More

September 4, 2014 by Shellie Wilson 7 Comments

Apple-Cider-Vinegar-Benefits

Well I have finally decided to give Apple Cider Vinegar a try. I have been researching it heaps and you can see this great article here at eatingbirdfood.com. But My reason for taking it is not weight-loss (sure that would be great) it is for cleansing out a 6mm annoying little stone in my Gallbladder. I don’t know if it will work or make things worst but with a surgical consult booked in I am prepared to try anything else first.  Have you tried Apple Cider Vinegar? If so what for? Share your stories here.
«
»

Comments

  1. Lana Graham says

    September 4, 2014 at 10:07 am

    I make the Trim Healthy Mama moonshine using this… Check out the Youtube video and use the one with the peppers…. wow. What a way to give up soda….

  2. Kim says

    September 4, 2014 at 11:50 am

    I drink it to reduce cholesterol. Works great…dropped mine by 40 points. It also will clear up nail fungus. I lost my large toenail to it and after a year of applying the vinegar I had a new nail and the fungus is totally gone…5 years later and no problems with fungus at all.

  3. Anusha says

    September 5, 2014 at 12:00 am

    Hi … I have never used it. Bought one recently … But have no idea how to use it. Purpose I want to use it for is detox cleansing … Any suggestions on how to intake it. Thanks !

  4. Nickey says

    September 5, 2014 at 2:29 am

    I just had my gallbladder removed today. I don’t think this would of helped mine though I had 20 plus bb size stones. But I wish I would of seen this before it got that bad. I’m going to suggest it to my friend. Thank you for the info

  5. Shellie Wilson says

    September 7, 2014 at 10:18 pm

    I am taking 1 tsp (diluted in a glass of water). Don’t drink it straight as its acidic and will cause discomfort. You can add it to any juice if you don’t like the taste.

  6. Michelle says

    September 11, 2014 at 11:13 am

    My husband has taken it to get rid of kidney stones. 1tbl ACV and 1tbl raw honey in a class of warm water 3 times a day. It took about three days to get rid of them. He did yhis last year and again this year. He hates the taste of ACV but likes the way it works. Beats meds or surgery.

  7. JEM says

    August 13, 2015 at 5:37 pm

    My cat kept getting cystitis and I read that giving them ACV and coconut oil helps so I thought I’d give it a try! It has worked! I diluted 1.5ml in 50ml water and give him 3ml of that solution twice a day.. He doesn’t enjoy drinking it but it has settled his cystitis and has saved me $$$$ with more vet bills! I put coconut oil on top of his sardines and he likes it! ??

Have you read?

Is It Safe To Make My Own Soap? Beginner Soap Making Safety Guide

Making your own soap can feel a little intimidating at first, especially once someone mentions lye and suddenly it sounds less like a relaxing craft and more like a chemistry lesson with rubber gloves. But yes, it can be safe to make your own soap at home, as long as you choose the right soap making method for your experience level and follow proper safety steps.

For beginners, the safest and easiest way to start is usually melt and pour soap making. With melt and pour soap, the soap base has already gone through the lye process before it reaches you. You simply cut, melt, colour, scent, and pour it into molds. It is still hot and you still need to be sensible, but you are not handling raw lye.

Cold process soap and hot process soap are different. These methods involve mixing oils with lye, usually sodium hydroxide for bar soap. Lye is a caustic ingredient and must be treated with respect. That does not mean you should be terrified of it, but it does mean this is not the project to start while barefoot, distracted, and balancing a cup of tea on the same bench. Ask me how many craft disasters begin with “I’ll just quickly…”

If you are brand new to soap making, I always suggest beginning with simple melt and pour soap recipes first. You will learn about molds, colourants, fragrance oils, additives, layering, packaging, and how soap behaves without jumping straight into lye calculations. A gentle beginner project like this DIY oatmeal soap recipe is a lovely place to start because it uses basic ingredients and shows how easy handmade soap can be when you keep things simple.

Once you are confident, you can move on to cold process soap if you want to make soap completely from scratch. That is when safety becomes much more important.

Is Melt And Pour Soap Safe For Beginners?

Melt and pour soap is the most beginner-friendly soap making method. It is a great choice for older children with adult supervision, craft groups, handmade gifts, market-style projects, and anyone who wants to make pretty soap without handling lye.

To make melt and pour soap safely, use a heatproof jug or bowl, melt the soap slowly, and avoid overheating it. Melted soap can still burn skin, so treat it like any hot liquid. Use soap-safe fragrance oils, colourants, and additives. Not everything from the pantry or craft cupboard belongs in soap, no matter how tempting it is when you are having a creative moment.

If you want a simple honey-based starter project, this DIY melt and pour bee soap recipe is a nice example of how a basic soap base can be dressed up with just a few extra ingredients.

Keep your work area clean, measure additives carefully, and avoid adding too much liquid. Melt and pour soap can become soft, sweaty, or crumbly if overloaded with extra ingredients.

If you are making soap with children, an adult should handle all melting and pouring. Children can help choose colours, sprinkle botanicals, or package the finished soap once it has cooled.

Is It Safe To Make Soap With Lye?

Yes, it can be safe to make soap with lye, but only when you follow proper safety precautions every single time.

Lye should be handled with gloves, eye protection, long sleeves, and good ventilation. It should be measured accurately using a digital scale and mixed carefully according to a tested soap recipe. Never guess lye amounts. Soap making is not the place for “close enough” measurements.

Always add lye to water, not water to lye. This is one of the most important soap making safety rules. Adding water to lye can cause a dangerous reaction, splashing, or overheating.

Use heat-safe and lye-safe containers and tools. Do not use aluminium, as lye reacts with it. Stainless steel, heat-safe plastic, and silicone tools are commonly used by soap makers, but always check your equipment is suitable before using it.

Mix lye solution in a well-ventilated area and avoid breathing fumes. Keep children, pets, and curious family members out of the workspace. This includes the dog who thinks every bowl is potentially for him.

Store lye in a clearly labelled, sealed container, away from moisture, food, pets, and children. A locked cupboard is ideal.

If you are curious about more advanced soap projects, this DIY sushi cold process soap shows how creative cold process soap can be, but it also makes it clear why preparation, proper ingredients, and safety steps matter.

Common Soap Making Mistakes To Avoid

The first big mistake is starting with a random recipe from somewhere untrustworthy. Use a tested soap making recipe from a reliable source, especially if it includes lye. Do not swap oils, change measurements, or reduce lye unless you understand how to properly recalculate a soap formula.

The second mistake is using fragrance oils or colourants that are not skin-safe or soap-safe. Candle fragrance oil, craft glitter, food colouring, and random essential oils can cause problems in soap. Some may irritate skin, fade badly, seize the soap mixture, or simply behave like tiny villains once added.

Another mistake is adding too much exfoliant. A little oatmeal, coffee, clay, or seeds can be lovely in handmade soap, but too much can make the bar feel scratchy or unpleasant. If you are not sure which exfoliants are best for facial scrubs, soaps, or body products, this guide to using exfoliants in DIY skincare is a helpful read. Your skin is not a chopping board. It does not need aggressive sanding.

Do not use fresh fruit, fresh herbs, milk, purées, or juices unless the recipe is designed for them. Fresh ingredients can shorten shelf life or cause spoilage if used incorrectly. If you are experimenting, make small batches and take notes.

Do not make medical claims about handmade soap. You can say a soap is handmade, cleansing, gentle-feeling, moisturising-feeling, exfoliating, or made with certain ingredients, but be cautious with claims like “heals eczema,” “treats acne,” “cures rashes,” or “anti-bacterial” unless you understand the legal requirements in your country.

Basic Soap Making Safety Checklist

Start with melt and pour soap if you are a beginner.

Read the full recipe before you start.

Prepare all equipment before melting or mixing anything.

Use a digital scale for accurate measurements.

Wear gloves and eye protection when working with lye.

Work in a ventilated space.

Keep children and pets away from hot soap and lye.

Use soap-safe fragrance oils, colourants, and additives.

Label ingredients clearly.

Do not use aluminium with lye.

Do not rush the process.

Clean your workspace carefully afterwards.

Label finished soaps if gifting or selling.

What About Handmade Soap For Sensitive Skin?

Handmade soap can be lovely, but natural does not automatically mean suitable for everyone. Essential oils, fragrance oils, botanicals, exfoliants, clays, and even simple ingredients can irritate sensitive skin.

If you are making soap for someone with sensitive skin, keep it simple. Use a mild soap base, skip strong fragrances, avoid scratchy exfoliants, and choose gentle additives such as finely ground oatmeal or plain clays in small amounts.

Always patch test new soaps, especially facial soaps or soaps made with active ingredients.

If someone has eczema, allergies, open skin, ongoing rashes, or medical skin concerns, homemade soap should not replace medical advice.

Can I Sell Homemade Soap?

You may be able to sell homemade soap, but rules depend on where you live and how you describe the product. Soap that is sold simply as soap may be treated differently from products marketed as cosmetics or products that claim to treat a skin condition.

Before selling handmade soap, check the requirements for your country or region. You may need correct labelling, ingredient information, business insurance, batch records, safety testing, or cosmetic registration depending on your location and claims.

Even if you are only gifting soap, it is a good idea to label it with the ingredients, date made, and any fragrance or essential oils used. It is thoughtful, practical, and saves people from having to guess whether that pretty pink bar contains something they are allergic to.

The Safest Way To Start Making Soap

If you are wondering where to begin, start with a plain melt and pour soap base and make a simple batch with one colour, one scent, and one mold. Once you are comfortable, try adding oatmeal, clay, dried botanicals, or simple layering.

A basic beginner soap making kit might include melt and pour soap base, silicone soap molds, a heatproof jug, a digital scale, a soap-safe fragrance oil, soap-safe colourant, rubbing alcohol for bubbles, and a dedicated spatula. You can usually find beginner soap making supplies through Amazon or your favourite bath and body craft supplier.

Once you understand the basics, you can explore cold process soap making with lye. Take your time, read proper safety instructions, watch reputable tutorials, and do not rush into complicated recipes with milks, sugars, swirls, and ten different oils on your first go.

So, Is It Safe To Make Your Own Soap?

Yes, it is safe to make your own soap when you use the right method, follow a tested recipe, and respect the materials you are working with.

Melt and pour soap is the safest and easiest choice for beginners. Cold process soap making can also be safe, but it requires proper lye handling, protective gear, accurate measuring, and a careful workspace.

Like most crafts, soap making rewards patience. Start simple, keep good notes, use skin-safe ingredients, and do not let Pinterest convince you that your first batch needs eight colours, a whipped top, glitter, goat milk, dried flowers, and a dramatic swirl. One lovely bar of simple handmade soap is a perfectly good place to begin.

Leave a Reply

Your email address will not be published. Required fields are marked *

RSS More Articles

  • 10 Bookmark Embroidery Patterns for Quick Handmade Gifts
  • Necklace Length Guide For Handmade Jewelry Makers
  • Toy Story Cross Stitch Patterns
  • Vintage Bed Socks Knitting Pattern – A Cozy Little Gift Project With Old-Fashioned Charm
  • Vintage Crochet Baby Dress Pattern Review
  • 12+ Beautiful Butterfly Card Ideas
  • Cute Little Backpack Knitting Patterns
  • Easy Pen and Paper Games for Road Trips and Beyond
  • Handmade Pretend Play Food Ideas For Kids’ Kitchens, Classrooms And Crafty Grandparents
  • Air-Dry Clay Sunflower Trinket Dish Tutorial

Copyright © 2026 · CraftGossip | Start Here | Contact Us | Link to Us | Your Editors | Privacy and affiliate policy