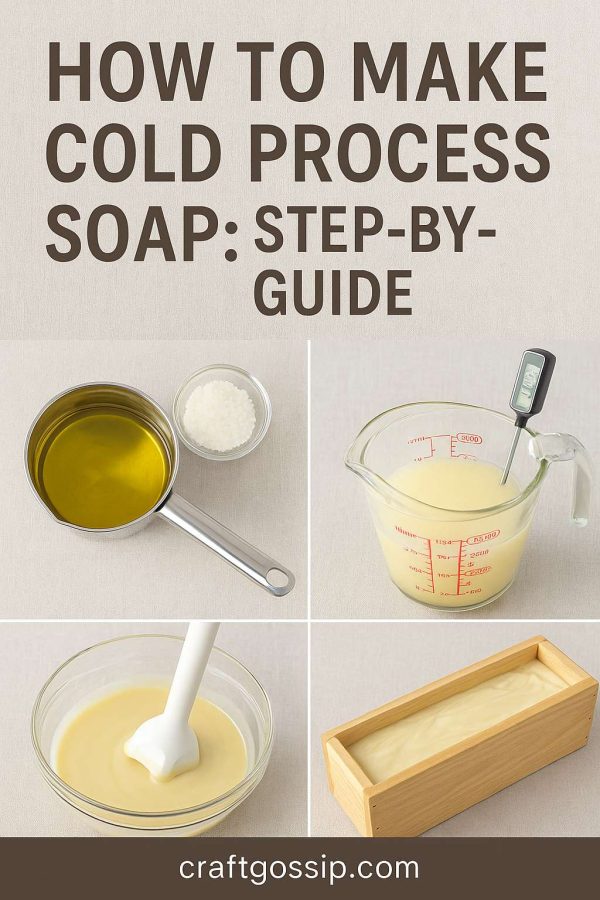
There’s something deeply satisfying about crafting your own bar of soap from scratch. It’s a little bit chemistry, a little bit art, and a whole lot of self-care. If you’ve ever felt overwhelmed by the idea of cold process soap-making, I promise—once you’ve done it, you’ll be hooked.
This beginner-friendly tutorial is written for real life. You won’t need a lab setup or rare ingredients—just a handful of pantry oils, a stick blender, and a free afternoon. Whether you want to avoid harsh detergents, gift something meaningful, or simply dip your toes into traditional soap-making, this is your place to start.
What Is Cold Process Soap?
Cold process soap is made by combining oils and lye (sodium hydroxide) to trigger a chemical reaction called saponification. That’s just a fancy word for turning fat and lye into soap and glycerin—no heat or additives needed. The final bar is completely different from its ingredients: rich, sudsy, gentle on skin, and totally customisable.
Unlike melt-and-pour bases, cold process lets you control every element—texture, scent, moisture, hardness. You can tweak oil ratios to suit your climate, add herbs from your own garden, and infuse the bars with skin-loving botanicals. It takes a few weeks to cure, but that wait is part of the charm. For those looking to get started quickly, check out these Cold Process Soap Making Kits.
Basic Cold Process Soap Recipe
This beginner batch makes roughly 6–8 bars and uses common natural oils that create a lovely, balanced bar: bubbly lather, gentle cleansing, and creamy moisture.
Ingredients:
- 300g olive oil (moisturising and gentle)
- 300g coconut oil (cleansing and bubbly)
- 200g palm-free shortening or shea butter (hardness and stability)
- 100g castor oil (boosts lather)
- 134g lye (sodium hydroxide)
- 300g distilled water
- Optional: 15–20g essential oil (lavender, peppermint, sweet orange)
- Optional: 1–2 tbsp ground oatmeal, lavender buds, or calendula petals
Equipment:
- Digital kitchen scale
- Large stainless steel or heat-safe mixing bowl
- Heatproof jug or pitcher (for lye solution)
- Stick blender
- Silicone loaf mold or recycled carton lined with baking paper
- Safety gear: goggles, gloves, long sleeves
- Towel or blanket for insulation
- Thermometer (optional but helpful)
Step-by-Step Instructions
Step 1: Prepare Your Workspace
Soap-making involves lye, which is caustic before it saponifies. Choose a well-ventilated space and keep pets and little ones safely out of the way. Set out your tools and ingredients in advance so you’re not scrambling mid-process.
Step 2: Mix the Lye Solution
Wearing gloves and goggles, slowly pour lye into the distilled water while stirring with a silicone spatula or spoon. Never add water to lye—it can erupt. The mixture will heat up quickly. Set aside in a safe spot to cool to around 38–43°C (100–110°F).
Step 3: Melt the Oils
Combine all oils in a large bowl and melt gently using a microwave or double boiler. Once fully liquid, let the oil mix cool to the same temperature range as your lye solution (38–43°C).
Step 4: Combine Lye and Oils
Pour the cooled lye water into the melted oils. Blend with short bursts of the stick blender, alternating with hand stirring. You’re looking for “trace”—when the mixture thickens slightly and leaves a visible trail on the surface. This usually takes 1–5 minutes.
Step 5: Add Scent and Botanicals
At light trace, stir in essential oils and any exfoliants or decorative add-ins like dried herbs or clays. Mix thoroughly but gently.
Step 6: Pour and Insulate
Pour the soap batter into your prepared mold. Tap gently to release air bubbles. Cover with a lid or baking paper and wrap the mold in a towel to encourage gel phase (this helps harden and brighten the soap). Leave undisturbed for 24–48 hours.
Step 7: Unmold and Cure
Once the soap is firm, remove it from the mold and cut into bars. Place on a rack or tray lined with parchment in a dry, ventilated spot. Cure for 4–6 weeks, turning every few days during the first week. Curing helps the soap harden and lowers its pH to a gentle, skin-safe level.
Soap Troubleshooting for Beginners
- Why is my soap sweating? That’s likely from humidity or glycerin. It’s harmless—just wrap bars in paper or store in a dry cupboard.
- Why does my soap smell like ammonia? It’s still saponifying. Give it a few days to mellow.
- Can I use fresh milk or fruit juice? Yes, but follow a milk soap-specific recipe and freeze the liquid first to prevent scorching.
Making your own distilled water at home is easier than most people think—and handy when you’re crafting things like cold process soap, where tap water just won’t do. Distillation removes minerals, impurities, and contaminants by boiling water into steam and then condensing it back into liquid form. Here’s a method that works with basic kitchen gear.
DIY Distilled Water (Stovetop Method)
What You’ll Need:
- Large stainless steel pot with a lid
- A heat-safe glass or metal bowl that floats or fits inside the pot
- Ice cubes
- Tap water
- Stove
- Tongs or oven mitts
- Clean glass jar for collecting
Step-by-Step Instructions
- Fill the pot halfway with tap water.
Don’t overfill—you need space for the bowl and for steam to circulate. - Float the bowl in the pot.
The bowl should float without touching the bottom. If it sinks, place it on a steamer rack or invert a small metal trivet underneath to elevate it. - Invert the pot lid and place it on top.
Turn the lid upside down so the handle dips inward toward the bowl. This allows steam to condense and drip directly into the bowl. - Add ice to the lid.
This helps cool the lid and speed up condensation. As steam rises and hits the cold lid, it turns back into water and drips into the bowl. - Bring to a gentle boil.
Turn the stove on medium heat and allow the water to boil gently. As steam collects and condenses, you’ll see distilled water gathering in the bowl inside. - Collect your water.
Once you’ve collected enough, turn off the heat and let everything cool. Carefully remove the bowl using tongs or mitts. Transfer the distilled water into a clean, airtight jar.
Tips:
- One liter of distilled water may take 30–45 minutes to collect.
- Always use a clean bowl and lid to avoid reintroducing contaminants.
- Store the finished water in a sterile glass bottle if you plan to use it for skin care, soap, or essential oil blending.


My co-worker Knute has one of these. He says it looks smoky.