• Home
  • Suggest A Craft
  • DIY Newsletter

Bath and Body

Soap Making, Oils and Recipes

  • About CraftGossip
  • Our Network
    • Bath & Body Crafts
    • Candle Making Ideas
    • Crochet Ideas
    • Cross Stitch
    • Edible Crafts
    • Felting Patterns
    • Glass Art
    • Home & Garden Ideas
    • Indie Crafts
    • Jewelry Making
    • Kids Crafts
    • Knitting Patterns
    • Lesson Plans
    • Needlework
    • Party Ideas
    • Polymer Clay
    • Quilting Ideas
    • Recycled Crafts
    • Scrapbooking
    • Sewing Patterns
    • Card Making
    • DIY Weddings
    • Not Craft Ideas
  • Giveaways
  • Roundups
  • Store
  • Search

DIY Emergency Car Toilet For When You Have To Go Pee Pee Fast

February 19, 2015 by Shellie Wilson 5 Comments

emergency-car-toilet

I am sure we have all been there at some point, stuck in a car in desperate need of a bathroom. This kit is for Emergencies only, so no point writing to me to tell me it’s gross and unpractical etc.  It is for Emergencies! When you got to go you don’t really care how you go.

My children always need to go to the toilet just after we passed a highway exit. So far we have always made it to a garage station or rest stop but one day we won’t and the older they get the more particular they are going to be as to where and how they go.  Emergency Car Toilet Kit.

Other important uses for this kit is for people with a medical condition like IBS irritable bowel syndrome. If you have it, then I sympathize with you as I too have this dreaded curse. I have to plan where the toilets are going to be, what goes into my mouth and when in case it comes out in a hurry.  It is a curse a terrible life-altering curse.  I recently went on holiday with long bus rides and the only way to manage was medicine and not eating until I had a toilet nearby, which meant I couldn’t enjoy cultural foods fresh from the stores, instead taking them back home to eat later in my hotel room, with a toilet on standby.  Do you know how else I felt safe? toilet bags. I never had to use one, BUT it was always in my bag, along with a shawl for squatting over that bag and a change of clothes just in case.

Related Posts:

  • DIY Money Saving Bathroom And Kitchen Cleaners
  • How Much CBD Oil Should I Take For Insomnia?
«
»

Comments

  1. Judy P says

    February 19, 2015 at 11:20 am

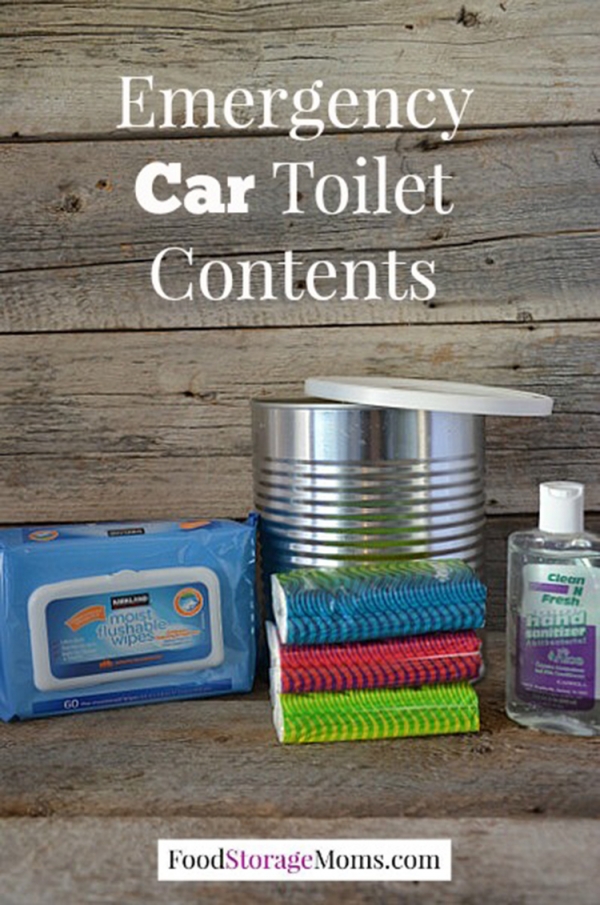
    what are the colored plastic items in front?

  2. Sarah says

    February 19, 2015 at 12:57 pm

    Baby wipes, hand sanitizer and a pot to poop in. What is the stack of 3 in the middle? Kleenex? The link you provided only leads to the same photo, no details.

  3. Shellie Wilson says

    February 19, 2015 at 9:15 pm

    Yes, tissues in the front. I have updated the link to the full article.

  4. Tammy-Jean says

    February 20, 2015 at 7:41 pm

    Great Idea! It sounds gross but when you gotta go, ya gotta go somewhere!!! LoL… Personally this would be my choice over goin bare butt in the woods or grass! Bug bites on the butt don’t chew well in my mouth at all lol :)) Thanks for sharing, I will definitely be puttin’ this together! Perfect for summer camping if the toilets are too far or if no toilets at all lol.

  5. Pat says

    July 29, 2020 at 9:04 pm

    I have a suggestion to add to this very good idea. Plastic bagsbags, maybe the grocery store type of smaller if you can find them, and twist ties to wrap the bags consecrated use. Also, the lid to the can to lock indoors until you can discard the bag.

Have you read?

DIY Summer Nail Designs You’ll Want to Rock All Season Long

As soon as the weather heats up and the days get longer, I swap out my moody nail colors for something a little more fun, flirty, and full of sunshine. Summer is the perfect excuse to get playful with your nail designs — and this year, I’ve been experimenting at home to find a few favorites that are both easy to paint and seriously cute.

I’ve rounded up three of my go-to summer nail looks that you can totally do yourself, even if you’re not a pro. These are the styles I keep coming back to because they’re fun, eye-catching, and honestly — they just make you feel good. Whether you’re heading to the beach, a backyard BBQ, or just want to admire your nails while holding an iced latte, these are the ones to try.

Let’s dive in!

Sunset Ombre Nails

This is hands down one of the most satisfying nail designs you can do yourself. The colors melt into each other like a beach sunset, and the end result looks way more advanced than it really is.

You’ll Need:

  • A base coat

  • Three polishes (I use pink, orange, and yellow)

  • A makeup sponge

  • Top coat

  • Nail polish remover for cleanup

How to Do It:

  1. Start with a clear base coat to protect your nails.

  2. Paint horizontal stripes of your 3 colors directly onto the makeup sponge.

  3. Dab the sponge gently onto your nail, reapplying polish to the sponge as needed. Tap until the gradient blends.

  4. Clean up any excess polish around your cuticle.

  5. Apply a top coat to smooth the colors and add shine.

This design is one of those that looks good even when it’s a little messy — the top coat really pulls it all together.


 Tropical Palm Silhouettes

If you want vacation vibes without actually going anywhere, this one’s for you. The pastel base paired with simple black palm trees gives it that dreamy island feel.

You’ll Need:

  • A light pastel base polish or soft gradient background

  • Black nail art pen or thin brush with black polish

  • Top coat

How to Do It:

  1. Paint your nails with a soft pastel or ombre base.

  2. Once dry, draw a thin curved line for the palm trunk.

  3. From the top of the trunk, add small lines that fan out to mimic palm fronds.

  4. Let everything dry completely before adding a glossy top coat.

Even if your palm trees aren’t perfect, they still look awesome. Think of it like nail doodling — just more tropical.


 Watermelon French Tips

This design is so cheerful, I smile every time I see it. It’s a fruity twist on a French manicure and it’s perfect for pool parties or picnics.

You’ll Need:

  • Pink polish for the base

  • Green and white for the rind

  • Black polish for the seeds (use a dotting tool or toothpick)

  • Base and top coat

How to Do It:

  1. Paint your entire nail a soft pink.

  2. Add a green curved tip at the top edge (like a French tip).

  3. Under the green, paint a very thin white stripe.

  4. Add small black dots on the pink section to create seeds.

  5. Seal it all in with your favorite top coat.

This one is such a crowd-pleaser and looks adorable on both long and short nails.

Whether you try one of these or rotate through all three this summer, I hope these nail designs add a little color and creativity to your routine. They’re simple enough to do at home but still look like you spent time (and money!) at the salon.

Let me know which one you’re trying first — and don’t forget to tag us if you share your summer nail look!

Leave a Reply

Your email address will not be published. Required fields are marked *

RSS More Articles

  • Do You Park Your Cross Stitch Thread? Try The Royal Roads Method
  • Etsy Spotlight – Sew Your Own Baby Dress with the Harper Dress Pattern PDF
  • July 4th Mini Scrapbook Album
  • Upcycled Writing Desk to Cocktail Cabinet
  • Create Stunning Pineapple String Art – A Fun and Easy Tutorial You Can’t Miss
  • DMC Woodland Moth Tapestry Pattern – Earthy, Elegant, and Surprisingly Relaxing
  • Learn about Comoros for Kids
  • Classic Blocks Revisited Quilt Pattern Book
  • Discover Your Unique Style with Second Chances by Macy Eleni
  • Luxe Leopard Headband- Free Crochet Pattern

Categories

Bath And Body bath bombs Body Scrubs & Lotions Colds & Flu CraftGossip Exclusive Craft Inspirations detox DIY Recipes And Tutorials DIY Tutorials and Patterns Essential Oils And Aromatherapy facials Hair Care Makeup & Beauty Melt & Pour Soap Packaging Product Reviews Soapmaking Recipes, Products And Tutorials Style Me Quick Supply Store Specials & Discounts Wellbeing

Copyright © 2025 · CraftGossip | Start Here | Contact Us | Link to Us | Your Editors | Privacy and affiliate policy