• Home
  • Suggest A DIY
  • DIY Newsletter

Bath and Body

Soap Making, Oils and Recipes

  • About CraftGossip
  • Our Network
    • Bath & Body Crafts
    • Candle Making Ideas
    • Crochet Ideas
    • Cross Stitch
    • Edible Crafts
    • Felting Patterns
    • Glass Art
    • Home & Garden Ideas
    • Indie Crafts
    • Jewelry Making
    • Kids Crafts
    • Knitting Patterns
    • Lesson Plans
    • Needlework
    • Party Ideas
    • Polymer Clay
    • Quilting Ideas
    • Recycled Crafts
    • Scrapbooking
    • Sewing Patterns
    • Card Making
    • DIY Weddings
    • Not Craft Ideas
  • Giveaways
  • Roundups
  • Store
  • Search

4 Of The Stickest DIY Hair Removal Recipes

March 1, 2014 by Shellie Wilson Leave a Comment

Hair removal is one of those things, we don’t really WANT to do it. We probably don’t even NEED to do it but here we sit planning on ways to rip the hair from its delicate roots so that we can feel hairless and smooth. What methods of hair removal have you tried?

How long have you gone without removing leg hair? Dark hair on legs and arms can be a serious issue for some people and an expensive issue too. Hair removal is very expensive and that is why these DIY hair removal recipes are the perfect way to remove your own body hair easily, safely, and at home.


With so many countries in lockdown, you don’t need to feel hairy you can DIY and make your own Hair removal recipes to remove your hairy armpits or legs. These recipes are not just for women, men can use these homemade hair removal creams too.  If you are a hairy family you may want to invest in your own Wax hair removal kit with a heated pot.

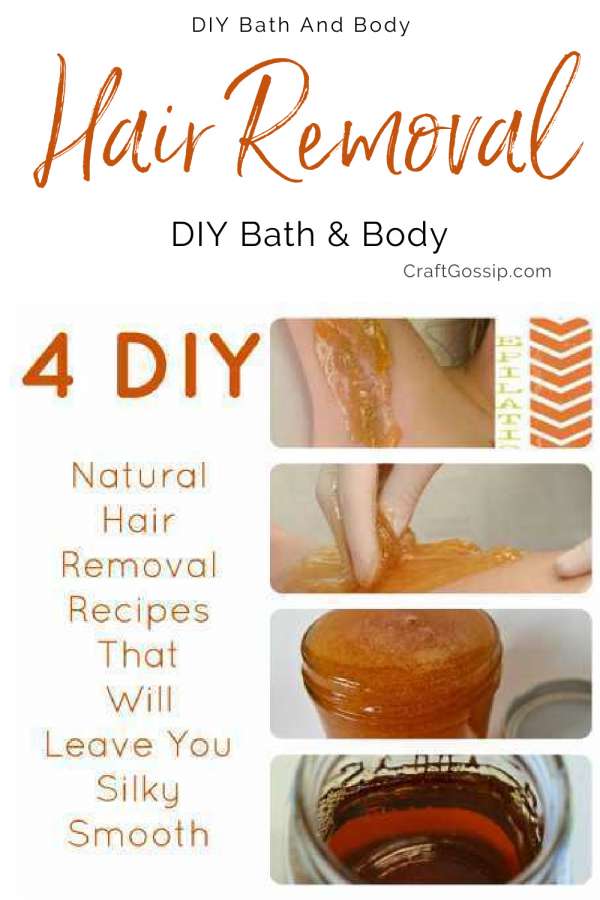
1: Randomness  Kinda looks like toffee though.

2: As The Bunny Hops – Jar of Sticky sugar wax.

3: Home remedy – Again it looks more edible then practical.

4: Beauty tips for her – Says it’s practically painless but I am not convinced.

DIY Sugar wax for hair removal

You’ll require:
White sugar, two cups
Lemon juice, 1/4 cup
14 cups of water
You can see that all of the components are natural and are likely present in your kitchen. And just think of the money you’ll be saving! It’s quite simple to manufacture this sugar wax at home.

Related Posts:

  • DIY Money Saving Bathroom And Kitchen Cleaners
  • DIY Makeup Remover Recipes For Every Skin Type
«
»

Have you read?

DIY Herbal Vapor Rub Balm – A Natural Vicks-Style Decongestant for Cold and Flu Relief

When someone in the house starts sniffling, you just know it’s going to make the rounds. That’s when I reach for this homemade herbal vapor rub—our family’s go-to chest balm for easing congestion, coughs, and that heavy-headed sick feeling.

Made with gentle yet powerful essential oils, this balm works just like the classic Vicks rub (but without the synthetic stuff). It’s safe, effective, and smells like a eucalyptus grove with a hint of grandma’s medicine chest—in the best possible way!

Whether you’re treating a toddler’s sniffles or trying to head off a man cold, this DIY vapor rub will be your winter wellness MVP.

Why You’ll Love This Natural Decongestant Balm

  • No petroleum or nasties – A clean, green homemade Vicks alternative 
  • Gentle enough for kids – With optional adjustments for littlies 
  • Nourishing balm texture – Melts into skin without being greasy 
  • Essential oils – Provide cooling, clearing, and comforting support 
  • Customizable – Make it stronger for adults or extra-gentle for babies 

Ingredients

Base:

  • 1/4 cup coconut oil (or olive oil for a softer balm) 
  • 2 tbsp shea butter or mango butter 
  • 2 tbsp beeswax pellets 

Essential Oil Blend (for adults):

  • 10 drops eucalyptus essential oil 
  • 8 drops peppermint essential oil 
  • 6 drops rosemary essential oil 
  • 4 drops tea tree essential oil 
  • 4 drops lavender essential oil 

Optional for kids under 5:
Replace eucalyptus and peppermint with fir needle and cedarwood atlas, and halve the total essential oil amount.

How to Make Your Own Vapor Rub

  1. Melt the base:
    In a double boiler (or a bowl over simmering water), gently melt the coconut oil, shea butter, and beeswax together. Stir until smooth and liquid. 
  2. Cool slightly:
    Remove from heat and let cool just a few minutes—enough that it’s no longer scalding hot but still liquid. 
  3. Add essential oils:
    Stir in your essential oil blend. Don’t add them too early or the heat will evaporate their goodness. 
  4. Pour into tins or jars:
    Carefully pour into a small glass jar or metal balm tin. Let cool completely before putting the lid on. 
  5. Label & store:
    Store in a cool place away from sunlight. Balm will keep for up to 6 months. 

How to Use Your Herbal Chest Rub

  • For chest and back: Rub a small amount onto chest, upper back, and soles of the feet during cold or flu season. 
  • For steam relief: Add a pea-sized amount to a bowl of steaming water, cover your head with a towel, and inhale. 
  • For headaches: Dab a touch on temples and neck (use caution and avoid eyes). 

Mum Tips

  • Patch test first if you’re unsure about sensitivities. 
  • Keep a tiny jar in your handbag during winter for on-the-go sniffles. 
  • For a nighttime version, add a few drops of Roman chamomile or lavender for extra sleep support. 


Leave a Reply

Your email address will not be published. Required fields are marked *

RSS More Articles

  • 4 FREE Marine Creatures Digital Stamps
  • Pocket Emotional Support Chickens
  • All About Cross Stitch Project Bags
  • Get into the Details with the Sashiko Tee Knitting Pattern
  • How To Add In-Seam Pockets To A Dress, Skirt Or Pants
  • Wet Felted Hot Water Bottle Cover Tutorial Review – Gillian Gladrag
  • 12 Masculine Scrapbook Layout Ideas for Boys and Teens
  • Claire Easy Granny Stitch Cardigan Crochet Pattern Review
  • Easy Patriotic Mason Jar Cricut Craft for Summer Decorating
  • How To Sew A Tube Top: 10 Easy Tube Top Sewing Tutorials

Copyright © 2026 · CraftGossip | Start Here | Contact Us | Link to Us | Your Editors | Privacy and affiliate policy