• Home
  • Suggest A DIY
  • DIY Newsletter

Bath and Body

Soap Making, Oils and Recipes

  • About CraftGossip
  • Our Network
    • Bath & Body Crafts
    • Candle Making Ideas
    • Crochet Ideas
    • Cross Stitch
    • Edible Crafts
    • Felting Patterns
    • Glass Art
    • Home & Garden Ideas
    • Indie Crafts
    • Jewelry Making
    • Kids Crafts
    • Knitting Patterns
    • Lesson Plans
    • Needlework
    • Party Ideas
    • Polymer Clay
    • Quilting Ideas
    • Recycled Crafts
    • Scrapbooking
    • Sewing Patterns
    • Card Making
    • DIY Weddings
    • Not Craft Ideas
  • Giveaways
  • Roundups
  • Store
  • Search

DIY Honey Lip Scrub Recipe – Soften, Smooth and Sweeten Naturally

July 10, 2013 by Shellie Wilson 1 Comment

Dry, flaky lips? We’ve all been there. Whether it’s from winter winds, too much sun, or just not drinking enough water (guilty), our lips sometimes need a little extra love. This quick and easy homemade honey lip scrub is my go-to when I want soft, smooth lips in minutes—plus it smells and tastes delicious!

Honestly, I first whipped this up during a Sunday clean-out when I realized I had five open lip balms but none of them were helping. A quick kitchen raid later, and this little pot of magic was born.

Why Use a Lip Scrub?

Our lips don’t have oil glands like the rest of our skin, so they dry out quickly and can become chapped or rough. A gentle scrub buffs away dead skin, letting your balm (or lipstick) glide on like a dream.

Plus, regular exfoliation helps improve circulation and gives your lips a natural flush.
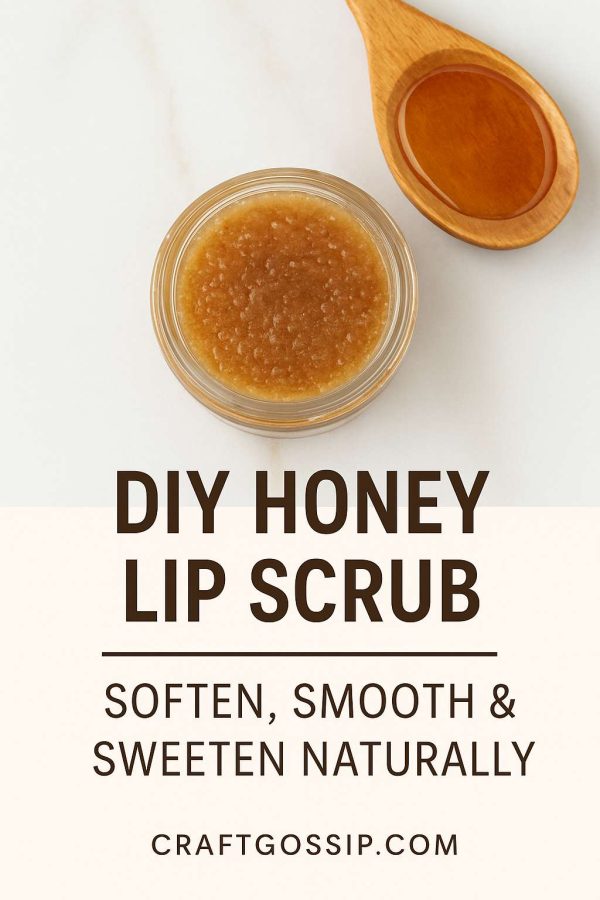
Ingredients:

  • 1 tsp raw honey 
  • 1 tsp brown sugar (finely ground is best) 
  • ½ tsp olive oil or coconut oil 
  • Optional: drop of vanilla extract or essential oil for scent 

Instructions:

  1. Mix it up.
    In a small bowl, stir together the honey and sugar until it forms a gritty paste. Add the oil and optional scent, then stir again. 
  2. Apply to lips.
    Using a clean fingertip, gently massage the scrub onto your lips in circular motions. Don’t scrub too hard—just enough to loosen dry skin. 
  3. Let it sit.
    Leave it on for 1–2 minutes for a deeper treatment (the honey acts as a natural humectant). 
  4. Wipe or lick.
    Yep, it’s totally edible! But you can also use a warm, damp cloth to wipe it away. 
  5. Moisturize.
    Follow with your favorite lip balm or a dab of shea butter to lock in moisture. 

How Often Should You Use It?

For most people, once or twice a week is enough. If your lips are super sensitive, start with once weekly and adjust from there.

Customize Your Lip Scrub:

  • For extra softness: Add a pinch of cinnamon or ginger for a tingly boost. 
  • For a tinted glow: Stir in a touch of beetroot powder or hibiscus powder. 
  • For mature lips: Add a drop of vitamin E oil to nourish delicate skin. 

Why You’ll Love It

  • Only takes 2 minutes to make 
  • 100% natural and edible 
  • Leaves lips baby soft and kissably smooth 
  • Makes a great DIY gift when packed in a little tin or jar 


Related Posts:

  • DIY Makeup Remover Recipes For Every Skin Type
  • How to Make Foaming Hand Soap From Regular Hand Soap
«
»

Comments

  1. Becky PS says

    July 11, 2013 at 9:26 am

    Cool! Thanks for sharing.

Have you read?

DIY Sore Muscle Relief Balm with Essential Oils – Natural Comfort in a Jar

When your back’s tight, your shoulders are screaming, and even stretching feels like too much effort—sometimes, you just need a little help in a jar.

Enter this soothing DIY Sore Muscle Relief Balm. It’s warming, nourishing, and infused with essential oils known for easing tension and boosting circulation. Whether you’re dealing with post-gardening aches, a long day on your feet, or that stubborn neck kink from sleeping funny (again), this balm is a natural way to say goodbye to muscle misery.

I keep a tin of this on my bedside table and another in the kitchen drawer. It’s a go-to remedy in our house for everything from growing pains to post-walk stiffness—and trust me, with a big dog like Aloo dragging me around, I know sore calves!

Why Make Your Own Muscle Balm?

Commercial rubs often contain synthetic fragrances, petroleum byproducts, or ingredients that can be too harsh on sensitive skin. When you make your own, you’re in full control—and it doesn’t have to be complicated or time-consuming.

This DIY balm is:

  • Petroleum-free and non-toxic 
  • Packed with anti-inflammatory oils 
  • Warming without the burn 
  • Gentle on sensitive or mature skin 
  • Perfect for gifting 

Ingredients You’ll Need

Base Oils & Butters:

  • ¼ cup shea butter – rich in vitamins and helps deeply hydrate skin 
  • 2 tbsp beeswax pellets – thickens the balm and adds a protective barrier 
  • ¼ cup coconut oil – light carrier oil with natural anti-inflammatory properties 
  • 2 tbsp magnesium oil (optional but recommended for extra relief) 

Essential Oils Blend:

  • 10 drops peppermint essential oil – cooling and refreshing 
  • 8 drops eucalyptus essential oil – helps reduce inflammation 
  • 6 drops rosemary essential oil – boosts circulation 
  • 5 drops lavender essential oil – calming and soothing 
  • 4 drops ginger essential oil – gentle warming effect (skip if sensitive to heat) 

Note: Always do a patch test before slathering it on.

How to Make It – Step-by-Step

  1. Melt Your Base
    In a double boiler (or a heat-safe bowl over simmering water), melt together the shea butter, beeswax, and coconut oil until fully liquified. 
  2. Add Magnesium Oil (Optional)
    Remove from heat and stir in magnesium oil if using. This may cause some bubbling—that’s normal! 
  3. Cool Slightly
    Let the mixture cool for a couple of minutes. You want it warm but not hot to avoid damaging the essential oils. 
  4. Stir in Essential Oils
    Add your essential oils and mix thoroughly with a wooden stick or glass stirrer. 
  5. Pour into Tins or Jars
    Carefully pour the balm intometal balm tins or glass jars. Let cool uncovered until set. 
  6. Label & Store
    Store in a cool place away from direct sunlight. It should last 6–12 months. 

How to Use Your Homemade Muscle Rub

  • Massage a small amount into sore muscles after a shower or bath. 
  • Use it before bed to help loosen tight areas and promote deeper sleep. 
  • Rub into feet and calves after long days of standing or walking. 
  • Warm it between your hands for easier spreading on cold days. 

Bonus tip: Rub a bit onto temples and neck during tension headaches—peppermint works wonders.

Customize Your Balm

Want to make it your own? Here are a few add-ins:

  • Arnica oil – great for bruises and swelling 
  • Cayenne pepper oil – for extra heat (only a drop or two!) 
  • Menthol crystals – adds a deep cooling sensation, use sparingly 
  • Comfrey-infused oil – old-school remedy for joint pain and strains 

Gift It!

This balm makes a thoughtful gift for:

  • Gym-goers 
  • Gardeners 
  • Grandparents 
  • Stressed-out teachers 
  • Care packages for new mums or anyone in recovery 

Pair it with a cozy pair of socks or a DIY rice heat pack for a full self-care bundle.

Making your own sore muscle balm isn’t just about saving money or going natural—it’s about putting a little love and intention into your self-care. This balm smells divine, feels luxurious, and actually works. No mystery ingredients. No overpriced tubes. Just natural, handmade relief whenever you need it.


Leave a Reply

Your email address will not be published. Required fields are marked *

RSS More Articles

  • The 5 Outlet Placement Mistakes You Don’t Want to Make
  • Celebrate the Spirit of the Southwest with These Stunning Indian Navajo Tribal Quilt Patterns
  • Pricing Handmade Sewing Items Without Undervaluing Yourself
  • Tips for Teaching the Alphabet to Kids
  • Yarn Sardines T-Shirt Review – A Whimsical Gift For Yarn Lovers
  • Cropped Chunky Granny Stitch Cardigan Crochet Pattern
  • Free Butterfly Digital Stamps for Card Making, Coloring and Paper Crafts
  • 14 Masculine Card Ideas for Guys
  • Juneteenth Cross Stitch Patterns
  • Ties to Knit for Father’s Day

Categories

Bath And Body bath bombs Body Scrubs & Lotions Colds & Flu CraftGossip Exclusive Craft Inspirations DIY Recipes And Tutorials DIY Tutorials and Patterns Essential Oils And Aromatherapy facials Hair Care Makeup & Beauty Melt & Pour Soap Packaging Product Reviews Seasonal Products & Tutorials Soapmaking Recipes, Products And Tutorials Style Me Quick Supply Store Specials & Discounts Wellbeing

Copyright © 2026 · CraftGossip | Start Here | Contact Us | Link to Us | Your Editors | Privacy and affiliate policy