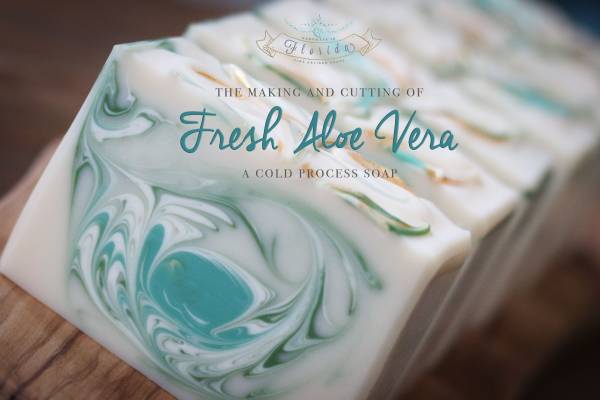
This Aloe Vera Soap recipe is made using fresh Aloe Vera, and takes you through the whole process until cutting. It’s hypnotizing to watch as she swirls the colors and adds the droplets of mica to the top.
Soap Making, Oils and Recipes

This Aloe Vera Soap recipe is made using fresh Aloe Vera, and takes you through the whole process until cutting. It’s hypnotizing to watch as she swirls the colors and adds the droplets of mica to the top.

There is something wonderfully satisfying about making soap that looks as though it came from a bubbling witch’s cauldron—especially when the actual process is far easier than anything involving potions, spells or an eye of newt.
These Witch’s Cauldron Halloween Soap Bars are made with a beginner-friendly melt-and-pour soap base, swirled with orange, purple and black cosmetic colourants and scented with a warm autumn fragrance.
They are spooky without being gruesome, practical enough to use after Halloween and easy to make in batches for party favours, teacher gifts, craft stalls or handmade Halloween pamper baskets.
Best of all, melt-and-pour soap has already gone through the soapmaking process. You simply cut, melt, colour, fragrance and pour it, making this a much more approachable Halloween soap recipe for beginners than working with sodium hydroxide from scratch. CraftBits has a useful basic melt-and-pour soapmaking guide for anyone trying the technique for the first time.
Yield: Approximately four 4-ounce soap bars
Preparation time: Around 25 minutes
Setting time: Two to four hours
Skill level: Beginner
A rectangular silicone soap mold creates chunky apothecary-style bars, while individual pumpkin, ghost or cauldron molds make the recipe especially easy for Halloween party favours.
Soapmaking supply kits, silicone molds, mica sets and small spray bottles are readily available through Amazon and specialist soap suppliers. Check that every colourant and fragrance is specifically approved for cosmetic soapmaking rather than intended for candles or general crafts.
Choose a cosmetic-grade fragrance oil approved by its supplier for use in soap.
The safe amount will depend on the individual fragrance, so check the manufacturer’s usage rate rather than relying on a universal number of drops.
Good Halloween fragrance ideas include:
A warm apple fragrance with vanilla and gentle spice notes.
Pumpkin, caramel and vanilla.
Cedar, amber and orange.
Grape, berry or sweet candy fragrance.
Leave the soap completely fragrance-free and let the Halloween colours create the theme.
Do not add ground cinnamon, cloves, pumpkin-pie spice or nutmeg directly to the soap. Kitchen spices can feel scratchy and may irritate sensitive skin.
There are already two pumpkin-pie soap recipes on CraftGossip, including a simple pumpkin melt-and-pour bar and a more decorative pumpkin pie slice soap. This cauldron version is designed to look darker, moodier and much more Halloween-specific.
Mica can form tiny speckles if it is stirred directly into thickening soap.
For smoother colour, place approximately 1/4 teaspoon of each mica into a separate small cup.
Add one teaspoon of vegetable glycerin or a spoonful of warm melted soap base to each cup. Stir until the mica forms a smooth, lump-free mixture.
You will need:
Start with a small amount of colour. More can always be added, but removing mica from melted soap requires a degree of witchcraft I have yet to master.
Place the silicone soap mold on a flat tray or cutting board.
This makes it easier to move the mold after pouring without bending it and sloshing half-set soap across the bench.
Lightly spray the inside of the mold with isopropyl alcohol, then allow it to evaporate.
Arrange any small soap embeds in the mold before melting the main batch. Only use embeds made from soap. Small plastic spiders or rings may look fun, but they can become sharp or present a choking hazard once exposed.
Cut the melt-and-pour soap base into small, evenly sized cubes.
Place the cubes in a microwave-safe measuring jug.
Smaller pieces melt more evenly and reduce the chance of overheating the soap.
Microwave the soap in 20- to 30-second intervals.
Stir gently after each interval until the soap is completely melted.
Do not allow it to boil. Overheated melt-and-pour soap can develop bubbles, lose moisture and become difficult to work with.
The soap can also be melted gently in a heatproof jug set over a saucepan of simmering water.
Allow the melted soap to cool slightly while remaining fluid.
Add the skin-safe fragrance oil according to the supplier’s recommended usage rate.
Stir slowly and thoroughly. Vigorous stirring can create a jug full of foam, which is less “witch’s cauldron” and more “someone put washing-up liquid in the dishwasher.”
Divide the melted soap between three heatproof cups.
A suggested division is:
The orange will become the main colour, while the purple and black create the Halloween swirls.
Keep a small amount of uncoloured white soap aside when you want a four-colour design.
Stir the prepared orange mica into the largest portion of soap.
Add purple mica to the second cup and black mica to the third.
Mix gently until each colour is even.
If the soap begins to form a skin or thicken, microwave the cup for approximately five seconds and stir again.
Pour most of the orange soap into the mold.
Do not scrape every last drop from the jug yet. Leave a small amount for the final surface swirl.
Spray the orange layer lightly with isopropyl alcohol to remove surface bubbles.
Pour the purple soap over the orange in several uneven ribbons.
Follow with smaller ribbons of black soap.
Pour from different heights and directions to create an irregular cauldron effect. Avoid stirring the mold too vigorously or the colours may blend into one murky brownish shade.
Murky brown may be authentically swamp-like, but it is not quite the look we are aiming for.
Insert a wooden skewer or narrow stirring stick just below the surface.
Move it through the soap in loose figure-eight shapes.
Limit yourself to two or three passes. Over-swirling will muddy the colours.
Drizzle the remaining orange soap over the top and give it one final gentle swirl.
Spray the surface with isopropyl alcohol to remove bubbles.
Add a very light dusting of biodegradable cosmetic glitter if desired.
Do not use ordinary craft glitter. It is not intended for use in rinse-off cosmetic products and can feel scratchy against the skin.
Small soap stars, moons, pumpkins or bats can be pressed gently into the top while the soap is still soft.
Leave the mold undisturbed at room temperature for two to four hours.
Avoid placing the soap in the freezer, as rapid temperature changes can encourage condensation.
Once completely firm, gently pull the silicone mold away from the sides and release the soap.
When using a loaf mold, cut the soap into bars with a sharp non-serrated knife.
Melt-and-pour soap contains glycerin, which attracts moisture from the surrounding air.
In humid conditions, tiny droplets may form on the surface. This is commonly known as glycerin dew or soap sweating.
To reduce it:
This is especially relevant in humid climates, where an innocent soap bar can begin looking as though it has completed a vigorous workout.
Divide the soap into white, orange and yellow portions.
Pour the colours in layers, allowing each layer to form a firm skin before adding the next.
Spray each layer with isopropyl alcohol before pouring another layer so they adhere properly.
Use green, purple and black swirls with a cosmetic-grade apple fragrance.
Add a small soap apple or skull embed to the top.
Create deep burgundy, black and white swirls.
Use a dark berry fragrance and package the bars with dramatic black labels.
Use an opaque white soap base poured into ghost-shaped molds.
Add tiny black soap eyes or paint the details with cosmetic mica mixed with isopropyl alcohol after unmolding.
CraftGossip previously featured ghost and candy-corn soap pops, so a molded ghost bar would work nicely as a modern handmade variation.
Use translucent green soap with purple and black accents.
For a playful project inspired by the older Halloween soap-slime idea, package the bars in laboratory-style bags or potion boxes.
Use black and purple soap with a small gold-mica moon on top.
Choose a cat-shaped mold or attach a black-cat paper label after wrapping.
For a cleaner design than the loose swirl, create three distinct layers.
Pour the black soap first and allow it to form a firm skin.
Spray with isopropyl alcohol, then pour the purple layer.
Repeat with the orange layer.
Each layer should be firm enough to support the next but not completely cold. The alcohol helps the layers adhere.
This method works particularly well in clear rectangular molds because the Halloween colours remain clearly visible down the sides.
Reserve approximately 2 ounces of soap base.
Colour it purple or bright green and allow it to cool until it begins to thicken.
Whisk it gently with a fork to create a slightly frothy texture, then spoon it over the top of the bars.
Add small round soap embeds to resemble potion bubbles.
Keep the decorative layer fairly shallow so the finished soap remains comfortable to hold and use.
Once the bars are completely cool, wrap them tightly in plastic wrap to protect them from moisture.
Add a decorative paper sleeve or label over the wrapping.
Packaging ideas include:
Pair the soap with the handmade Witch’s Brew Bath Salts and Pumpkin Spice Hand Balm for a complete Halloween bath-and-body gift set.
You could also add one of the Halloween bubble bars for a larger seasonal pamper basket.
Witch’s Cauldron Soap
A spellbinding handmade Halloween bar
Net weight: ___
Lather with warm water and rinse thoroughly. Keep dry between uses. External use only.
List the ingredients from your soap-base packaging first, followed by fragrance and cosmetic colourants.
A simple craft-gift label might read:
Melt-and-pour soap base, fragrance and cosmetic-grade mica.
For products being sold, follow the cosmetic-labeling rules that apply in your location and use the correct ingredient names supplied by the manufacturer.
A Little Halloween Magic
Handmade for clean hands and wickedly good baths.
Melted soap can become very hot, so use heatproof equipment and handle the jug carefully.
Do not leave melting soap unattended.
Use only cosmetic-grade colours, fragrances and additives approved for soapmaking.
Follow the fragrance supplier’s maximum usage rate.
Do not add water, fresh pumpkin, milk or other perishable ingredients to this recipe.
Patch test fragranced soap before regular use.
Stop using the soap if irritation develops.
Keep fragrance oils, melted soap and cosmetic colourants away from children and pets.
Anyone new to soapmaking may also find CraftGossip’s beginner soapmaking safety guide useful. It covers safe heating, equipment and the key differences between melt-and-pour and cold-process soap.
The exact shelf life depends on the soap base, fragrance and storage conditions.
Check the use-by guidance supplied with the soap base and fragrance oil.
For the best appearance and scent:
A draining soap dish will help the bar dry between washes and last longer.
This Witch’s Cauldron Halloween Soap has enough orange, purple and black drama to look impressive in a gift basket, but the actual technique remains wonderfully achievable.
The swirls do not need to be perfect. In fact, slightly irregular colours make each bar look more like a bubbling potion, which is excellent news for anyone whose soap-pouring style could politely be described as enthusiastic.
Make a few bars for your bathroom, wrap individual soaps as non-candy Halloween gifts or prepare a larger batch for friends who deserve a little seasonal pampering.
Unlike most Halloween decorations, these will not need to be packed into a plastic storage tub on November 1. They will simply be used, enjoyed and gradually disappear—which is exactly what a good handmade soap should do.
Leave a Reply