• Home
  • Suggest A DIY
  • DIY Newsletter

Bath and Body

Soap Making, Oils and Recipes

  • About CraftGossip
  • Our Network
    • Bath & Body Crafts
    • Candle Making Ideas
    • Crochet Ideas
    • Cross Stitch
    • Edible Crafts
    • Felting Patterns
    • Glass Art
    • Home & Garden Ideas
    • Indie Crafts
    • Jewelry Making
    • Kids Crafts
    • Knitting Patterns
    • Lesson Plans
    • Needlework
    • Party Ideas
    • Polymer Clay
    • Quilting Ideas
    • Recycled Crafts
    • Scrapbooking
    • Sewing Patterns
    • Card Making
    • DIY Weddings
    • Not Craft Ideas
  • Giveaways
  • Roundups
  • Store
  • Search

Style Me Quick – Barbie Hair Repair

July 19, 2013 by Shellie Wilson 5 Comments

barbie-hair-frizz-fix-repair

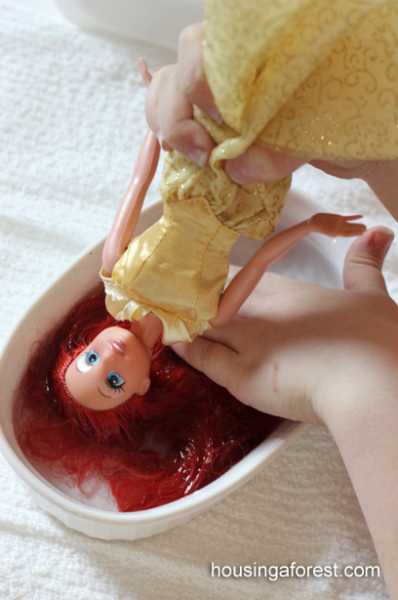
If your little girl has Barbies, then you know exactly why Barbie (or any other fashion doll) will eventually need a serious hair repair. Little girls love to brush and style Barbies hair and as a result it becomes frizzy and teased into a nest.

HousingAForest shares her tips for getting the hair back to manageable again.

More Style Me Quick tips?

Related Posts:

  • Teaching the Art of Soap Making: A Guide to Hosting…
  • DIY Makeup Remover Recipes For Every Skin Type
«
»

Comments

  1. Debbie B says

    July 19, 2013 at 11:12 am

    nothing here on Barbie hair repair??

  2. Carole Thomas says

    July 19, 2013 at 11:29 am

    All I saw was a spam ad for bigger breasts. I already HAVE that!

  3. Heather R. says

    July 19, 2013 at 1:14 pm

    It would appear that there isn’t. Very disappointing- my youngest has some pre-loved dolls that could use a makeover in the hair department….

  4. Mariel says

    July 19, 2013 at 6:50 pm

    Folks. You have to click on the blue letters that say Housing A Forest to get the how to. It’s a link. I tried it and it takes me to that page and step by step.

  5. Shellie Wilson says

    July 19, 2013 at 7:06 pm

    Sorry Everyone, seems a technical error caused the text to not show up in the post.

    I hope now you can all spend the day styling Barbie. 🙂 Don’t forget Ken. Even guys need a little pampering too sometimes.

Have you read?

DIY Herbal Vapor Rub Balm – A Natural Vicks-Style Decongestant for Cold and Flu Relief

When someone in the house starts sniffling, you just know it’s going to make the rounds. That’s when I reach for this homemade herbal vapor rub—our family’s go-to chest balm for easing congestion, coughs, and that heavy-headed sick feeling.

Made with gentle yet powerful essential oils, this balm works just like the classic Vicks rub (but without the synthetic stuff). It’s safe, effective, and smells like a eucalyptus grove with a hint of grandma’s medicine chest—in the best possible way!

Whether you’re treating a toddler’s sniffles or trying to head off a man cold, this DIY vapor rub will be your winter wellness MVP.

Why You’ll Love This Natural Decongestant Balm

  • No petroleum or nasties – A clean, green homemade Vicks alternative 
  • Gentle enough for kids – With optional adjustments for littlies 
  • Nourishing balm texture – Melts into skin without being greasy 
  • Essential oils – Provide cooling, clearing, and comforting support 
  • Customizable – Make it stronger for adults or extra-gentle for babies 

Ingredients

Base:

  • 1/4 cup coconut oil (or olive oil for a softer balm) 
  • 2 tbsp shea butter or mango butter 
  • 2 tbsp beeswax pellets 

Essential Oil Blend (for adults):

  • 10 drops eucalyptus essential oil 
  • 8 drops peppermint essential oil 
  • 6 drops rosemary essential oil 
  • 4 drops tea tree essential oil 
  • 4 drops lavender essential oil 

Optional for kids under 5:
Replace eucalyptus and peppermint with fir needle and cedarwood atlas, and halve the total essential oil amount.

How to Make Your Own Vapor Rub

  1. Melt the base:
    In a double boiler (or a bowl over simmering water), gently melt the coconut oil, shea butter, and beeswax together. Stir until smooth and liquid. 
  2. Cool slightly:
    Remove from heat and let cool just a few minutes—enough that it’s no longer scalding hot but still liquid. 
  3. Add essential oils:
    Stir in your essential oil blend. Don’t add them too early or the heat will evaporate their goodness. 
  4. Pour into tins or jars:
    Carefully pour into a small glass jar or metal balm tin. Let cool completely before putting the lid on. 
  5. Label & store:
    Store in a cool place away from sunlight. Balm will keep for up to 6 months. 

How to Use Your Herbal Chest Rub

  • For chest and back: Rub a small amount onto chest, upper back, and soles of the feet during cold or flu season. 
  • For steam relief: Add a pea-sized amount to a bowl of steaming water, cover your head with a towel, and inhale. 
  • For headaches: Dab a touch on temples and neck (use caution and avoid eyes). 

Mum Tips

  • Patch test first if you’re unsure about sensitivities. 
  • Keep a tiny jar in your handbag during winter for on-the-go sniffles. 
  • For a nighttime version, add a few drops of Roman chamomile or lavender for extra sleep support. 


Leave a Reply

Your email address will not be published. Required fields are marked *

RSS More Articles

  • FIFA Soccer Crafts For Kids, Crochet Fans And Game-Day Makers
  • Cross Stitch Ice Cream and Frozen Treats
  • Sunflower Ribbon Embroidery Tutorials and Kits to Brighten Your Hoop
  • 15 Charity Sewing Projects That Let You Sew Something Useful For A Good Cause
  • Decorating Mistakes That Make Your Living Room Feel Cluttered
  • Remembering Jill Smokler, Founder Of Scary Mommy
  • In the Garden Layer Cake – A Bloom-Filled Fabric Collection for Spring Sewing
  • How To Do Kitchener Stitch: A Beginner-Friendly Guide To Grafting Knitting Seamlessly
  • Pattern Review: Georgie Granny Square Bucket Hat Crochet Pattern
  • Free Giant Squishy Octopus Crochet Pattern

Copyright © 2026 · CraftGossip | Start Here | Contact Us | Link to Us | Your Editors | Privacy and affiliate policy