• Home
  • Suggest A DIY
  • DIY Newsletter

Bath and Body

Soap Making, Oils and Recipes

  • About CraftGossip
  • Our Network
    • Bath & Body Crafts
    • Candle Making Ideas
    • Crochet Ideas
    • Cross Stitch
    • Edible Crafts
    • Felting Patterns
    • Glass Art
    • Home & Garden Ideas
    • Indie Crafts
    • Jewelry Making
    • Kids Crafts
    • Knitting Patterns
    • Lesson Plans
    • Needlework
    • Party Ideas
    • Polymer Clay
    • Quilting Ideas
    • Recycled Crafts
    • Scrapbooking
    • Sewing Patterns
    • Card Making
    • DIY Weddings
    • Not Craft Ideas
  • Giveaways
  • Roundups
  • Store
  • Search

Sweet grass and clary sage soap recipe

April 10, 2009 by jessica neaves Leave a Comment

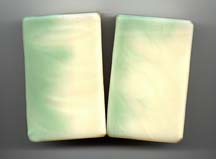
claryswgrassspsSweet Grass and Clary Sage Soap (Kathy Miller) from Miller Soap

24 ounces coconut oil
24 ounces canola oil (can use peanut, corn or sweet almond oil)
36 ounces soybean oil
24 ounces cold water
12 ounces lye crystals

Temperatures: 110-120 degrees

Added at light trace:
1 ounce Sweet Grass FO from Sweet Cakes
1 ounce Clary Sage Essential Oil

This needed a little bottom heat like the Cocanolive batch so I raised the temperatures here. After adding the fragrance and essential oils, I stirred a bit longer and then poured most of the soap. To the remainder, I added a few shavings of teal green candle color that had been melted with a little bit of coconut oil. This was mixed in quickly and the green soap poured on top of the uncolored. I had intended to swirl it, but the soap got too thick on me and try as I might, this was as much swirl as I could get! It’s actually kind of interesting the way it turned out. If you want to recreate this look, you just have to let the soap get to the soft pudding stage before adding the second color and it will refuse to drop down and swirl with the rest of the soap in the pan! This is a little heavier on Clary smell at this point than Sweet Grass. You could probably up the Sweet Grass by another half an ounce, or drop the Clary to 1/2 an ounce. They seem fairly strong and I wouldn’t add more than that for my nose…but you might like POWERFUL smelling soap or need it to last for a long time in storage.

[Ed. –  Instructions and notes are from the author, Kathy Miller.]
«
»

Have you read?

DIY Halloween Bath Bombs – Spooky-Fun Self-Care for Ghouls of All Ages

If your idea of Halloween fun includes a little bubbling, fizzing magic—without the sugar crash—these DIY Halloween Bath Bombs are your new favorite trick and treat. Think spooky swirls, candy-free gifts, and a little self-care potion-making, all rolled into one bewitching bath-time delight.

These are perfect for mums who’d rather stir up a bath bomb cauldron than bake another round of cupcakes for the class party. They also make fang-tastic gifts for teens, neighbours, or anyone who needs a little seasonal sparkle in their soak.

Why You’ll Love These Spooky Bath Bombs

  • Kid-safe ingredients – No creepy chemicals here 
  • Great for gifting – Pop into mini cauldrons, treat bags, or mason jars 
  • Smells like fall – Think pumpkin spice, candy corn, or sweet orange 
  • Budget-friendly – Uses pantry staples and affordable citric acid 
  • Easy to customize – Add spiders, glitter, glow-in-the-dark mica, or even a surprise toy 

Ingredients

  • 1 cup baking soda 
  • 1/2 cup citric acid 
  • 1/2 cup cornstarch 
  • 1/2 cup Epsom salt or fine sea salt 
  • 2 tsp sweet almond oil (or coconut oil) 
  • 1 tsp water or witch hazel in a spray bottle 
  • 10–15 drops essential oil (sweet orange, lavender, cinnamon, or candy-like blends) 
  • Natural colorants or skin-safe mica powder (orange, purple, black, green) 
  • Optional: eco glitter, mini plastic spiders or Halloween charms 
  • Silicone molds or mini plastic cauldrons 

How to Make Halloween Bath Bombs

1. Mix the Dry Ingredients

In a large mixing bowl, combine baking soda, citric acid, cornstarch, and Epsom salt. Whisk until it’s smooth and uniform—like a dusty spellbook.

2. Blend the Wet Ingredients

In a small bowl, mix your carrier oil and essential oils. Add your chosen colorant and glitter here too. If using black, go light—it can stain tubs if overdone.

3. Combine with Care

Slowly drizzle the wet mixture into the dry mix, whisking continuously. It should feel like damp sand. If it clumps when squeezed, you’re ready. Mist lightly with water or witch hazel if too dry.

4. Add Hidden Surprises

Press a small plastic spider, glow cube, or toy into the center for a trick-or-treat effect!

5. Mold It Up

Spoon the mixture into your molds, pressing firmly. Let them dry at least 24 hours before popping out.

Spooky Variations to Try

 Spider Surprise

Hide a plastic spider inside and use black mica for a creepy crawl effect.

 Pumpkin Spice Delight

Add a dash of cinnamon and orange essential oil with orange coloring.

 Glow-in-the-Dark Witch Bombs

Use glow mica and store under light for a fun bathroom glow!

 Boo Bombs for Kids

Make ghost-shaped fizzies using a silicone mold and sweet vanilla oil.

Packaging Ideas for Gifting

  • Wrap in cellophane with twine and a tag: “Drop in warm water and summon a spooky soak!” 
  • Nestle in mini cauldrons from the dollar store 
  • Use kraft boxes lined with Halloween tissue paper for classy spooky gifting 
  • Add a punny printable tag like “You’re the bomb!” or “Witch, please!” 

Tips & Tricks

  • Don’t over-wet your mixture—it can fizz prematurely. 
  • Use gloves to avoid stained fingers. 
  • Let kids help with colors and pressing (just maybe keep the glitter far away unless it’s a full moon). 

Why These Are Better Than Candy

Let’s be honest—October sugar overload is real. These bath bombs are a charming alternative that still feel like a treat. Plus, they turn your bathroom into a spa and a mad scientist lab.

Whether you’re making them for your kids’ school party, teen Halloween sleepovers, or your own pumpkin-scented peace and quiet after bedtime chaos, these DIY bath bombs are a crafty way to keep Halloween fun—and fizzy.


Leave a Reply

Your email address will not be published. Required fields are marked *

RSS feed: More Articles More Articles

  • Free Animal Person Embroidery Design Review
  • DIY Halloween Sock Pumpkins: Easy Fuzzy Pumpkins With Ghosts, Stripes and Witch Hats
  • Free Felting Tutorial Friday: Felt Into Autumn with Heidi Feathers
  • Knit a Classic Aran Cardigan with this Free Knitting Pattern
  • Printable Letter Books for Preschoolers
  • How to Make an Interactive Halloween Mini Scrapbook Album
  • 10 Ice Cubes That Instantly Elevate Champagne
  • Setting Up a Beginner Craft Space? A Practical Shopping List
  • Thrift Store Upcycling: Rustic Pumpkin Decorations From Glass Bowls
  • Mini Pumpkins and Jack o’Lanterns to Cross Stitch

Copyright © 2026 · CraftGossip | Start Here | Contact Us | Link to Us | Your Editors | Privacy and affiliate policy