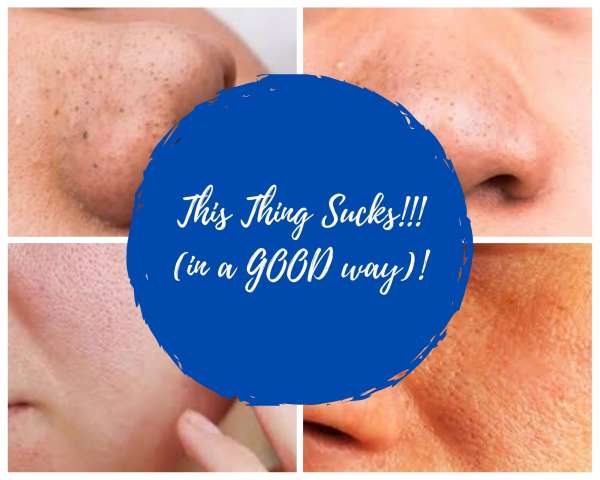
• Home
  • Suggest A DIY
  • DIY Newsletter

Bath and Body

Soap Making, Oils and Recipes

  • About CraftGossip
  • Our Network
    • Bath & Body Crafts
    • Candle Making Ideas
    • Crochet Ideas
    • Cross Stitch
    • Edible Crafts
    • Felting Patterns
    • Glass Art
    • Home & Garden Ideas
    • Indie Crafts
    • Jewelry Making
    • Kids Crafts
    • Knitting Patterns
    • Lesson Plans
    • Needlework
    • Party Ideas
    • Polymer Clay
    • Quilting Ideas
    • Recycled Crafts
    • Scrapbooking
    • Sewing Patterns
    • Card Making
    • DIY Weddings
    • Not Craft Ideas
  • Giveaways
  • Roundups
  • Store
  • Search

Pore Vacuum Review – This Thing Sucks!

July 21, 2021 by Angie McKain Leave a Comment

This thing sucks!

But I mean that in the BEST possible way.

Monday I posted about the top 10 beauty trends in 2021 and one of those trends was upping our skincare game. That’s been a theme for me this month as I’ve gotten more serious about the products I use and how consistent I am with them.

One problem I’ve been noticing with my skin, even with good skincare practices, is clogged pores. Even using a good cleanser that’s made for cleaning pores, they were still there and I still didn’t like the looks of them.

That’s where this little gadget comes in. It’s called a Blackhead Pore Vaccum Cleaner, and I kid you not, it is like a vacuum for your face. You can find the device here.
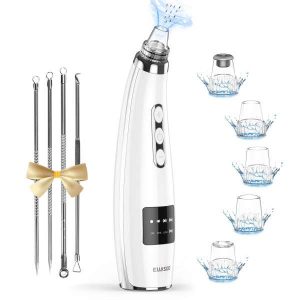
Pore Vaccum


This handy little contraption comes with 5 interchangeable heads, extra O-Rings and filters, is rechargeable, and has 5 different levels of suction that you can try to get the best results for your skin.

Each of the interchangeable heads is designed for different skin conditions (normal skin, combination skin, dry skin, acne, etc.). And as a bonus, they came with 4 other skincare tools to help you get more stubborn acne and blackheads.

To use the device, remove any makeup and wash your face like normal. Use a warm towel or facial steamer over your face for a few minutes to really open up your pores (this step is completely optional, I didn’t do this the first time I used it and was still very happy with my results). Turn the machine on starting with the lowest suction level and increase as needed while moving the machine over the surface of the skin. When you’re done, splash some cold water on your face to close up those pores, clean the removable head, and voila, you’re done!


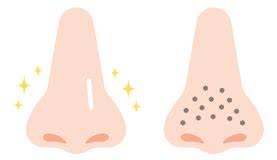
The first time I used this I was pretty amazed and grossed out at the same time. Amazed because it worked so well, grossed out by seeing all of the gunk it pulled out of my pores. After using it my skin felt smoother and the appearance of my pores was decreased.

I definitely recommend this product if you’re dealing with clogged pores, blackheads, or just want to uplevel your skincare game. I know I’m going to be continuing to use mine!

Happy Crafting!

Related Posts:

  • DIY Makeup Remover Recipes For Every Skin Type
  • Easy Homemade Laundry Soap From Scratch for Beginners
«
»

Have you read?

DIY Sore Muscle Relief Balm with Essential Oils – Natural Comfort in a Jar

When your back’s tight, your shoulders are screaming, and even stretching feels like too much effort—sometimes, you just need a little help in a jar.

Enter this soothing DIY Sore Muscle Relief Balm. It’s warming, nourishing, and infused with essential oils known for easing tension and boosting circulation. Whether you’re dealing with post-gardening aches, a long day on your feet, or that stubborn neck kink from sleeping funny (again), this balm is a natural way to say goodbye to muscle misery.

I keep a tin of this on my bedside table and another in the kitchen drawer. It’s a go-to remedy in our house for everything from growing pains to post-walk stiffness—and trust me, with a big dog like Aloo dragging me around, I know sore calves!

Why Make Your Own Muscle Balm?

Commercial rubs often contain synthetic fragrances, petroleum byproducts, or ingredients that can be too harsh on sensitive skin. When you make your own, you’re in full control—and it doesn’t have to be complicated or time-consuming.

This DIY balm is:

  • Petroleum-free and non-toxic 
  • Packed with anti-inflammatory oils 
  • Warming without the burn 
  • Gentle on sensitive or mature skin 
  • Perfect for gifting 

Ingredients You’ll Need

Base Oils & Butters:

  • ¼ cup shea butter – rich in vitamins and helps deeply hydrate skin 
  • 2 tbsp beeswax pellets – thickens the balm and adds a protective barrier 
  • ¼ cup coconut oil – light carrier oil with natural anti-inflammatory properties 
  • 2 tbsp magnesium oil (optional but recommended for extra relief) 

Essential Oils Blend:

  • 10 drops peppermint essential oil – cooling and refreshing 
  • 8 drops eucalyptus essential oil – helps reduce inflammation 
  • 6 drops rosemary essential oil – boosts circulation 
  • 5 drops lavender essential oil – calming and soothing 
  • 4 drops ginger essential oil – gentle warming effect (skip if sensitive to heat) 

Note: Always do a patch test before slathering it on.

How to Make It – Step-by-Step

  1. Melt Your Base
    In a double boiler (or a heat-safe bowl over simmering water), melt together the shea butter, beeswax, and coconut oil until fully liquified. 
  2. Add Magnesium Oil (Optional)
    Remove from heat and stir in magnesium oil if using. This may cause some bubbling—that’s normal! 
  3. Cool Slightly
    Let the mixture cool for a couple of minutes. You want it warm but not hot to avoid damaging the essential oils. 
  4. Stir in Essential Oils
    Add your essential oils and mix thoroughly with a wooden stick or glass stirrer. 
  5. Pour into Tins or Jars
    Carefully pour the balm intometal balm tins or glass jars. Let cool uncovered until set. 
  6. Label & Store
    Store in a cool place away from direct sunlight. It should last 6–12 months. 

How to Use Your Homemade Muscle Rub

  • Massage a small amount into sore muscles after a shower or bath. 
  • Use it before bed to help loosen tight areas and promote deeper sleep. 
  • Rub into feet and calves after long days of standing or walking. 
  • Warm it between your hands for easier spreading on cold days. 

Bonus tip: Rub a bit onto temples and neck during tension headaches—peppermint works wonders.

Customize Your Balm

Want to make it your own? Here are a few add-ins:

  • Arnica oil – great for bruises and swelling 
  • Cayenne pepper oil – for extra heat (only a drop or two!) 
  • Menthol crystals – adds a deep cooling sensation, use sparingly 
  • Comfrey-infused oil – old-school remedy for joint pain and strains 

Gift It!

This balm makes a thoughtful gift for:

  • Gym-goers 
  • Gardeners 
  • Grandparents 
  • Stressed-out teachers 
  • Care packages for new mums or anyone in recovery 

Pair it with a cozy pair of socks or a DIY rice heat pack for a full self-care bundle.

Making your own sore muscle balm isn’t just about saving money or going natural—it’s about putting a little love and intention into your self-care. This balm smells divine, feels luxurious, and actually works. No mystery ingredients. No overpriced tubes. Just natural, handmade relief whenever you need it.


Leave a Reply

Your email address will not be published. Required fields are marked *

RSS More Articles

  • 12 Cards with the Colors of the Rainbow
  • 15 Dog Poop Bag Carriers You Can Sew For Your Dog
  • America 250 Fourth of July Activities for Kids
  • Patriotic Knitting Patterns to Celebrate America’s Birthday
  • 4th of July Cookie Ideas for Parties, BBQs, and Summer Celebrations
  • 15 DIY 4th of July Porch Decor Ideas for a Festive Front Entry
  • How To Refresh An Old Cracked Ceramic Duck Garden Ornament
  • Patriotic Quilted Placemats – A Festive Table Project for Summer Sewing
  • Clay Too Sticky? Too Crumbly? Try These Fool-Proof Polymer Clay Fixes
  • Book Thong G-String Bookmark Free Crochet Pattern

Copyright © 2026 · CraftGossip | Start Here | Contact Us | Link to Us | Your Editors | Privacy and affiliate policy