• Home
  • Suggest A DIY
  • DIY Newsletter

Bath and Body

Soap Making, Oils and Recipes

  • About CraftGossip
  • Our Network
    • Bath & Body Crafts
    • Candle Making Ideas
    • Crochet Ideas
    • Cross Stitch
    • Edible Crafts
    • Felting Patterns
    • Glass Art
    • Home & Garden Ideas
    • Indie Crafts
    • Jewelry Making
    • Kids Crafts
    • Knitting Patterns
    • Lesson Plans
    • Needlework
    • Party Ideas
    • Polymer Clay
    • Quilting Ideas
    • Recycled Crafts
    • Scrapbooking
    • Sewing Patterns
    • Card Making
    • DIY Weddings
    • Not Craft Ideas
  • Giveaways
  • Roundups
  • Store
  • Search

Using Essential Oils Safely + Easy DIY Perfume

June 2, 2021 by Angie McKain Leave a Comment

Hey everyone! I hope you’re all having a great week!


A lot of the projects we’re going to be doing on this blog coming up use essential oils for scenting and therapeutic actions, so I thought we should probably do a quick intro to essential oils and touch on some important safety factors.

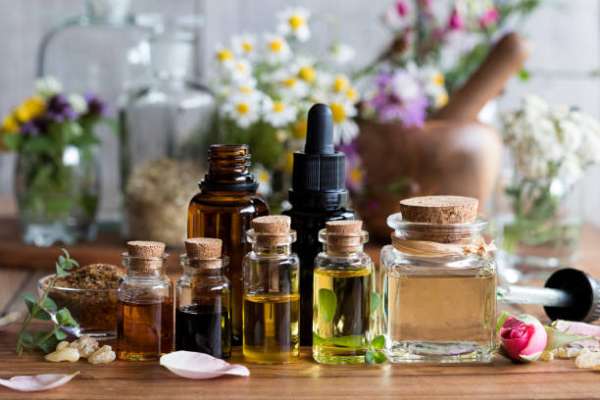
For those of you that are brand new to essential oils, they’re the aromatic compounds that come from different parts of plants. They can come from the roots, leaves, stems, bark, flowers, and other parts of plants. In nature, they help protect the plant and aid in the pollination process.

Essential oils have been used for thousands of years for a variety of health, wellness, and beauty concerns. Although the essential oils used back throughout history aren’t the same things that we know as essential oils today, the concept is very similar.

Essential oils are generally created using steam distillation (most essential oils), cold pressing (citrus oils), or solvent extracted (plants with a low yield of oils – rose, jasmine, etc.).

Using Essential Oils Safely:

1. Always follow proper dilution ratios. I’ll have a chart ready for you guys soon to help you figure out how much essential oil to use in your homemade bath and body products, please note that when I’m giving you a recipe to try, I’ll always let you know how much oil to use =)

2. Only use essential oils that are pure – using oils that aren’t pure can lead to adverse skin reactions. You can find a great brand of essential oils here.

3. If it’s your first time using a specific oil, do a skin patch test first. Directions for how to do this are located here.

4. Keep essential oils out of the reach of children and pets. It’s best to store them in a cool, dark area, preferably in a locked box or cabinet if you have children.

5. Never use essential oils on the skin without a carrier oil, don’t eat them, and please, don’t add them to your drinking water.

Those are the main safety guidelines for using essential oils safely and effectively. By following these, you’ll be well on your way to making safe bath and body products with essential oils.

Easy Essential Oil Perfume

empty 10 ml roller bottle

Vegetable oil of choice – I like to use fractionated coconut oil for this since it has no scent

12 drops essential oil(s) of choice – One of my favorite combinations is lavender, sweet orange, and vanilla for this, but you can use any essential oils that you like (please avoid using citrus oils such as lemon, lime, grapefruit, and bergamot as they are phototoxic oils and could cause skin burns if worn in the sun).

Directions:

Add all essential oils to your empty roller bottle, top off with your vegetable oil, cap off the bottle, and mix gently. To use, dab a little on your pulse points and refresh throughout the day as needed.

Happy Crafting!

Related Posts:

  • How To Dry Your Own Flowers For Bath And Body Recipes
  • Teaching the Art of Soap Making: A Guide to Hosting…
«
»

Have you read?

DIY Sore Muscle Relief Balm with Essential Oils – Natural Comfort in a Jar

When your back’s tight, your shoulders are screaming, and even stretching feels like too much effort—sometimes, you just need a little help in a jar.

Enter this soothing DIY Sore Muscle Relief Balm. It’s warming, nourishing, and infused with essential oils known for easing tension and boosting circulation. Whether you’re dealing with post-gardening aches, a long day on your feet, or that stubborn neck kink from sleeping funny (again), this balm is a natural way to say goodbye to muscle misery.

I keep a tin of this on my bedside table and another in the kitchen drawer. It’s a go-to remedy in our house for everything from growing pains to post-walk stiffness—and trust me, with a big dog like Aloo dragging me around, I know sore calves!

Why Make Your Own Muscle Balm?

Commercial rubs often contain synthetic fragrances, petroleum byproducts, or ingredients that can be too harsh on sensitive skin. When you make your own, you’re in full control—and it doesn’t have to be complicated or time-consuming.

This DIY balm is:

  • Petroleum-free and non-toxic 
  • Packed with anti-inflammatory oils 
  • Warming without the burn 
  • Gentle on sensitive or mature skin 
  • Perfect for gifting 

Ingredients You’ll Need

Base Oils & Butters:

  • ¼ cup shea butter – rich in vitamins and helps deeply hydrate skin 
  • 2 tbsp beeswax pellets – thickens the balm and adds a protective barrier 
  • ¼ cup coconut oil – light carrier oil with natural anti-inflammatory properties 
  • 2 tbsp magnesium oil (optional but recommended for extra relief) 

Essential Oils Blend:

  • 10 drops peppermint essential oil – cooling and refreshing 
  • 8 drops eucalyptus essential oil – helps reduce inflammation 
  • 6 drops rosemary essential oil – boosts circulation 
  • 5 drops lavender essential oil – calming and soothing 
  • 4 drops ginger essential oil – gentle warming effect (skip if sensitive to heat) 

Note: Always do a patch test before slathering it on.

How to Make It – Step-by-Step

  1. Melt Your Base
    In a double boiler (or a heat-safe bowl over simmering water), melt together the shea butter, beeswax, and coconut oil until fully liquified. 
  2. Add Magnesium Oil (Optional)
    Remove from heat and stir in magnesium oil if using. This may cause some bubbling—that’s normal! 
  3. Cool Slightly
    Let the mixture cool for a couple of minutes. You want it warm but not hot to avoid damaging the essential oils. 
  4. Stir in Essential Oils
    Add your essential oils and mix thoroughly with a wooden stick or glass stirrer. 
  5. Pour into Tins or Jars
    Carefully pour the balm intometal balm tins or glass jars. Let cool uncovered until set. 
  6. Label & Store
    Store in a cool place away from direct sunlight. It should last 6–12 months. 

How to Use Your Homemade Muscle Rub

  • Massage a small amount into sore muscles after a shower or bath. 
  • Use it before bed to help loosen tight areas and promote deeper sleep. 
  • Rub into feet and calves after long days of standing or walking. 
  • Warm it between your hands for easier spreading on cold days. 

Bonus tip: Rub a bit onto temples and neck during tension headaches—peppermint works wonders.

Customize Your Balm

Want to make it your own? Here are a few add-ins:

  • Arnica oil – great for bruises and swelling 
  • Cayenne pepper oil – for extra heat (only a drop or two!) 
  • Menthol crystals – adds a deep cooling sensation, use sparingly 
  • Comfrey-infused oil – old-school remedy for joint pain and strains 

Gift It!

This balm makes a thoughtful gift for:

  • Gym-goers 
  • Gardeners 
  • Grandparents 
  • Stressed-out teachers 
  • Care packages for new mums or anyone in recovery 

Pair it with a cozy pair of socks or a DIY rice heat pack for a full self-care bundle.

Making your own sore muscle balm isn’t just about saving money or going natural—it’s about putting a little love and intention into your self-care. This balm smells divine, feels luxurious, and actually works. No mystery ingredients. No overpriced tubes. Just natural, handmade relief whenever you need it.


Leave a Reply

Your email address will not be published. Required fields are marked *

RSS More Articles

  • Designer Spotlight: Unique Stitch Crafts
  • Peyote Stitch Pendants And Necklaces: 10 Seed Bead Jewelry Projects To Make
  • Free Dotted Lines Embroidery Pattern Review
  • Choose Your Own Brioche Knitting Adventure with this Shawl Knitting Pattern
  • How to Make a Masculine Folio Album
  • Courtyard Garden Quilt Kit Review – A Classic Floral Quilt with Vintage Garden Charm
  • Free Loving Life Crochet Blanket – Free Crochet Pattern
  • Book Review: The Royal School of Needlework Book of Embroidery
  • Learning about Finland for Kids
  • How Craft Bloggers Can Use AI Without Losing Their Handmade Voice

Copyright © 2026 · CraftGossip | Start Here | Contact Us | Link to Us | Your Editors | Privacy and affiliate policy