• Home
  • Suggest A Craft
  • DIY Newsletter

Bath and Body

Soap Making, Oils and Recipes

  • About CraftGossip
  • Our Network
    • Bath & Body Crafts
    • Candle Making Ideas
    • Crochet Ideas
    • Cross Stitch
    • Edible Crafts
    • Felting Patterns
    • Glass Art
    • Home & Garden Ideas
    • Indie Crafts
    • Jewelry Making
    • Kids Crafts
    • Knitting Patterns
    • Lesson Plans
    • Needlework
    • Party Ideas
    • Polymer Clay
    • Quilting Ideas
    • Recycled Crafts
    • Scrapbooking
    • Sewing Patterns
    • Card Making
    • DIY Weddings
    • Not Craft Ideas
  • Giveaways
  • Roundups
  • Store
  • Search

Don’t Believe The Hype Sunburn Is NOT Sexy

January 27, 2011 by Nellie Lee Luhrmann 2 Comments

A long time ago a deep tan used to be a sign of wealth and good health as only the rich could afford to lie around in the sun all day. Skip forward to modern day  where we fortunately realise it is not so. I have previously mentioned recipes for “faking the tan “  Today I share with you some cooling anti-inflammatory home remedies for when your skin has been scorched by the sun .

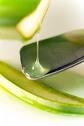
ALOE VERA GEL : Slice it fresh from the plant or squeeze it from a bottle. When purchasing Aloe Vera look for one that is as pure as possible. For best soothing results leave aloe vera in fridge  to enhance it’s cooling effects.

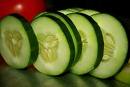
CUCUMBER: Cut thick strips of fresh cucumber straight from the fridge and rub all over your sunburn.

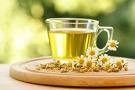
CHAMOMILE TEA: Pour 2 cups of boiled water over 8 chamomile teabags put in fridge and  allow to cool. Use a cloth to dip into the cool chamomile tea and place it over your sunburn. Reapply  several times as needed to reduce the redness/soreness of your sunburn.

Related Posts:

  • How To Make Fresh Aloe Vera Under Eye Gel
  • 10 DIY Bath And Body Recipes For When You Have A Headache
«
»

Comments

  1. Trekky says

    January 27, 2011 at 3:32 pm

    Great tips! Interestingly in Victorian times pale skin was the sign of wealth (it meant that you lived indoors & didn’t have to work on the land). However they took it a bit too far by using arsenic on their skin (!) to make themselves paler.

  2. Sara Lynott says

    January 28, 2011 at 10:34 am

    I would so fit into the victorian times thing. I see so many poeple my age with wrinkly skin and I am appaled. I’m only 33 and I have no fine line or even crows feet. I wear a high number SPF and go out to the beach later in the day. It’s common where I live to go out later in the day when all the summer people have left for the day, it’s locals time then.
    I also stay out of direct sunlight when I can or limit my exposure to half an hour.

Have you read?

DIY Summer Nail Designs You’ll Want to Rock All Season Long

As soon as the weather heats up and the days get longer, I swap out my moody nail colors for something a little more fun, flirty, and full of sunshine. Summer is the perfect excuse to get playful with your nail designs — and this year, I’ve been experimenting at home to find a few favorites that are both easy to paint and seriously cute.

I’ve rounded up three of my go-to summer nail looks that you can totally do yourself, even if you’re not a pro. These are the styles I keep coming back to because they’re fun, eye-catching, and honestly — they just make you feel good. Whether you’re heading to the beach, a backyard BBQ, or just want to admire your nails while holding an iced latte, these are the ones to try.

Let’s dive in!

Sunset Ombre Nails

This is hands down one of the most satisfying nail designs you can do yourself. The colors melt into each other like a beach sunset, and the end result looks way more advanced than it really is.

You’ll Need:

  • A base coat

  • Three polishes (I use pink, orange, and yellow)

  • A makeup sponge

  • Top coat

  • Nail polish remover for cleanup

How to Do It:

  1. Start with a clear base coat to protect your nails.

  2. Paint horizontal stripes of your 3 colors directly onto the makeup sponge.

  3. Dab the sponge gently onto your nail, reapplying polish to the sponge as needed. Tap until the gradient blends.

  4. Clean up any excess polish around your cuticle.

  5. Apply a top coat to smooth the colors and add shine.

This design is one of those that looks good even when it’s a little messy — the top coat really pulls it all together.


 Tropical Palm Silhouettes

If you want vacation vibes without actually going anywhere, this one’s for you. The pastel base paired with simple black palm trees gives it that dreamy island feel.

You’ll Need:

  • A light pastel base polish or soft gradient background

  • Black nail art pen or thin brush with black polish

  • Top coat

How to Do It:

  1. Paint your nails with a soft pastel or ombre base.

  2. Once dry, draw a thin curved line for the palm trunk.

  3. From the top of the trunk, add small lines that fan out to mimic palm fronds.

  4. Let everything dry completely before adding a glossy top coat.

Even if your palm trees aren’t perfect, they still look awesome. Think of it like nail doodling — just more tropical.


 Watermelon French Tips

This design is so cheerful, I smile every time I see it. It’s a fruity twist on a French manicure and it’s perfect for pool parties or picnics.

You’ll Need:

  • Pink polish for the base

  • Green and white for the rind

  • Black polish for the seeds (use a dotting tool or toothpick)

  • Base and top coat

How to Do It:

  1. Paint your entire nail a soft pink.

  2. Add a green curved tip at the top edge (like a French tip).

  3. Under the green, paint a very thin white stripe.

  4. Add small black dots on the pink section to create seeds.

  5. Seal it all in with your favorite top coat.

This one is such a crowd-pleaser and looks adorable on both long and short nails.

Whether you try one of these or rotate through all three this summer, I hope these nail designs add a little color and creativity to your routine. They’re simple enough to do at home but still look like you spent time (and money!) at the salon.

Let me know which one you’re trying first — and don’t forget to tag us if you share your summer nail look!

Leave a Reply

Your email address will not be published. Required fields are marked *

RSS More Articles

  • Book Review: Merry Stitchmas
  • Etsy Spotlight – Sew the Dress of Your Dreams with This Romantic Puff Sleeve Pattern
  • Vacation Pocket Mini Album Project
  • DIY Soda Bottle Cloches – A Clever Way to Shield Your Seedlings
  • Crochet Pattern Review: Aura Pullover
  • Scrappy Pineapple Block – Quilt Pattern
  • Learning about the Moon for Kids
  • Free Crochet Pattern – Battenberg Blanket
  • Book Review – Big Thrift Energy
  • How to Make a Summer Drinks Shaker Card

Categories

Bath And Body bath bombs Body Scrubs & Lotions Colds & Flu CraftGossip Exclusive Craft Inspirations detox DIY Recipes And Tutorials DIY Tutorials and Patterns Essential Oils And Aromatherapy facials Hair Care Makeup & Beauty Melt & Pour Soap Packaging Product Reviews Soapmaking Recipes, Products And Tutorials Style Me Quick Supply Store Specials & Discounts Wellbeing

Copyright © 2025 · CraftGossip | Start Here | Contact Us | Link to Us | Your Editors | Privacy and affiliate policy