• Home
  • Suggest A Craft
  • DIY Newsletter

Bath and Body

Soap Making, Oils and Recipes

  • About CraftGossip
  • Our Network
    • Bath & Body Crafts
    • Candle Making Ideas
    • Crochet Ideas
    • Cross Stitch
    • Edible Crafts
    • Felting Patterns
    • Glass Art
    • Home & Garden Ideas
    • Indie Crafts
    • Jewelry Making
    • Kids Crafts
    • Knitting Patterns
    • Lesson Plans
    • Needlework
    • Party Ideas
    • Polymer Clay
    • Quilting Ideas
    • Recycled Crafts
    • Scrapbooking
    • Sewing Patterns
    • Card Making
    • DIY Weddings
    • Not Craft Ideas
  • Giveaways
  • Roundups
  • Store
  • Search

11 DIY Blush Powders And Tints You Can Make At Home

August 21, 2022 by Shellie Wilson Leave a Comment

Making your own makeup and beauty products has become increasingly popular in recent years, and for good reason. Not only does it allow you to have complete control over the ingredients you use, but it can also save you money in the long run. When it comes to blush specifically, making your own can be a fun and rewarding experience. Not only will you be able to customize the color to suit your own skin tone, but you can also experiment with different ingredients to create a product that is unique to you.

The beauty industry can often be misleading, with many products containing harmful chemicals and additives that can be damaging to our skin and overall health. By making your own blush, you can ensure that you are using natural ingredients that are safe and gentle on your skin. Many DIY blush recipes call for simple ingredients such as mica powders and cornstarch, which can be easily sourced and purchased online.

While getting started with making your own blush may seem daunting, the initial investment in ingredients and equipment can actually be quite affordable. When you consider the cost of store-bought blushes, which can range from $5 to over $100 per packet, making your own can be a cost-effective alternative. Plus, many of the ingredients used for making blush can be used in other DIY beauty products, allowing you to create a whole range of personalized products tailored to your needs.

Overall, making your own blush is a great way to take control of your beauty routine and create a product that is both affordable and safe for your skin. With endless possibilities for customization and experimentation, it’s a fun and rewarding activity that can provide a sense of empowerment and satisfaction. So why not give it a try?

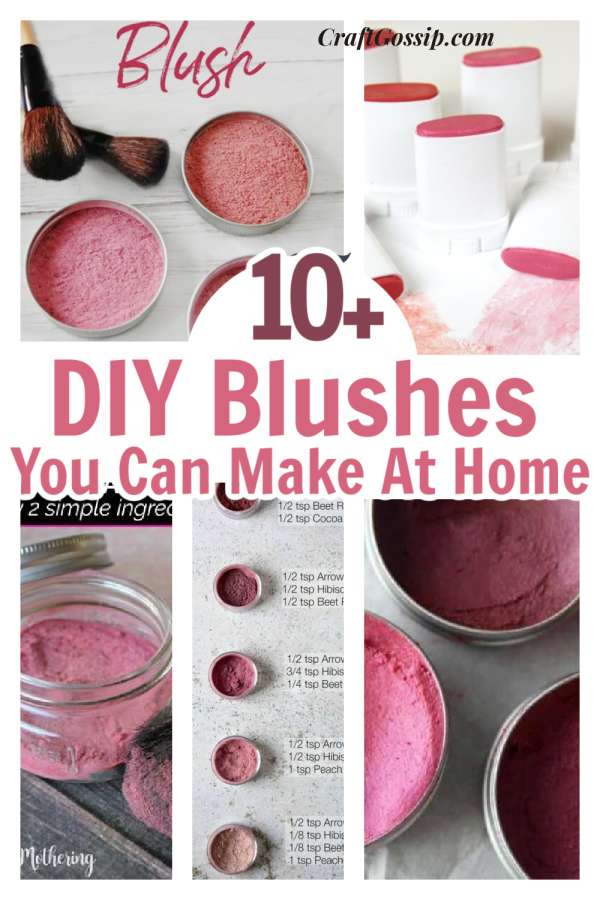
Arrowroot Powder and rose Mica are the 2 most common ingredients in these recipes and both are very affordable. For a container, I purchased these powder makeup containers because I loved the bamboo look and they worked really well for me.

DIY Homemade Cream Blush Recipe With Two Ingredients

DIY Natural blush

Blush Stain 

DIY Natural Blush – 

DIY Natural Blush – The Pistachio Project 

Homemade Blush

Natural blush  

Simple All Natural Beauty Recipes To Craft In Your Kitchen

DIY Beauty: 100% Natural Cream Blush   

How To Make Natural Blush With Freeze-Dried Berries

Creamy Blush Sticks

Lip and cheek tint  made with lipstick so not as natural but super easy for experimenting.

Related Posts:

  • DIY Rainbow Bath Bombs
  • Why You Can't Claim Your Product Cures Eczema,…
«
»

Have you read?

DIY Summer Nail Designs You’ll Want to Rock All Season Long

As soon as the weather heats up and the days get longer, I swap out my moody nail colors for something a little more fun, flirty, and full of sunshine. Summer is the perfect excuse to get playful with your nail designs — and this year, I’ve been experimenting at home to find a few favorites that are both easy to paint and seriously cute.

I’ve rounded up three of my go-to summer nail looks that you can totally do yourself, even if you’re not a pro. These are the styles I keep coming back to because they’re fun, eye-catching, and honestly — they just make you feel good. Whether you’re heading to the beach, a backyard BBQ, or just want to admire your nails while holding an iced latte, these are the ones to try.

Let’s dive in!

Sunset Ombre Nails

This is hands down one of the most satisfying nail designs you can do yourself. The colors melt into each other like a beach sunset, and the end result looks way more advanced than it really is.

You’ll Need:

  • A base coat

  • Three polishes (I use pink, orange, and yellow)

  • A makeup sponge

  • Top coat

  • Nail polish remover for cleanup

How to Do It:

  1. Start with a clear base coat to protect your nails.

  2. Paint horizontal stripes of your 3 colors directly onto the makeup sponge.

  3. Dab the sponge gently onto your nail, reapplying polish to the sponge as needed. Tap until the gradient blends.

  4. Clean up any excess polish around your cuticle.

  5. Apply a top coat to smooth the colors and add shine.

This design is one of those that looks good even when it’s a little messy — the top coat really pulls it all together.


 Tropical Palm Silhouettes

If you want vacation vibes without actually going anywhere, this one’s for you. The pastel base paired with simple black palm trees gives it that dreamy island feel.

You’ll Need:

  • A light pastel base polish or soft gradient background

  • Black nail art pen or thin brush with black polish

  • Top coat

How to Do It:

  1. Paint your nails with a soft pastel or ombre base.

  2. Once dry, draw a thin curved line for the palm trunk.

  3. From the top of the trunk, add small lines that fan out to mimic palm fronds.

  4. Let everything dry completely before adding a glossy top coat.

Even if your palm trees aren’t perfect, they still look awesome. Think of it like nail doodling — just more tropical.


 Watermelon French Tips

This design is so cheerful, I smile every time I see it. It’s a fruity twist on a French manicure and it’s perfect for pool parties or picnics.

You’ll Need:

  • Pink polish for the base

  • Green and white for the rind

  • Black polish for the seeds (use a dotting tool or toothpick)

  • Base and top coat

How to Do It:

  1. Paint your entire nail a soft pink.

  2. Add a green curved tip at the top edge (like a French tip).

  3. Under the green, paint a very thin white stripe.

  4. Add small black dots on the pink section to create seeds.

  5. Seal it all in with your favorite top coat.

This one is such a crowd-pleaser and looks adorable on both long and short nails.

Whether you try one of these or rotate through all three this summer, I hope these nail designs add a little color and creativity to your routine. They’re simple enough to do at home but still look like you spent time (and money!) at the salon.

Let me know which one you’re trying first — and don’t forget to tag us if you share your summer nail look!

Leave a Reply

Your email address will not be published. Required fields are marked *

RSS More Articles

  • How to Create a Photo Box Card
  • Embellish Your Knit Dishcloth with Flowers
  • 30 Brilliant Uses for Empty Pill Bottles You Probably Haven’t Tried Yet
  • Free Crochet Pattern – Emotional Support Chicken
  • Unisex Pajama Top Free Pattern
  • Back to School Cross Stitch Patterns
  • Wrap Yourself in Brilliance: Crochet Your Own Shawl or Scarf
  • 3 FREE Boho Bugs Coloring Pages and Digital Images
  • Embroidery for Mental Health: How Stitching Reduces Stress
  • Krampus Sweater Knitting Pattern

Categories

Bath And Body bath bombs Body Scrubs & Lotions Colds & Flu CraftGossip Exclusive Craft Inspirations detox DIY Recipes And Tutorials DIY Tutorials and Patterns Essential Oils And Aromatherapy facials Hair Care Makeup & Beauty Melt & Pour Soap Packaging Product Reviews Soapmaking Recipes, Products And Tutorials Style Me Quick Supply Store Specials & Discounts Wellbeing

Copyright © 2025 · CraftGossip | Start Here | Contact Us | Link to Us | Your Editors | Privacy and affiliate policy