• Home
  • Suggest A DIY
  • DIY Newsletter

Bath and Body

Soap Making, Oils and Recipes

  • About CraftGossip
  • Our Network
    • Bath & Body Crafts
    • Candle Making Ideas
    • Crochet Ideas
    • Cross Stitch
    • Edible Crafts
    • Felting Patterns
    • Glass Art
    • Home & Garden Ideas
    • Indie Crafts
    • Jewelry Making
    • Kids Crafts
    • Knitting Patterns
    • Lesson Plans
    • Needlework
    • Party Ideas
    • Polymer Clay
    • Quilting Ideas
    • Recycled Crafts
    • Scrapbooking
    • Sewing Patterns
    • Card Making
    • DIY Weddings
    • Not Craft Ideas
  • Giveaways
  • Roundups
  • Store
  • Search

25 Ways To Make Your Own Shampoo

February 8, 2021 by Shellie Wilson Leave a Comment

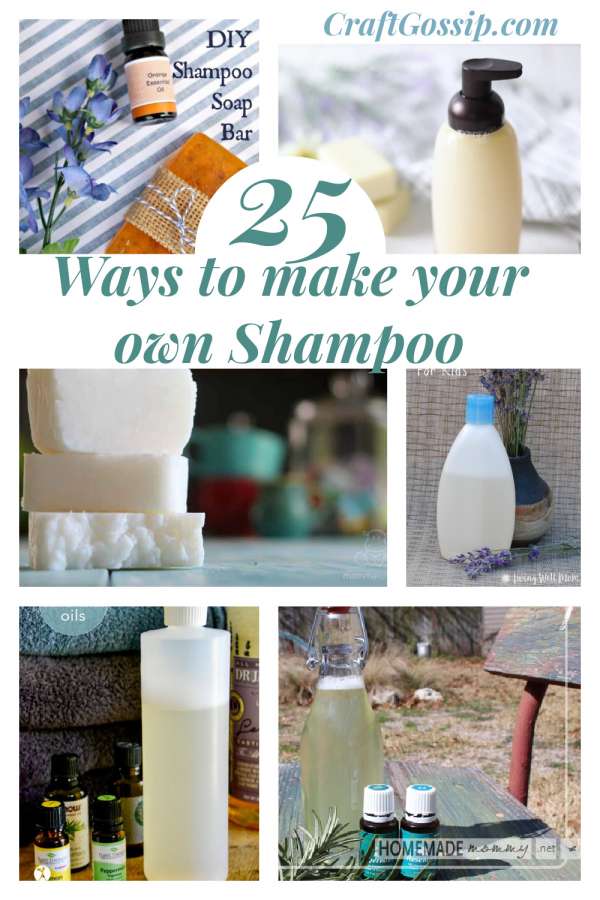
I have gone through lots of different phases in my life, including the DIY body products phase where I only made organic natural soaps and shampoo to put on our bodies. But then parenthood happens and school started and somewhere along the line I lost my get up and go vitality for making my own products.  So here I am back into the DIY shampoo thing, why? Well firstly my kids are teenagers now and I have found myself having a little more free time and also I have a teenage girl who cares about what she puts in and onto her body. She researches every brand she uses and cares more than I ever did at the age about my skin and hair. She has no issues when it comes to self-care and treating herself, and I love that about her. She is teaching me that, I too should come first sometimes.

So DIY shampoo, soaps and other amazingly fresh and scented items will be hitting my body soon.  For this roundup, I have focused on how to make your own shampoo. I have also thrown in some old links to some Shampoo bars we made a couple of years ago.  You can also take a few short cuts and purchase a ready-made organic shampoo base.  You then add your extras into that mix and then bottle it up.

Egg Shampoo 

Beer Shampoo 

Shampoo Build Up Remover

Home Made Herbal Shampoo — CraftBits.com

DIY Herbal Conditioner — CraftBits.com

DIY Shampoo Bars

Easy DIY Solid Shampoo Soap Bar – Bath and Body

Make Your Own Shampoo and Conditioner

Homemade Soap Nuts Shampoo Recipe

 How to Make Homemade Shampoo

Easy, DIY Shampoo for Oily Hair

Moisturizing DIY PH Balanced Shampoo

DIY Herbal Goddess Soapnuts Shampoo 

Homemade Herbal Shampoo

Prev Post Coconut Oil Shampoo Bar Recipe (Video Tutorial)

pH Balanced Shampoo Recipe for a Healthy Scalp

Fight Greasy Hair! Make Your Own Homemade Shampoo!

DIY Honey Shampoo Method

All Natural Homemade Shampoo for Kids (Quick + Simple DIY Shampoo)

problems with no-‘poo or low-‘poo? here’s the holy grail of natural shampoos…

How to Make All Natural Shampoo | Simple Recipe using Essential Oils

Not Ready For No ‘Poo? Try Sorta ‘Poo With Coconut Milk and Castille

Incredibly Easy DIY Castile Soap Shampoo – Ecofriendly

Homemade Rosemary Peppermint Shampoo

DIY Shampoo with Argan Oil for Soft & Silky Hair


Looking for a herbal shampoo? Check out our DIY recipe for making your own natural herbal shampoo with basic supplies. We also have a herbal conditioner recipe too.  Home-made shampoos and conditioners are a great way to strip back to basics and control what herbs you are putting into your hair shampoo and products. Store-bought herbal shampoo contains lots of numbers and ingredients that as the consumer we know very little about.

Related Posts:

  • Teaching the Art of Soap Making: A Guide to Hosting…
  • DIY Makeup Remover Recipes For Every Skin Type
«
»

Have you read?

DIY Sore Muscle Relief Balm with Essential Oils – Natural Comfort in a Jar

When your back’s tight, your shoulders are screaming, and even stretching feels like too much effort—sometimes, you just need a little help in a jar.

Enter this soothing DIY Sore Muscle Relief Balm. It’s warming, nourishing, and infused with essential oils known for easing tension and boosting circulation. Whether you’re dealing with post-gardening aches, a long day on your feet, or that stubborn neck kink from sleeping funny (again), this balm is a natural way to say goodbye to muscle misery.

I keep a tin of this on my bedside table and another in the kitchen drawer. It’s a go-to remedy in our house for everything from growing pains to post-walk stiffness—and trust me, with a big dog like Aloo dragging me around, I know sore calves!

Why Make Your Own Muscle Balm?

Commercial rubs often contain synthetic fragrances, petroleum byproducts, or ingredients that can be too harsh on sensitive skin. When you make your own, you’re in full control—and it doesn’t have to be complicated or time-consuming.

This DIY balm is:

  • Petroleum-free and non-toxic 
  • Packed with anti-inflammatory oils 
  • Warming without the burn 
  • Gentle on sensitive or mature skin 
  • Perfect for gifting 

Ingredients You’ll Need

Base Oils & Butters:

  • ¼ cup shea butter – rich in vitamins and helps deeply hydrate skin 
  • 2 tbsp beeswax pellets – thickens the balm and adds a protective barrier 
  • ¼ cup coconut oil – light carrier oil with natural anti-inflammatory properties 
  • 2 tbsp magnesium oil (optional but recommended for extra relief) 

Essential Oils Blend:

  • 10 drops peppermint essential oil – cooling and refreshing 
  • 8 drops eucalyptus essential oil – helps reduce inflammation 
  • 6 drops rosemary essential oil – boosts circulation 
  • 5 drops lavender essential oil – calming and soothing 
  • 4 drops ginger essential oil – gentle warming effect (skip if sensitive to heat) 

Note: Always do a patch test before slathering it on.

How to Make It – Step-by-Step

  1. Melt Your Base
    In a double boiler (or a heat-safe bowl over simmering water), melt together the shea butter, beeswax, and coconut oil until fully liquified. 
  2. Add Magnesium Oil (Optional)
    Remove from heat and stir in magnesium oil if using. This may cause some bubbling—that’s normal! 
  3. Cool Slightly
    Let the mixture cool for a couple of minutes. You want it warm but not hot to avoid damaging the essential oils. 
  4. Stir in Essential Oils
    Add your essential oils and mix thoroughly with a wooden stick or glass stirrer. 
  5. Pour into Tins or Jars
    Carefully pour the balm intometal balm tins or glass jars. Let cool uncovered until set. 
  6. Label & Store
    Store in a cool place away from direct sunlight. It should last 6–12 months. 

How to Use Your Homemade Muscle Rub

  • Massage a small amount into sore muscles after a shower or bath. 
  • Use it before bed to help loosen tight areas and promote deeper sleep. 
  • Rub into feet and calves after long days of standing or walking. 
  • Warm it between your hands for easier spreading on cold days. 

Bonus tip: Rub a bit onto temples and neck during tension headaches—peppermint works wonders.

Customize Your Balm

Want to make it your own? Here are a few add-ins:

  • Arnica oil – great for bruises and swelling 
  • Cayenne pepper oil – for extra heat (only a drop or two!) 
  • Menthol crystals – adds a deep cooling sensation, use sparingly 
  • Comfrey-infused oil – old-school remedy for joint pain and strains 

Gift It!

This balm makes a thoughtful gift for:

  • Gym-goers 
  • Gardeners 
  • Grandparents 
  • Stressed-out teachers 
  • Care packages for new mums or anyone in recovery 

Pair it with a cozy pair of socks or a DIY rice heat pack for a full self-care bundle.

Making your own sore muscle balm isn’t just about saving money or going natural—it’s about putting a little love and intention into your self-care. This balm smells divine, feels luxurious, and actually works. No mystery ingredients. No overpriced tubes. Just natural, handmade relief whenever you need it.


Leave a Reply

Your email address will not be published. Required fields are marked *

RSS More Articles

  • Book Review: The Royal School of Needlework Book of Embroidery
  • Learning about Finland for Kids
  • How Craft Bloggers Can Use AI Without Losing Their Handmade Voice
  • How To Start Selling Crochet From Home Without Turning Your Hobby Into A Headache
  • Vintage Doily Jar Lanterns: A Pretty Recycled Jar Craft For Weddings, Tables & Cozy Corners
  • 4 FREE Downloadable Sentiments for Dad
  • Everything You Need to Know About Embroidery Hoops
  • Printable Stickers for Journals and Planners – Self Care
  • Needle Felting Fairy Tutorial by Santa Meada
  • Stitch Your Favorite Fruit on a Sweater

Copyright © 2026 · CraftGossip | Start Here | Contact Us | Link to Us | Your Editors | Privacy and affiliate policy