• Home
  • Suggest A Craft
  • DIY Newsletter

Bath and Body

Soap Making, Oils and Recipes

  • About CraftGossip
  • Our Network
    • Bath & Body Crafts
    • Candle Making Ideas
    • Crochet Ideas
    • Cross Stitch
    • Edible Crafts
    • Felting Patterns
    • Glass Art
    • Home & Garden Ideas
    • Indie Crafts
    • Jewelry Making
    • Kids Crafts
    • Knitting Patterns
    • Lesson Plans
    • Needlework
    • Party Ideas
    • Polymer Clay
    • Quilting Ideas
    • Recycled Crafts
    • Scrapbooking
    • Sewing Patterns
    • Card Making
    • DIY Weddings
    • Not Craft Ideas
  • Giveaways
  • Roundups
  • Store
  • Search

3 Self Care Recipes to Make this Weekend

May 28, 2021 by Angie McKain Leave a Comment

Hey everyone!

We’re getting ready to move into a holiday weekend and what is usually considered the unofficial start to summer in the United States! Are you excited? I know I sure am!!!

Long weekends usually mean extra time to craft for me, and I’m hoping you get some extra time to be creative this weekend too. It’s also the perfect opportunity to take a little bit of time to wind down and relax and just enjoy the weekend! To help you get started, I have 3 great self-care recipes you can make this weekend with simple ingredients! Continue reading below for all of the recipes and how to make them!
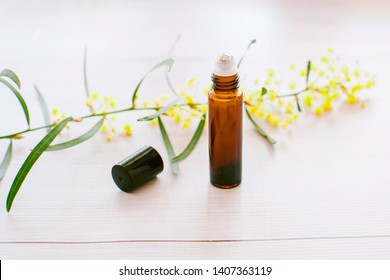
 

Liquid Lip Gloss

8 mL of vegetable oil of choice (I use a 50/50 mix of jojoba and sweet almond oil for this, but you can choose any oil you like!)

1 mL vegetable glycerine

2 mL agave nectar or honey (to sweeten the gloss up)

2 drops of your favorite essential oil – Some ideas are peppermint, spearmint, sweet orange, and vanilla. Refrain from using citrus oils other than sweet orange if you’re going to be wearing this lip gloss outside, they can cause skin burns when exposed to the sun 😉

10 mL empty roller bottle

Mix vegetable glycerine, vegetable oil, and sweetener in a small bowl or cup until well combined. Empty contents into the empty roller bottle, add your essential oil, cap the roller bottle and gently roll it back and forth in your hands to ensure all ingredients are mixed well, enjoy!
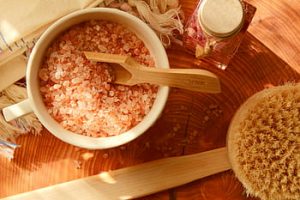


Relaxing Bath Salts

4 ounces pink Himalayan salt (if you want, you can also substitute this with 4 ounces of coarse sea salt or Epsom salts)

2 TBSP castile soap (I like to use the lavender-scented, but you can use any that you have on hand)

3 drops Lavender Essential Oil

2 drops Sweet Orange Essential Oil

Empty Jar

Add all ingredients to clean, empty jar, and stir well to make sure all ingredients are mixed together well. Use 1-2 ounces of the mixture in the bath and soak up the relaxation!

Luscious Locks Overnight Hair Treatment

2 tablespoons Castor Oil or vegetable oil of choice

3 drops Lavender Essential Oil

3 drops Rosemary Essential Oil

2 drops Ylang Ylang Essential Oil

Empty Glass Bottle

Add all ingredients to an empty glass bottle and shake gently to combine. Apply in hair and on the scalp before bed and let it sit overnight. Wash out in the morning for soft, perfectly moisturized tresses.

After you make one (or more) of these awesome recipes, why not take some time for yourself to relax and pamper yourself a little? After all, you deserve it!

Happy Crafting!

Related Posts:

  • The New Menopause: Your Ultimate Guide to Navigating…
  • Efficiency and Expertise: Crafting 200 Bath Bombs in…
«
»

Have you read?

DIY Summer Nail Designs You’ll Want to Rock All Season Long

As soon as the weather heats up and the days get longer, I swap out my moody nail colors for something a little more fun, flirty, and full of sunshine. Summer is the perfect excuse to get playful with your nail designs — and this year, I’ve been experimenting at home to find a few favorites that are both easy to paint and seriously cute.

I’ve rounded up three of my go-to summer nail looks that you can totally do yourself, even if you’re not a pro. These are the styles I keep coming back to because they’re fun, eye-catching, and honestly — they just make you feel good. Whether you’re heading to the beach, a backyard BBQ, or just want to admire your nails while holding an iced latte, these are the ones to try.

Let’s dive in!

Sunset Ombre Nails

This is hands down one of the most satisfying nail designs you can do yourself. The colors melt into each other like a beach sunset, and the end result looks way more advanced than it really is.

You’ll Need:

  • A base coat

  • Three polishes (I use pink, orange, and yellow)

  • A makeup sponge

  • Top coat

  • Nail polish remover for cleanup

How to Do It:

  1. Start with a clear base coat to protect your nails.

  2. Paint horizontal stripes of your 3 colors directly onto the makeup sponge.

  3. Dab the sponge gently onto your nail, reapplying polish to the sponge as needed. Tap until the gradient blends.

  4. Clean up any excess polish around your cuticle.

  5. Apply a top coat to smooth the colors and add shine.

This design is one of those that looks good even when it’s a little messy — the top coat really pulls it all together.


 Tropical Palm Silhouettes

If you want vacation vibes without actually going anywhere, this one’s for you. The pastel base paired with simple black palm trees gives it that dreamy island feel.

You’ll Need:

  • A light pastel base polish or soft gradient background

  • Black nail art pen or thin brush with black polish

  • Top coat

How to Do It:

  1. Paint your nails with a soft pastel or ombre base.

  2. Once dry, draw a thin curved line for the palm trunk.

  3. From the top of the trunk, add small lines that fan out to mimic palm fronds.

  4. Let everything dry completely before adding a glossy top coat.

Even if your palm trees aren’t perfect, they still look awesome. Think of it like nail doodling — just more tropical.


 Watermelon French Tips

This design is so cheerful, I smile every time I see it. It’s a fruity twist on a French manicure and it’s perfect for pool parties or picnics.

You’ll Need:

  • Pink polish for the base

  • Green and white for the rind

  • Black polish for the seeds (use a dotting tool or toothpick)

  • Base and top coat

How to Do It:

  1. Paint your entire nail a soft pink.

  2. Add a green curved tip at the top edge (like a French tip).

  3. Under the green, paint a very thin white stripe.

  4. Add small black dots on the pink section to create seeds.

  5. Seal it all in with your favorite top coat.

This one is such a crowd-pleaser and looks adorable on both long and short nails.

Whether you try one of these or rotate through all three this summer, I hope these nail designs add a little color and creativity to your routine. They’re simple enough to do at home but still look like you spent time (and money!) at the salon.

Let me know which one you’re trying first — and don’t forget to tag us if you share your summer nail look!

Leave a Reply

Your email address will not be published. Required fields are marked *

RSS More Articles

  • How to Create a Photo Box Card
  • Embellish Your Knit Dishcloth with Flowers
  • 30 Brilliant Uses for Empty Pill Bottles You Probably Haven’t Tried Yet
  • Free Crochet Pattern – Emotional Support Chicken
  • Unisex Pajama Top Free Pattern
  • Back to School Cross Stitch Patterns
  • Wrap Yourself in Brilliance: Crochet Your Own Shawl or Scarf
  • 3 FREE Boho Bugs Coloring Pages and Digital Images
  • Embroidery for Mental Health: How Stitching Reduces Stress
  • Krampus Sweater Knitting Pattern

Categories

Bath And Body bath bombs Body Scrubs & Lotions Colds & Flu CraftGossip Exclusive Craft Inspirations detox DIY Recipes And Tutorials DIY Tutorials and Patterns Essential Oils And Aromatherapy facials Hair Care Makeup & Beauty Melt & Pour Soap Packaging Product Reviews Soapmaking Recipes, Products And Tutorials Style Me Quick Supply Store Specials & Discounts Wellbeing

Copyright © 2025 · CraftGossip | Start Here | Contact Us | Link to Us | Your Editors | Privacy and affiliate policy