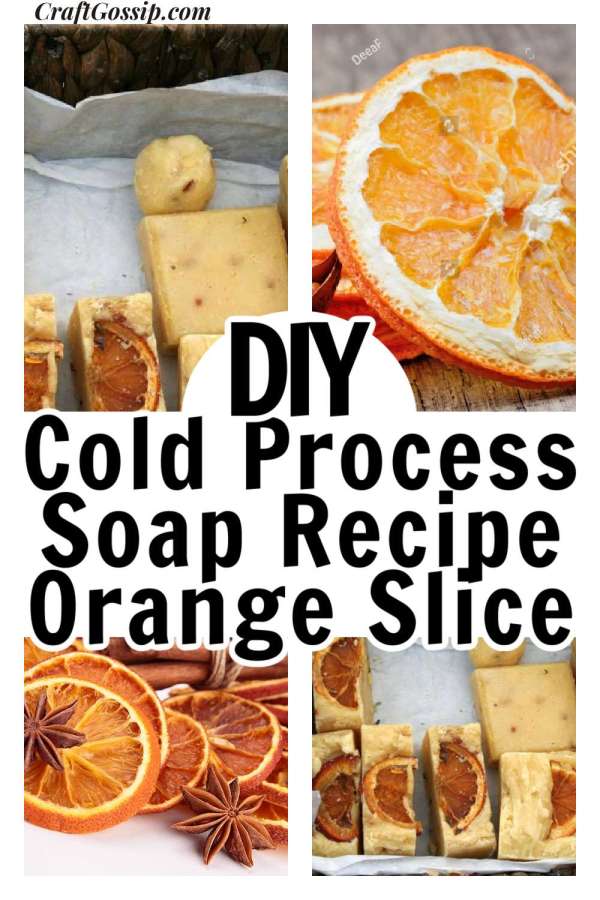
Welcome to a journey where creativity and craftsmanship converge, resulting in a masterpiece that not only nourishes the skin but also captures the essence of nature’s elegance. In this comprehensive tutorial, we delve into the captivating art of crafting cold process soap adorned with the exquisite charm of dehydrated orange slices. The combination of artisanal soap-making techniques and the natural allure of citrus creates a symphony of sensory delights that is both indulgent and invigorating.
At the heart of this endeavor lies a fusion of creativity and science. Cold process soap-making is a time-honored technique that transforms carefully selected oils, lye, and fragrances into luxurious bars of soap. As we embark on this hands-on journey, you’ll witness the magic that occurs when these simple ingredients unite to produce something truly extraordinary. But this tutorial doesn’t stop at crafting soap; it embraces the artistic concept of decoration, elevating the end product to a realm of visual splendor.
Dehydrated orange slices, plucked from the bountiful orchards of nature, become more than just a decorative touch – they become a testament to the beauty that can be found in every facet of creation. These delicate slices, painstakingly dehydrated to preserve their vibrant colors and alluring aromas, harmonize perfectly with the soap’s essence, delivering a sensory experience that bridges the realms of sight, scent, and touch.
The process itself is a blend of precision and patience. We’ll guide you through each step, from preparing your workspace to handling lye with the utmost care. Safety is paramount, and we ensure that you embark on this journey with all the necessary precautions in place. As you become acquainted with the transformation of oils and lye into a silky emulsion, you’ll appreciate the science behind the craft, understanding how molecules reconfigure to produce the luxurious soap you’re crafting.
But crafting cold process soap is not merely a scientific endeavor; it’s a canvas for artistic expression. Weaving in dried orange zest and the invigorating aroma of sweet orange essential oil infuses your soap with citrusy vibrancy. However, it is the final touch – the arrangement of dehydrated orange slices – that truly transforms your soap into a work of art. Each slice is a whisper from nature itself, a reminder of the beauty that surrounds us and the magic that can be captured with a thoughtful touch.
Through the curing process, your soap evolves into a sublime creation. Weeks of patience yield bars that are not just cleansers but also vessels of indulgence. As you hold a bar in your hand, you’re holding a piece of the journey – a representation of your dedication to both craft and creativity.
So, join us on this captivating journey of creation and artistry. As we dive into the process of crafting cold process soap adorned with dehydrated orange slices, let your senses awaken to the harmonious convergence of nature’s bounty and human ingenuity. Your hands will shape a creation that not only nourishes the body but also feeds the soul, reminding us all that beauty is found in every carefully chosen detail.

Cold Process Soap Recipe: Dehydrated Orange Slice Elegance
Ingredients:
For the Soap:
10 oz (283 g) Coconut Oil
10 oz (283 g) Olive Oil
10 oz (283 g) Sustainable Palm Oil
4.8 oz (136 g) Sodium Hydroxide (Lye)
11.5 oz (326 g) Distilled Water
1.5 oz (43 g) Sweet Orange Essential Oil
1 tbsp Orange Zest (dried and ground)
For Decoration: Dehydrated Orange Slices
Safety Precautions:
Work in a well-ventilated area, preferably outdoors or in a space with good air circulation.
Wear protective gear, including safety goggles and gloves, to handle lye.
Keep children and pets away from the soap-making process.
Instructions
Step 1: Prepare Your Workspace
Choose a well-ventilated and clutter-free area to work.
Cover your workspace with newspaper or a plastic drop cloth to protect surfaces.
Step 2: Prepare Dehydrated Orange Slices
Start by dehydrating orange slices using a dehydrator or an oven set at the lowest temperature. This process may take several hours. The slices should be completely dry and leathery to the touch. Once dried, let the slices cool before using them for decoration.
Step 3: Prepare Lye Solution
For this step, wear safety goggles and gloves.
In a well-ventilated area, add the sodium hydroxide (lye) to the distilled water. NEVER add water to lye.
Stir until the lye is fully dissolved. The mixture will emit fumes, so ensure proper ventilation.
Allow the lye solution to cool while you prepare the oils.
Step 4: Prepare Oils
In a well-ventilated area, melt the coconut oil, olive oil, and sustainable palm oil together in a heat-resistant container.
Let the oils cool to around 100-110°F (38-43°C).
Step 5: Combine Lye Solution and Oils
Make sure both the lye solution and oils are within a similar temperature range (100-110°F or 38-43°C).
Slowly pour the lye solution into the oils while stirring gently with a heat-resistant spatula.
Step 6: Emulsification and Mixing
Use a stick blender to mix the mixture until it reaches a light trace. This means the mixture has thickened to a consistency similar to heavy cream.
Add the sweet orange essential oil and dried, ground orange zest. Mix until fully incorporated.
Step 7: Pouring the Soap
Carefully pour the soap batter into a soap mold.
Tap the mold on a solid surface to remove any air bubbles.
Step 8: Decorating with Dehydrated Orange Slices
Once the soap has slightly thickened in the mold (usually within an hour or so), gently press the dehydrated orange slices onto the surface. Arrange them in a decorative pattern.
Lightly press the slices into the soap to help them adhere.
Step 9: Curing and Unmolding
Cover the mold with a piece of cardboard and a towel to retain heat and promote gel phase.
Allow the soap to sit in the mold for 24-48 hours.
Carefully unmold the soap and cut it into bars.
Place the bars on a curing rack in a cool, dry, and well-ventilated area.
Step 10: Curing Period
Let the soap bars cure for 4-6 weeks. During this time, the soap will harden, mellow, and become mild for use.
Step 11: Enjoy Your Creations!
Once fully cured, your beautifully decorated dehydrated orange slice soap is ready to use, share, or gift.
Creating cold process soap is a creative and satisfying endeavor, offering both functionality and artistic expression. With the added touch of dehydrated orange slices, your soap becomes an exquisite work of art that celebrates nature’s beauty and the joy of crafting. Remember that cold process soap-making requires patience, attention to detail, and safety precautions, but the end result is well worth the effort.
Frequently Asked Questions (FAQ) – Using Dehydrated Fruit and Flowers in Soaps
Q1: Can I use any type of dehydrated fruit or flower in soap-making?
A1: While many fruits and flowers can be used in soap-making, it’s important to consider their moisture content and potential reactivity with the soap ingredients. Dehydrated fruits like citrus peels and berries are commonly used, while flowers such as lavender and rose petals are popular choices for their aesthetic appeal and aromatherapeutic qualities.
Q2: How do I prepare dehydrated fruit and flowers for soap-making?
A2: Ensure your dehydrated materials are fully dried and free of moisture. Crush or grind them into smaller pieces for even distribution in the soap. If using larger pieces, consider their sharp edges, as they might affect the soap’s texture.
Q3: Will dehydrated fruit and flowers change the soap’s color?
A3: Yes, they can influence the soap’s color. For instance, using dried orange peels might add a hint of orange hue to the soap. Conduct small test batches to understand the color changes that may occur.
Q4: How do I prevent mold and spoilage when using dehydrated materials?
A4: Dehydrated materials should be free of moisture to prevent mold growth. Additionally, their use might affect the soap’s shelf life, so consider using additives like rosemary extract or Vitamin E oil as natural preservatives.
Q5: Can I use dehydrated materials in both melt-and-pour and cold process soap-making?
A5: Yes, you can incorporate dehydrated materials in both soap-making methods. In melt-and-pour soap, simply mix them into the melted soap base before pouring. In cold process soap, add them to the soap batter before pouring into molds.
Q6: Will dehydrated materials affect the soap’s texture or lather?
A6: Some dehydrated materials might affect the texture due to their abrasiveness. They might also slightly alter lather characteristics. Consider using finely ground materials or small particles to mitigate texture-related issues.
Q7: Can dehydrated flowers retain their fragrance in soap?
A7: Dehydrated flowers often lose their natural fragrance during the drying process. However, they can still contribute a pleasing aesthetic and potentially offer subtle aromatherapy benefits.
Q8: How should I store soap with dehydrated fruit and flowers?
A8: Store these soaps in a cool, dry place away from direct sunlight to preserve their appearance and fragrance. Proper storage helps prevent any potential moisture-related issues.
Q9: Can I use dehydrated materials for exfoliation in soap?
A9: Yes, dehydrated materials can provide gentle exfoliation. However, ensure that the particles are not too coarse or sharp to avoid skin irritation.
Q10: Are there any safety precautions when using dehydrated materials in soap-making?
A10: If you’re using materials from your garden, make sure they haven’t been treated with pesticides or chemicals. Also, avoid any materials that might have toxic properties when absorbed through the skin. Always research the safety of the specific plant material you plan to use.
Remember, experimentation is part of the joy of soap-making, so feel free to explore and create unique combinations with dehydrated fruits and flowers. Conduct small tests before making larger batches to ensure the final product meets your expectations.


Leave a Reply