• Home
  • Suggest A DIY
  • DIY Newsletter

Bath and Body

Soap Making, Oils and Recipes

  • About CraftGossip
  • Our Network
    • Bath & Body Crafts
    • Candle Making Ideas
    • Crochet Ideas
    • Cross Stitch
    • Edible Crafts
    • Felting Patterns
    • Glass Art
    • Home & Garden Ideas
    • Indie Crafts
    • Jewelry Making
    • Kids Crafts
    • Knitting Patterns
    • Lesson Plans
    • Needlework
    • Party Ideas
    • Polymer Clay
    • Quilting Ideas
    • Recycled Crafts
    • Scrapbooking
    • Sewing Patterns
    • Card Making
    • DIY Weddings
    • Not Craft Ideas
  • Giveaways
  • Roundups
  • Store
  • Search

Creating Your Own Elecampane Root Tincture

May 14, 2026 by Shellie Wilson Leave a Comment

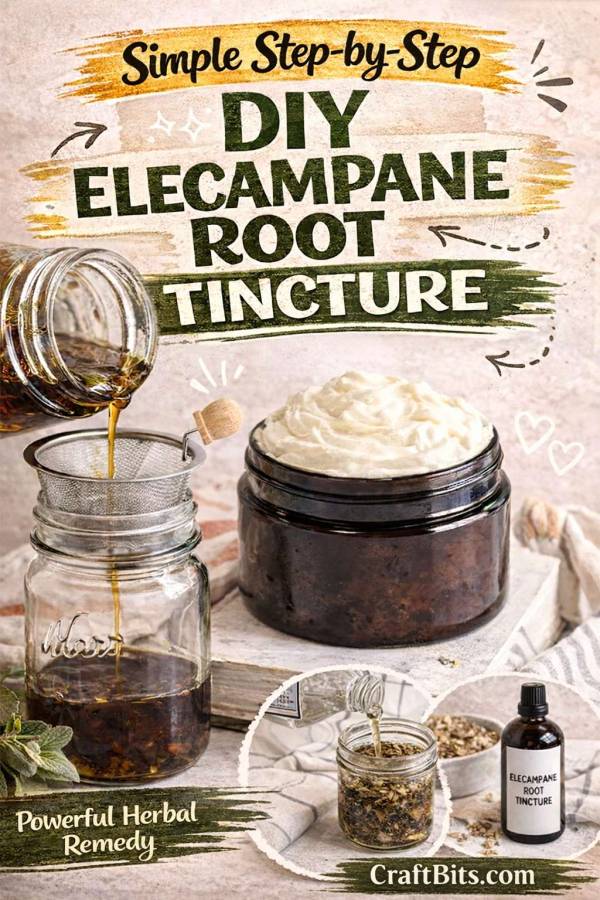
There’s something very old-fashioned and comforting about a herbal tincture project like this one. This elecampane root tincture tutorial has that homemade apothecary feel to it, like the sort of recipe you’d tuck away in a notebook and come back to every winter when everyone starts coughing dramatically in the lounge room. The project uses elecampane root, vegetable glycerin, and water, then lets the mixture sit for around six weeks before straining it into a tincture bottle.

What I like about this one is that it doesn’t try to be flashy. It’s a simple, slow craft, and honestly that’s part of the appeal. You’re not whipping up a sugar scrub in ten minutes and calling it a day. This is more of a patience project, which makes it feel nicely intentional. If you enjoy herbal DIYs and the whole “little jars and bottles lined up on the shelf” aesthetic, this one definitely scratches that itch.

The post also gives a bit of background on elecampane’s traditional uses, especially around respiratory support, digestive support, and its reputation for helping loosen mucus. It even touches on possible antimicrobial properties and mentions that research around blood sugar effects is still developing. That makes it feel more informative than just a bare-bones recipe card, which I always appreciate. I don’t mind a project with a little context, especially when the ingredient is one a lot of people may not have worked with before.

I also think the glycerin base makes this especially approachable. The tutorial notes that you can use vodka instead if you want to make an alcohol tincture, but this version keeps it softer and a bit more beginner-friendly. For anyone easing into herbal prep, that’s a nice option. Not everybody wants their kitchen looking like they’re opening a bush-medicine speakeasy.

The method itself is straightforward too: fill the jar about one-third with root, pour over the 75% vegetable glycerin and 25% water mixture, let it infuse for six weeks with the occasional shake, then strain and bottle it. It’s the kind of process that feels doable even if you’re not deep into herbal crafting.

Related Posts:

  • Creating Your Own Elecampane Root Tincture
  • DIY Makeup Remover Recipes For Every Skin Type
«
»

Have you read?

DIY Herbal Vapor Rub Balm – A Natural Vicks-Style Decongestant for Cold and Flu Relief

When someone in the house starts sniffling, you just know it’s going to make the rounds. That’s when I reach for this homemade herbal vapor rub—our family’s go-to chest balm for easing congestion, coughs, and that heavy-headed sick feeling.

Made with gentle yet powerful essential oils, this balm works just like the classic Vicks rub (but without the synthetic stuff). It’s safe, effective, and smells like a eucalyptus grove with a hint of grandma’s medicine chest—in the best possible way!

Whether you’re treating a toddler’s sniffles or trying to head off a man cold, this DIY vapor rub will be your winter wellness MVP.

Why You’ll Love This Natural Decongestant Balm

  • No petroleum or nasties – A clean, green homemade Vicks alternative 
  • Gentle enough for kids – With optional adjustments for littlies 
  • Nourishing balm texture – Melts into skin without being greasy 
  • Essential oils – Provide cooling, clearing, and comforting support 
  • Customizable – Make it stronger for adults or extra-gentle for babies 

Ingredients

Base:

  • 1/4 cup coconut oil (or olive oil for a softer balm) 
  • 2 tbsp shea butter or mango butter 
  • 2 tbsp beeswax pellets 

Essential Oil Blend (for adults):

  • 10 drops eucalyptus essential oil 
  • 8 drops peppermint essential oil 
  • 6 drops rosemary essential oil 
  • 4 drops tea tree essential oil 
  • 4 drops lavender essential oil 

Optional for kids under 5:
Replace eucalyptus and peppermint with fir needle and cedarwood atlas, and halve the total essential oil amount.

How to Make Your Own Vapor Rub

  1. Melt the base:
    In a double boiler (or a bowl over simmering water), gently melt the coconut oil, shea butter, and beeswax together. Stir until smooth and liquid. 
  2. Cool slightly:
    Remove from heat and let cool just a few minutes—enough that it’s no longer scalding hot but still liquid. 
  3. Add essential oils:
    Stir in your essential oil blend. Don’t add them too early or the heat will evaporate their goodness. 
  4. Pour into tins or jars:
    Carefully pour into a small glass jar or metal balm tin. Let cool completely before putting the lid on. 
  5. Label & store:
    Store in a cool place away from sunlight. Balm will keep for up to 6 months. 

How to Use Your Herbal Chest Rub

  • For chest and back: Rub a small amount onto chest, upper back, and soles of the feet during cold or flu season. 
  • For steam relief: Add a pea-sized amount to a bowl of steaming water, cover your head with a towel, and inhale. 
  • For headaches: Dab a touch on temples and neck (use caution and avoid eyes). 

Mum Tips

  • Patch test first if you’re unsure about sensitivities. 
  • Keep a tiny jar in your handbag during winter for on-the-go sniffles. 
  • For a nighttime version, add a few drops of Roman chamomile or lavender for extra sleep support. 


Leave a Reply

Your email address will not be published. Required fields are marked *

RSS More Articles

  • Cross Stitch Ice Cream and Frozen Treats
  • 15 Charity Sewing Projects That Let You Sew Something Useful For A Good Cause
  • Sunflower Ribbon Embroidery Tutorials and Kits to Brighten Your Hoop
  • Decorating Mistakes That Make Your Living Room Feel Cluttered
  • Remembering Jill Smokler, Founder Of Scary Mommy
  • In the Garden Layer Cake – A Bloom-Filled Fabric Collection for Spring Sewing
  • How To Do Kitchener Stitch: A Beginner-Friendly Guide To Grafting Knitting Seamlessly
  • Pattern Review: Georgie Granny Square Bucket Hat Crochet Pattern
  • 12 Handmade Patriotic 4th of July Card Ideas
  • Shark Week Learning for Kids

Copyright © 2026 · CraftGossip | Start Here | Contact Us | Link to Us | Your Editors | Privacy and affiliate policy