• Home
  • Suggest A Craft
  • DIY Newsletter

Bath and Body

Soap Making, Oils and Recipes

  • About CraftGossip
  • Our Network
    • Bath & Body Crafts
    • Candle Making Ideas
    • Crochet Ideas
    • Cross Stitch
    • Edible Crafts
    • Felting Patterns
    • Glass Art
    • Home & Garden Ideas
    • Indie Crafts
    • Jewelry Making
    • Kids Crafts
    • Knitting Patterns
    • Lesson Plans
    • Needlework
    • Party Ideas
    • Polymer Clay
    • Quilting Ideas
    • Recycled Crafts
    • Scrapbooking
    • Sewing Patterns
    • Card Making
    • DIY Weddings
    • Not Craft Ideas
  • Giveaways
  • Roundups
  • Store
  • Search

DIY Natural “Green” Mouthwash Recipes

June 17, 2011 by Nellie Lee Luhrmann 3 Comments

Mouthwash is a neat little invention. It’s an easy way to feel like your mouth is totally clean and fresh smelling in a matter of seconds…all easily achieved without your toothbrush. So it’s no wonder that mouthwash is so popular. But really ask yourself why would you pour chemicals into your mouth, supporting the production and manufacturing of products that cause pollution, whilst spending money you don’t have to spend when you can make your own mouthwash from items you  may very well  have around the house. Here are a couple of recipes. Enjoy!

Spearmint ( warning contains alcohol – NOT SUITABLE FOR CHILDREN )

Boil 6 ounces of water and 2 ounces of vodka together. Add in 4 teaspoons of liquid glycerin and 1 teaspoon of aloe vera gel. Remove from heat and let cool. When cooled, add 10-15 drops of Spearmint oil and shake the entire mixture together well.

Rosemary Mint

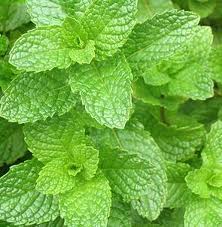
Boil 2.5 cups of water. Add in 1 teaspoon of fresh mint leaves, 1 teaspoon of rosemary leaves, and 1 teaspoon of anise seeds. Let this boil for about 20 minutes. Once it is cooled, you’ve got your mouthwash!

Baking Soda Mouthwash

Mix 2 ounces of Water, 1/4 Teaspoon of baking soda or Sea Salt, 1 drop of Pure Peppermint Oil, and 1 drop of Tea Tree oil. This Homemade mouthwash recipe leaves a great refreshing minty taste in your mouth and helps prevent bad breath.

DIY: All Natural Mouthwash

Herbal Mouthwash Recipes

Brushee Single-Use Toothbrushes: A Lifesaver for Busy Mornings and More!

Related Posts:

  • DIY Money Saving Bathroom And Kitchen Cleaners
  • How To Make Fresh Aloe Vera Under Eye Gel
«
»

Comments

  1. Shay says

    June 18, 2011 at 11:47 am

    News flash? Everything has chemicals in it. Please finda more accurate way to describe a compound with natural ingredients. Even pure water has hydrogen and oxygen.

  2. Nellie Lee Luhrmann says

    June 18, 2011 at 5:23 pm

    Thanks for the “News Flash” Shay When I say chemical free most people who follow & read my blog know I mean “chemical free” as in free from carcinogenic harmful chemicals. I have renamed the title “natural” thanks again Nellie 🙂

  3. Tyson F. Gautreaux says

    July 7, 2011 at 12:36 am

    Keep functioning ,fantastic job!

Have you read?

DIY Summer Nail Designs You’ll Want to Rock All Season Long

As soon as the weather heats up and the days get longer, I swap out my moody nail colors for something a little more fun, flirty, and full of sunshine. Summer is the perfect excuse to get playful with your nail designs — and this year, I’ve been experimenting at home to find a few favorites that are both easy to paint and seriously cute.

I’ve rounded up three of my go-to summer nail looks that you can totally do yourself, even if you’re not a pro. These are the styles I keep coming back to because they’re fun, eye-catching, and honestly — they just make you feel good. Whether you’re heading to the beach, a backyard BBQ, or just want to admire your nails while holding an iced latte, these are the ones to try.

Let’s dive in!

Sunset Ombre Nails

This is hands down one of the most satisfying nail designs you can do yourself. The colors melt into each other like a beach sunset, and the end result looks way more advanced than it really is.

You’ll Need:

  • A base coat

  • Three polishes (I use pink, orange, and yellow)

  • A makeup sponge

  • Top coat

  • Nail polish remover for cleanup

How to Do It:

  1. Start with a clear base coat to protect your nails.

  2. Paint horizontal stripes of your 3 colors directly onto the makeup sponge.

  3. Dab the sponge gently onto your nail, reapplying polish to the sponge as needed. Tap until the gradient blends.

  4. Clean up any excess polish around your cuticle.

  5. Apply a top coat to smooth the colors and add shine.

This design is one of those that looks good even when it’s a little messy — the top coat really pulls it all together.


 Tropical Palm Silhouettes

If you want vacation vibes without actually going anywhere, this one’s for you. The pastel base paired with simple black palm trees gives it that dreamy island feel.

You’ll Need:

  • A light pastel base polish or soft gradient background

  • Black nail art pen or thin brush with black polish

  • Top coat

How to Do It:

  1. Paint your nails with a soft pastel or ombre base.

  2. Once dry, draw a thin curved line for the palm trunk.

  3. From the top of the trunk, add small lines that fan out to mimic palm fronds.

  4. Let everything dry completely before adding a glossy top coat.

Even if your palm trees aren’t perfect, they still look awesome. Think of it like nail doodling — just more tropical.


 Watermelon French Tips

This design is so cheerful, I smile every time I see it. It’s a fruity twist on a French manicure and it’s perfect for pool parties or picnics.

You’ll Need:

  • Pink polish for the base

  • Green and white for the rind

  • Black polish for the seeds (use a dotting tool or toothpick)

  • Base and top coat

How to Do It:

  1. Paint your entire nail a soft pink.

  2. Add a green curved tip at the top edge (like a French tip).

  3. Under the green, paint a very thin white stripe.

  4. Add small black dots on the pink section to create seeds.

  5. Seal it all in with your favorite top coat.

This one is such a crowd-pleaser and looks adorable on both long and short nails.

Whether you try one of these or rotate through all three this summer, I hope these nail designs add a little color and creativity to your routine. They’re simple enough to do at home but still look like you spent time (and money!) at the salon.

Let me know which one you’re trying first — and don’t forget to tag us if you share your summer nail look!

Leave a Reply

Your email address will not be published. Required fields are marked *

RSS More Articles

  • Book Review: Merry Stitchmas
  • Etsy Spotlight – Sew the Dress of Your Dreams with This Romantic Puff Sleeve Pattern
  • Vacation Pocket Mini Album Project
  • DIY Soda Bottle Cloches – A Clever Way to Shield Your Seedlings
  • Crochet Pattern Review: Aura Pullover
  • Scrappy Pineapple Block – Quilt Pattern
  • Learning about the Moon for Kids
  • Free Crochet Pattern – Battenberg Blanket
  • Book Review – Big Thrift Energy
  • How to Make a Summer Drinks Shaker Card

Categories

Bath And Body bath bombs Body Scrubs & Lotions Colds & Flu CraftGossip Exclusive Craft Inspirations detox DIY Recipes And Tutorials DIY Tutorials and Patterns Essential Oils And Aromatherapy facials Hair Care Makeup & Beauty Melt & Pour Soap Packaging Product Reviews Soapmaking Recipes, Products And Tutorials Style Me Quick Supply Store Specials & Discounts Wellbeing

Copyright © 2025 · CraftGossip | Start Here | Contact Us | Link to Us | Your Editors | Privacy and affiliate policy