• Home
  • Suggest A Craft
  • DIY Newsletter

Bath and Body

Soap Making, Oils and Recipes

  • About CraftGossip
  • Our Network
    • Bath & Body Crafts
    • Candle Making Ideas
    • Crochet Ideas
    • Cross Stitch
    • Edible Crafts
    • Felting Patterns
    • Glass Art
    • Home & Garden Ideas
    • Indie Crafts
    • Jewelry Making
    • Kids Crafts
    • Knitting Patterns
    • Lesson Plans
    • Needlework
    • Party Ideas
    • Polymer Clay
    • Quilting Ideas
    • Recycled Crafts
    • Scrapbooking
    • Sewing Patterns
    • Card Making
    • DIY Weddings
    • Not Craft Ideas
  • Giveaways
  • Roundups
  • Store
  • Search

DIY Crystal Mouthwash Decanter

July 12, 2013 by Shellie Wilson 7 Comments

crystal-mouthwash-decanter-diy-bathroom-organization

I know what you’re thinking – Putting mouthwash and not whiskey into a crystal whiskey decanter is pure wrong. Trust me I already thought of adding wine to this and stashing it next to the bath – except I don’t have a bath tub. We do have a baby bath for the kids in the bottom of the shower. After many different attempts and positions, I have finally come to the conclusion it is NOT suitable for me to bath in a baby bath.

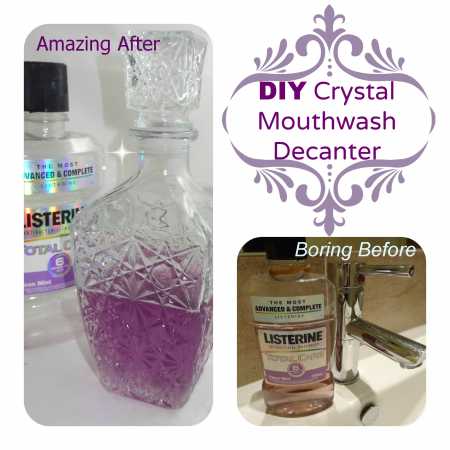
Keeping the bathroom clean and tidy is a nightmare especially if it is a shared bathroom. I saw this idea all over the internet and thought I would add it to my To Do list.

Ideally, for this DIY project I would suggest using a Vintage Decanter but vintage is not always affordable or available.

So fake it.

This decanter was on sale at the discount shop for $5.00 (Actually it wasn’t on sale and it was $7.99 but don’t tell my husband that).

It does the job perfectly.

Now I have a very beautiful reason to leave one more thing out on the countertop each morning.


Related Posts:

  • DIY Stylish Eucalyptus Leaf Shower Steamer Ring
  • DIY Aphrodisiac Rose Petal Shower Steamers
«
»

Comments

  1. Nikki @ Tikkido says

    July 12, 2013 at 9:30 pm

    What a lovely idea! I absolutely adore crystal decanders–have several, even–but have actually never used them.

  2. Erin says

    July 13, 2013 at 6:32 am

    i have done this for years i got one from the local value village for about 3$ when we moved into our 1st home!

  3. Dianne M. says

    July 13, 2013 at 7:25 am

    There should be a caveat here about using actual lead crystal vs glass decanters. Lead crystal decanters can leach lead into liquids stored in them, so be sure to use the cheaper glass (the kind you find for $5 at a discount shop should be fine).

  4. Marlene @ Jade and Fern says

    July 13, 2013 at 9:20 am

    Oh I do this with mouthwash too! So much nicer than having plastic bottles standing around.

  5. ciarra says

    July 14, 2013 at 2:26 pm

    Your child-proof lid would also be gone.

  6. Shellie Wilson says

    July 14, 2013 at 6:39 pm

    Ciarra, I guess if your kids get into everything then that is a valid point to consider. MY children detest mint so I have no chance of them even going near it.

  7. Shellie Wilson says

    July 14, 2013 at 6:39 pm

    I know I can’t help but wanting to pop everything into crystal now LOL.

Have you read?

DIY Summer Nail Designs You’ll Want to Rock All Season Long

As soon as the weather heats up and the days get longer, I swap out my moody nail colors for something a little more fun, flirty, and full of sunshine. Summer is the perfect excuse to get playful with your nail designs — and this year, I’ve been experimenting at home to find a few favorites that are both easy to paint and seriously cute.

I’ve rounded up three of my go-to summer nail looks that you can totally do yourself, even if you’re not a pro. These are the styles I keep coming back to because they’re fun, eye-catching, and honestly — they just make you feel good. Whether you’re heading to the beach, a backyard BBQ, or just want to admire your nails while holding an iced latte, these are the ones to try.

Let’s dive in!

Sunset Ombre Nails

This is hands down one of the most satisfying nail designs you can do yourself. The colors melt into each other like a beach sunset, and the end result looks way more advanced than it really is.

You’ll Need:

  • A base coat

  • Three polishes (I use pink, orange, and yellow)

  • A makeup sponge

  • Top coat

  • Nail polish remover for cleanup

How to Do It:

  1. Start with a clear base coat to protect your nails.

  2. Paint horizontal stripes of your 3 colors directly onto the makeup sponge.

  3. Dab the sponge gently onto your nail, reapplying polish to the sponge as needed. Tap until the gradient blends.

  4. Clean up any excess polish around your cuticle.

  5. Apply a top coat to smooth the colors and add shine.

This design is one of those that looks good even when it’s a little messy — the top coat really pulls it all together.


 Tropical Palm Silhouettes

If you want vacation vibes without actually going anywhere, this one’s for you. The pastel base paired with simple black palm trees gives it that dreamy island feel.

You’ll Need:

  • A light pastel base polish or soft gradient background

  • Black nail art pen or thin brush with black polish

  • Top coat

How to Do It:

  1. Paint your nails with a soft pastel or ombre base.

  2. Once dry, draw a thin curved line for the palm trunk.

  3. From the top of the trunk, add small lines that fan out to mimic palm fronds.

  4. Let everything dry completely before adding a glossy top coat.

Even if your palm trees aren’t perfect, they still look awesome. Think of it like nail doodling — just more tropical.


 Watermelon French Tips

This design is so cheerful, I smile every time I see it. It’s a fruity twist on a French manicure and it’s perfect for pool parties or picnics.

You’ll Need:

  • Pink polish for the base

  • Green and white for the rind

  • Black polish for the seeds (use a dotting tool or toothpick)

  • Base and top coat

How to Do It:

  1. Paint your entire nail a soft pink.

  2. Add a green curved tip at the top edge (like a French tip).

  3. Under the green, paint a very thin white stripe.

  4. Add small black dots on the pink section to create seeds.

  5. Seal it all in with your favorite top coat.

This one is such a crowd-pleaser and looks adorable on both long and short nails.

Whether you try one of these or rotate through all three this summer, I hope these nail designs add a little color and creativity to your routine. They’re simple enough to do at home but still look like you spent time (and money!) at the salon.

Let me know which one you’re trying first — and don’t forget to tag us if you share your summer nail look!

Leave a Reply

Your email address will not be published. Required fields are marked *

RSS More Articles

  • DMC Woodland Moth Tapestry Pattern – Earthy, Elegant, and Surprisingly Relaxing
  • Learn about Comoros for Kids
  • Classic Blocks Revisited Quilt Pattern Book
  • Discover Your Unique Style with Second Chances by Macy Eleni
  • Luxe Leopard Headband- Free Crochet Pattern
  • 20+ FREE Beach Vacation Digital Stamps
  • DIY Bandana Bib Tutorial: A Stylish and Practical Accessory for Little Ones
  • Designer Spotlight: Flossy Fox Shop
  • 6 FREE Summer Printable Journaling Cards
  • Bucket Hat Knitting Patterns

Categories

Bath And Body bath bombs Body Scrubs & Lotions Colds & Flu CraftGossip Exclusive Craft Inspirations detox DIY Recipes And Tutorials DIY Tutorials and Patterns Essential Oils And Aromatherapy facials Hair Care Makeup & Beauty Melt & Pour Soap Packaging Product Reviews Soapmaking Recipes, Products And Tutorials Style Me Quick Supply Store Specials & Discounts Wellbeing

Copyright © 2025 · CraftGossip | Start Here | Contact Us | Link to Us | Your Editors | Privacy and affiliate policy