• Home
  • Suggest A Craft
  • DIY Newsletter

Bath and Body

Soap Making, Oils and Recipes

  • About CraftGossip
  • Our Network
    • Bath & Body Crafts
    • Candle Making Ideas
    • Crochet Ideas
    • Cross Stitch
    • Edible Crafts
    • Felting Patterns
    • Glass Art
    • Home & Garden Ideas
    • Indie Crafts
    • Jewelry Making
    • Kids Crafts
    • Knitting Patterns
    • Lesson Plans
    • Needlework
    • Party Ideas
    • Polymer Clay
    • Quilting Ideas
    • Recycled Crafts
    • Scrapbooking
    • Sewing Patterns
    • Card Making
    • DIY Weddings
    • Not Craft Ideas
  • Giveaways
  • Roundups
  • Store
  • Search

DIY Eczema Lotion Bars

August 17, 2013 by Shellie Wilson 1 Comment

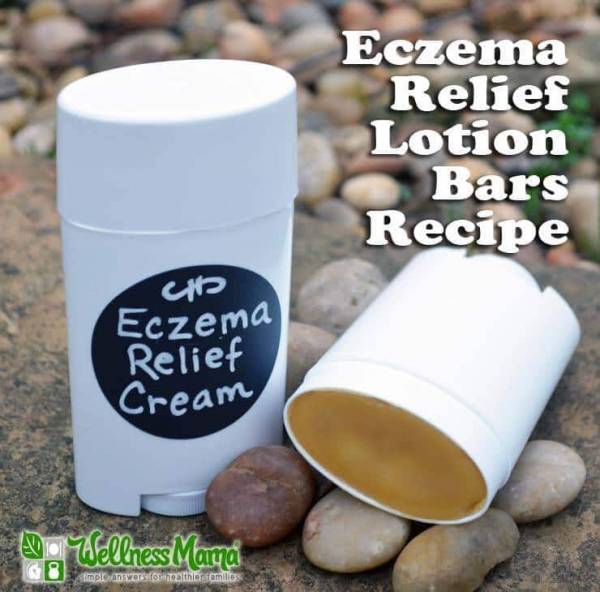
These Eczema Lotion Bars are simple to make and really soothing to the skin. Check out her testimony on just how good these lotions bars are. Do you have a tried and tested natural Eczema treatment?  Share it with us here.

Thinking about adding Essential Oils?

Essential oils are the most important part of aromatherapy treatments. They provide a large percentage of the healing properties, and should be chosen carefully. Any of the following oils, or a combination of them, can be used.

Carrot seed – improves sensitive skin, tones skin and stimulates elasticity
Chamomile – improves damaged skin, heals, calms inflammation
Geranium – improves oily skin
Jasmine – cleanses and soothes skin, improves all skin types
Juniper – cools, refreshes, soothes
Lavender – soothes skin, improves all skin types
Lemon – evens skin tone, restores natural pH levels, improves oily skin
Orange – soothes skin, emollient, improves dry and sensitive skin
Peppermint – cools and refreshes, improves oily skin
Rose – improves dry or chapped skin, restores natural pH levels
Sandalwood – improves dry skin, disinfects
Tea Tree – heals, cleanses, disinfects, germicidal
Ylang-ylang – lifts spirits, sweet scent, improves dry skin


Here is our recipe for making Aromatherapy Body Lotion

Combine two ounces (60 ml) of the chosen oil(s) with ½ ounce (15 ml) vegetable glycerin, and 1 ½ tablespoons (22 ml) emulsifying wax in a large, heat-safe measuring cup.
Fill a saucepan with 1-2 inches of water, and place the measuring cup inside the pan. Heat on medium until the ingredients are thoroughly melted, and then remove from heat. Alternatively, you can use a double boiler instead of the measuring cup and pan.
Pour eight ounces (237 ml) of your chosen water into the blender.
Turn to low speed, and slowly but steadily, pour the melted oil into the water. Once all the oil is blended, you should be left with a thick cream.
Add 30-50 drops of your chosen essential oil(s) to the aromatherapy body lotion.
Blend on low, just long enough to thoroughly incorporate the oil, but be careful not to over-blend.
Pour into storage tubs or jars while the lotion is still warm. Place the lids on the jars after it has completely cooled and thickened, and label with the contents and date.


Related Posts:

  • 10 DIY Bath And Body Recipes For When You Have A Headache
  • Why You Can't Claim Your Product Cures Eczema,…
«
»

Comments

  1. Christine says

    August 25, 2013 at 4:27 pm

    Wonderful

Have you read?

DIY Summer Nail Designs You’ll Want to Rock All Season Long

As soon as the weather heats up and the days get longer, I swap out my moody nail colors for something a little more fun, flirty, and full of sunshine. Summer is the perfect excuse to get playful with your nail designs — and this year, I’ve been experimenting at home to find a few favorites that are both easy to paint and seriously cute.

I’ve rounded up three of my go-to summer nail looks that you can totally do yourself, even if you’re not a pro. These are the styles I keep coming back to because they’re fun, eye-catching, and honestly — they just make you feel good. Whether you’re heading to the beach, a backyard BBQ, or just want to admire your nails while holding an iced latte, these are the ones to try.

Let’s dive in!

Sunset Ombre Nails

This is hands down one of the most satisfying nail designs you can do yourself. The colors melt into each other like a beach sunset, and the end result looks way more advanced than it really is.

You’ll Need:

  • A base coat

  • Three polishes (I use pink, orange, and yellow)

  • A makeup sponge

  • Top coat

  • Nail polish remover for cleanup

How to Do It:

  1. Start with a clear base coat to protect your nails.

  2. Paint horizontal stripes of your 3 colors directly onto the makeup sponge.

  3. Dab the sponge gently onto your nail, reapplying polish to the sponge as needed. Tap until the gradient blends.

  4. Clean up any excess polish around your cuticle.

  5. Apply a top coat to smooth the colors and add shine.

This design is one of those that looks good even when it’s a little messy — the top coat really pulls it all together.


 Tropical Palm Silhouettes

If you want vacation vibes without actually going anywhere, this one’s for you. The pastel base paired with simple black palm trees gives it that dreamy island feel.

You’ll Need:

  • A light pastel base polish or soft gradient background

  • Black nail art pen or thin brush with black polish

  • Top coat

How to Do It:

  1. Paint your nails with a soft pastel or ombre base.

  2. Once dry, draw a thin curved line for the palm trunk.

  3. From the top of the trunk, add small lines that fan out to mimic palm fronds.

  4. Let everything dry completely before adding a glossy top coat.

Even if your palm trees aren’t perfect, they still look awesome. Think of it like nail doodling — just more tropical.


 Watermelon French Tips

This design is so cheerful, I smile every time I see it. It’s a fruity twist on a French manicure and it’s perfect for pool parties or picnics.

You’ll Need:

  • Pink polish for the base

  • Green and white for the rind

  • Black polish for the seeds (use a dotting tool or toothpick)

  • Base and top coat

How to Do It:

  1. Paint your entire nail a soft pink.

  2. Add a green curved tip at the top edge (like a French tip).

  3. Under the green, paint a very thin white stripe.

  4. Add small black dots on the pink section to create seeds.

  5. Seal it all in with your favorite top coat.

This one is such a crowd-pleaser and looks adorable on both long and short nails.

Whether you try one of these or rotate through all three this summer, I hope these nail designs add a little color and creativity to your routine. They’re simple enough to do at home but still look like you spent time (and money!) at the salon.

Let me know which one you’re trying first — and don’t forget to tag us if you share your summer nail look!

Leave a Reply

Your email address will not be published. Required fields are marked *

RSS More Articles

  • Designer Spotlight: Needle Lot Designs
  • Coffee Cozy Knitting Patterns
  • Book Review: Sew Green: Reimagine, Reuse, Recreate
  • 12 Travel and Vacation Scrapbook Layout Ideas
  • Better World Dress – Free Crochet Pattern
  • Building with Nature: My Experience with Natural Birdhouses
  • King Sophie’s World – Where Photography Meets Embroidery in a Stunning Art Evolution
  • Keto Just Got Crunchy: 17 Salty Snacks That Won’t Blow Your Macros
  • Handmade with a Past: Tuesday’s Top Recycled Etsy Find
  • Child’s Granny Cardigan – Crochet Pattern

Categories

Bath And Body bath bombs Body Scrubs & Lotions Colds & Flu CraftGossip Exclusive Craft Inspirations detox DIY Recipes And Tutorials DIY Tutorials and Patterns Essential Oils And Aromatherapy facials Hair Care Makeup & Beauty Melt & Pour Soap Packaging Product Reviews Soapmaking Recipes, Products And Tutorials Style Me Quick Supply Store Specials & Discounts Wellbeing

Copyright © 2025 · CraftGossip | Start Here | Contact Us | Link to Us | Your Editors | Privacy and affiliate policy