• Home
  • Suggest A Craft
  • DIY Newsletter

Bath and Body

Soap Making, Oils and Recipes

  • About CraftGossip
  • Our Network
    • Bath & Body Crafts
    • Candle Making Ideas
    • Crochet Ideas
    • Cross Stitch
    • Edible Crafts
    • Felting Patterns
    • Glass Art
    • Home & Garden Ideas
    • Indie Crafts
    • Jewelry Making
    • Kids Crafts
    • Knitting Patterns
    • Lesson Plans
    • Needlework
    • Party Ideas
    • Polymer Clay
    • Quilting Ideas
    • Recycled Crafts
    • Scrapbooking
    • Sewing Patterns
    • Card Making
    • DIY Weddings
    • Not Craft Ideas
  • Giveaways
  • Roundups
  • Store
  • Search

DIY Garbage Disposal Cleaner

January 7, 2015 by Shellie Wilson 1 Comment

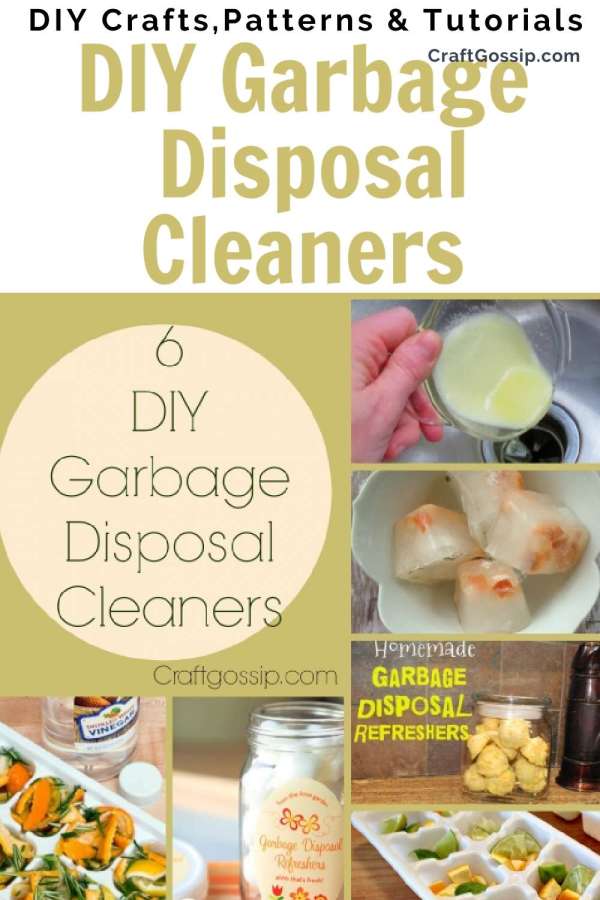
You would think your kitchen sink is relatively clean, considering the number of times per day you use it but how often are you running soap or detergent down it?

Check out our step-by-step DIY recipes to get your sink and disposal clean.

I don’t have a garbage disposal in my house, any food scraps seem to make it into my mouth as if I am the mummy cleaning machine. Sometimes I don’t make my self lunch knowing that I will just eat the kid’s leftovers. Shameful I know. I did have a garbage disposal unit in one of my properties and apart from always losing a spoon down there, it did stink 90% of the time.

These  Garbage disposal cleaners all have lemons and citrus properties and they are pretty much the same thing just created in different ways. Personally, I like the refresher blocks that don’t need to be stored in my freezer as freezer space is limited here in our house as  I am storing food in there for a zombie attack.  Here are all the different variations of DIY Garbage Disposal cleaners, all with the same outcome – Clean garbage disposal.  Grab a DIY recipe and make your own cleaners.

Here is our own recipe too

Ingredients
2 cups baking soda
1 cup salt
½ cup water
? cup unscented liquid castile soap
30 drops Lemon oil or the peel of 2-3 lemons

Mix all the ingredients together to form a clumpy paste, pop into a mold or ice cube tray and turn out and allow to dry. If you have ever made bath bombs it is the same concept.


Citrus Ice Blocks

Citrus Blocks With Vinegar

Rosemary Cleaning Blocks

Lemon & Bicarb liquid

Salt soap and Essential Oils

Blocks of soap and Bicarb


Related Posts:

  • DIY Money Saving Bathroom And Kitchen Cleaners
  • DIY sensitive skin Laundry detergent
«
»

Comments

  1. stmargaretscarpetcleaners.org.uk says

    January 26, 2015 at 8:13 am

    That’s it! This new tricks works oh-so-perfectly for me. With my recent obsession with freshly squeezed orange juice, I always have orange rind around the house. So after I juice my oranges, I keep some rind in a Ziploc bag and store them in the fridge. That way, whenever the garbage disposal is getting a wee-bit stinky, I drop a couple rinds and return back to an odor-free kitchen.

    Best regards!
    St Margaret’s Carpet Cleaners Ltd.

Have you read?

DIY Summer Nail Designs You’ll Want to Rock All Season Long

As soon as the weather heats up and the days get longer, I swap out my moody nail colors for something a little more fun, flirty, and full of sunshine. Summer is the perfect excuse to get playful with your nail designs — and this year, I’ve been experimenting at home to find a few favorites that are both easy to paint and seriously cute.

I’ve rounded up three of my go-to summer nail looks that you can totally do yourself, even if you’re not a pro. These are the styles I keep coming back to because they’re fun, eye-catching, and honestly — they just make you feel good. Whether you’re heading to the beach, a backyard BBQ, or just want to admire your nails while holding an iced latte, these are the ones to try.

Let’s dive in!

Sunset Ombre Nails

This is hands down one of the most satisfying nail designs you can do yourself. The colors melt into each other like a beach sunset, and the end result looks way more advanced than it really is.

You’ll Need:

  • A base coat

  • Three polishes (I use pink, orange, and yellow)

  • A makeup sponge

  • Top coat

  • Nail polish remover for cleanup

How to Do It:

  1. Start with a clear base coat to protect your nails.

  2. Paint horizontal stripes of your 3 colors directly onto the makeup sponge.

  3. Dab the sponge gently onto your nail, reapplying polish to the sponge as needed. Tap until the gradient blends.

  4. Clean up any excess polish around your cuticle.

  5. Apply a top coat to smooth the colors and add shine.

This design is one of those that looks good even when it’s a little messy — the top coat really pulls it all together.


 Tropical Palm Silhouettes

If you want vacation vibes without actually going anywhere, this one’s for you. The pastel base paired with simple black palm trees gives it that dreamy island feel.

You’ll Need:

  • A light pastel base polish or soft gradient background

  • Black nail art pen or thin brush with black polish

  • Top coat

How to Do It:

  1. Paint your nails with a soft pastel or ombre base.

  2. Once dry, draw a thin curved line for the palm trunk.

  3. From the top of the trunk, add small lines that fan out to mimic palm fronds.

  4. Let everything dry completely before adding a glossy top coat.

Even if your palm trees aren’t perfect, they still look awesome. Think of it like nail doodling — just more tropical.


 Watermelon French Tips

This design is so cheerful, I smile every time I see it. It’s a fruity twist on a French manicure and it’s perfect for pool parties or picnics.

You’ll Need:

  • Pink polish for the base

  • Green and white for the rind

  • Black polish for the seeds (use a dotting tool or toothpick)

  • Base and top coat

How to Do It:

  1. Paint your entire nail a soft pink.

  2. Add a green curved tip at the top edge (like a French tip).

  3. Under the green, paint a very thin white stripe.

  4. Add small black dots on the pink section to create seeds.

  5. Seal it all in with your favorite top coat.

This one is such a crowd-pleaser and looks adorable on both long and short nails.

Whether you try one of these or rotate through all three this summer, I hope these nail designs add a little color and creativity to your routine. They’re simple enough to do at home but still look like you spent time (and money!) at the salon.

Let me know which one you’re trying first — and don’t forget to tag us if you share your summer nail look!

Leave a Reply

Your email address will not be published. Required fields are marked *

RSS More Articles

  • DMC Woodland Moth Tapestry Pattern – Earthy, Elegant, and Surprisingly Relaxing
  • Learn about Comoros for Kids
  • Classic Blocks Revisited Quilt Pattern Book
  • Discover Your Unique Style with Second Chances by Macy Eleni
  • Luxe Leopard Headband- Free Crochet Pattern
  • 20+ FREE Beach Vacation Digital Stamps
  • DIY Bandana Bib Tutorial: A Stylish and Practical Accessory for Little Ones
  • Designer Spotlight: Flossy Fox Shop
  • 6 FREE Summer Printable Journaling Cards
  • Bucket Hat Knitting Patterns

Categories

Bath And Body bath bombs Body Scrubs & Lotions Colds & Flu CraftGossip Exclusive Craft Inspirations detox DIY Recipes And Tutorials DIY Tutorials and Patterns Essential Oils And Aromatherapy facials Hair Care Makeup & Beauty Melt & Pour Soap Packaging Product Reviews Soapmaking Recipes, Products And Tutorials Style Me Quick Supply Store Specials & Discounts Wellbeing

Copyright © 2025 · CraftGossip | Start Here | Contact Us | Link to Us | Your Editors | Privacy and affiliate policy