• Home
  • Suggest A Craft
  • DIY Newsletter

Bath and Body

Soap Making, Oils and Recipes

  • About CraftGossip
  • Our Network
    • Bath & Body Crafts
    • Candle Making Ideas
    • Crochet Ideas
    • Cross Stitch
    • Edible Crafts
    • Felting Patterns
    • Glass Art
    • Home & Garden Ideas
    • Indie Crafts
    • Jewelry Making
    • Kids Crafts
    • Knitting Patterns
    • Lesson Plans
    • Needlework
    • Party Ideas
    • Polymer Clay
    • Quilting Ideas
    • Recycled Crafts
    • Scrapbooking
    • Sewing Patterns
    • Card Making
    • DIY Weddings
    • Not Craft Ideas
  • Giveaways
  • Roundups
  • Store
  • Search

Haircare Don’ts

November 6, 2009 by Jessica Dougherty 1 Comment

Mystical Aromas posted 10 Definite Don’ts Of Great Haircare from Michael Barrows’ website Great Hairstyles. Mystical Aromas offers Moonmist Shampoo, Conditioner & Herbal Shampoo.
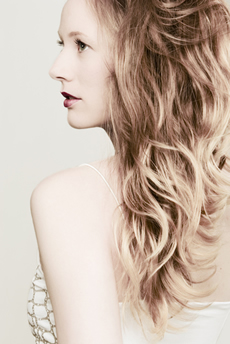
Haircare Don’ts:
1. Avoid unprofessional and over-the-counter hair care products whenever you can. Many of these only offer false hopes and promises.
2. Do not cut your own bangs. Leave all of your cutting needs, even bangs, to your hair care professional.
3. Avoid excessive sun, chlorine and salt water during the summer months. Excessive exposure can cause severe damage that is irreversible even if you use the best hair care products.
4. Do not use clarifying hair care products on your tresses more than one time per week. They can strip hair of moisture and essential oils.
5. Do not visit a hair care salon without first getting a referral from someone you can trust. Choosing a salon based on an advertisement or sale alone is very risky.
6. Do not purchase hair color that comes in a box.
7. Never stick with an outdated look because you are afraid of looking different. Styles change for a reason. Ask your hair care professional to bring you into this decade with a new style.
8. Do not straighten your hair with a clothes iron. C’mon, this was so over in the 70s. We have straightening irons that won’t damage your hair for this now. Look in the hair care isle.
9. Don’t brush your hair or put too much tension on it while it is still wet. This will cause breakage. Also, do not wear tight styles such as corn rows for extended periods of time unless you have ethnic hair.
10. Never use sun-lightening products such as lemon juice or over-the-counter hair care products designed to lighten hair with the sun unless you want a very short hair cut in the future.

Looking for a herbal shampoo? Check out our DIY recipe for making your own natural herbal shampoo with basic supplies. We also have a herbal conditioner recipe too.  Home-made shampoos and conditioners are a great way to strip back to basics and control what herbs you are putting into your hair shampoo and products. Store-bought herbal shampoo contains lots of numbers and ingredients that as the consumer we know very little about.

Related Posts:

  • How Much CBD Oil Should I Take For Insomnia?
  • DIY Easy Dog Shampoo
«
»

Comments

  1. MARINALOBO says

    November 6, 2009 at 8:32 pm

    Hi, I came across this unique way to find out the exact condition of my hair and also got the rite remedy to make my hair healthy and shiny. Try the link below and take the hair damage meter test to know the exact condition of your hair and get the best remedy given by an expert
    http://www.dove.in/damage_meter_start.php?um=5
    also try this blog it has great tips for hair care http://www.dovehaircare.blogspot.com/

Have you read?

DIY Summer Nail Designs You’ll Want to Rock All Season Long

As soon as the weather heats up and the days get longer, I swap out my moody nail colors for something a little more fun, flirty, and full of sunshine. Summer is the perfect excuse to get playful with your nail designs — and this year, I’ve been experimenting at home to find a few favorites that are both easy to paint and seriously cute.

I’ve rounded up three of my go-to summer nail looks that you can totally do yourself, even if you’re not a pro. These are the styles I keep coming back to because they’re fun, eye-catching, and honestly — they just make you feel good. Whether you’re heading to the beach, a backyard BBQ, or just want to admire your nails while holding an iced latte, these are the ones to try.

Let’s dive in!

Sunset Ombre Nails

This is hands down one of the most satisfying nail designs you can do yourself. The colors melt into each other like a beach sunset, and the end result looks way more advanced than it really is.

You’ll Need:

  • A base coat

  • Three polishes (I use pink, orange, and yellow)

  • A makeup sponge

  • Top coat

  • Nail polish remover for cleanup

How to Do It:

  1. Start with a clear base coat to protect your nails.

  2. Paint horizontal stripes of your 3 colors directly onto the makeup sponge.

  3. Dab the sponge gently onto your nail, reapplying polish to the sponge as needed. Tap until the gradient blends.

  4. Clean up any excess polish around your cuticle.

  5. Apply a top coat to smooth the colors and add shine.

This design is one of those that looks good even when it’s a little messy — the top coat really pulls it all together.


 Tropical Palm Silhouettes

If you want vacation vibes without actually going anywhere, this one’s for you. The pastel base paired with simple black palm trees gives it that dreamy island feel.

You’ll Need:

  • A light pastel base polish or soft gradient background

  • Black nail art pen or thin brush with black polish

  • Top coat

How to Do It:

  1. Paint your nails with a soft pastel or ombre base.

  2. Once dry, draw a thin curved line for the palm trunk.

  3. From the top of the trunk, add small lines that fan out to mimic palm fronds.

  4. Let everything dry completely before adding a glossy top coat.

Even if your palm trees aren’t perfect, they still look awesome. Think of it like nail doodling — just more tropical.


 Watermelon French Tips

This design is so cheerful, I smile every time I see it. It’s a fruity twist on a French manicure and it’s perfect for pool parties or picnics.

You’ll Need:

  • Pink polish for the base

  • Green and white for the rind

  • Black polish for the seeds (use a dotting tool or toothpick)

  • Base and top coat

How to Do It:

  1. Paint your entire nail a soft pink.

  2. Add a green curved tip at the top edge (like a French tip).

  3. Under the green, paint a very thin white stripe.

  4. Add small black dots on the pink section to create seeds.

  5. Seal it all in with your favorite top coat.

This one is such a crowd-pleaser and looks adorable on both long and short nails.

Whether you try one of these or rotate through all three this summer, I hope these nail designs add a little color and creativity to your routine. They’re simple enough to do at home but still look like you spent time (and money!) at the salon.

Let me know which one you’re trying first — and don’t forget to tag us if you share your summer nail look!

Leave a Reply

Your email address will not be published. Required fields are marked *

RSS More Articles

  • Book Review: Merry Stitchmas
  • Etsy Spotlight – Sew the Dress of Your Dreams with This Romantic Puff Sleeve Pattern
  • Vacation Pocket Mini Album Project
  • DIY Soda Bottle Cloches – A Clever Way to Shield Your Seedlings
  • Crochet Pattern Review: Aura Pullover
  • Scrappy Pineapple Block – Quilt Pattern
  • Learning about the Moon for Kids
  • Free Crochet Pattern – Battenberg Blanket
  • Book Review – Big Thrift Energy
  • How to Make a Summer Drinks Shaker Card

Categories

Bath And Body bath bombs Body Scrubs & Lotions Colds & Flu CraftGossip Exclusive Craft Inspirations detox DIY Recipes And Tutorials DIY Tutorials and Patterns Essential Oils And Aromatherapy facials Hair Care Makeup & Beauty Melt & Pour Soap Packaging Product Reviews Soapmaking Recipes, Products And Tutorials Style Me Quick Supply Store Specials & Discounts Wellbeing

Copyright © 2025 · CraftGossip | Start Here | Contact Us | Link to Us | Your Editors | Privacy and affiliate policy