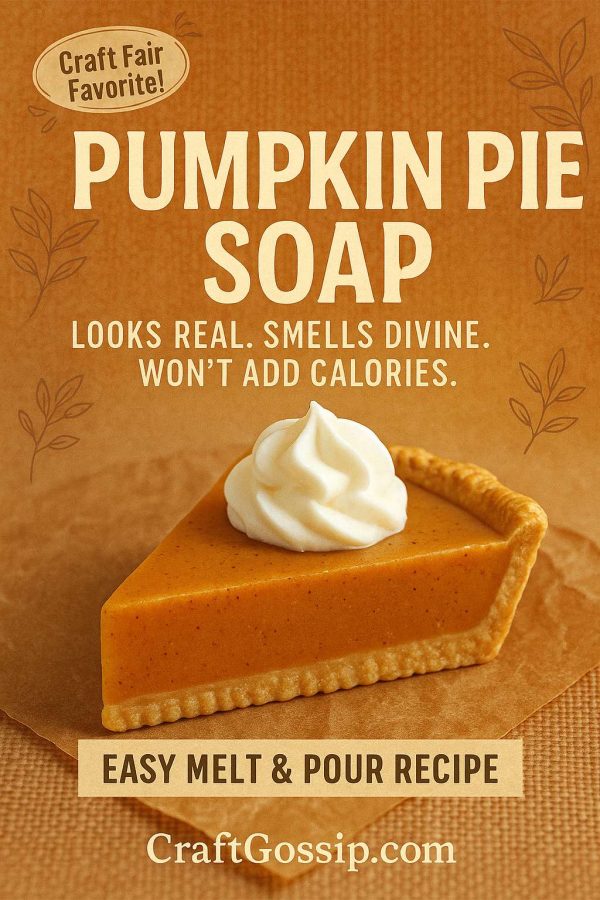
There’s nothing quite like that warm, spicy scent of pumpkin pie drifting through the house on a crisp autumn afternoon. But what if you could bottle up that feeling—minus the calories—and take it into your bath? That’s exactly what this DIY Pumpkin Pie Soap does.
It’s cute enough to fool your guests into thinking it’s an actual mini pie, smells heavenly, and makes the perfect little gift for teachers, friends, or yourself (because let’s be honest, we all deserve a slice).
This version has a realistic pie crust look, a spiced orange “filling,” and a whipped soap topping that mimics whipped cream. But don’t worry—it’s still beginner-friendly and uses an easy melt and pour method.
What You’ll Love About This Project
- Fall-scented and festive
- No lye, no mess, no fancy equipment
- Looks like a mini pumpkin pie slice
- Great for gifting or adding to your seasonal market stall
- Naturally moisturizing and gentle on skin
Supplies You’ll Need
- 1 lb shea butter or goat milk melt and pour soap base
- Pumpkin pie fragrance oil
- 1 tsp pumpkin pie spice or cinnamon (optional for speckles)
- Orange and brown mica powder or soap-safe colorants
- 1 tsp vitamin E or jojoba oil (optional for skin-softening)
- Rubbing alcohol in a spray bottle
- Pumpkin silicone mold or actual pie dish, then cut the soap pie into slices whilst soft.
- Optional: pipette or piping bag for topping
- Optional: white soap base for whipped topping
How to Make Pumpkin Pie Soap
1. Create the “Pie Crust” Layer
Melt about ¼ of your soap base and tint it with a touch of brown mica for that golden crust look. Pour a thin layer into the bottom of your round or slice-shaped mold. Let it set just until firm.
2. Mix the Pumpkin “Filling”
Melt the remaining soap base, then stir in:
- 1–2 tsp of pumpkin pie fragrance oil
- A pinch of real pumpkin pie spice or cinnamon
- Orange mica or soap colorant
- Optional: 1 tsp vitamin E oil for added skin benefits
Stir gently to avoid bubbles.
3. Pour the Main Layer
Once your crust layer has set, spritz it with rubbing alcohol and carefully pour the pumpkin soap mixture over it. The rubbing alcohol helps the layers bond.
Let this layer set for 1–2 hours at room temp.
4. Add the Whipped “Cream” Topping (Optional)
Melt a bit of white soap base and whip it with a mini whisk as it cools slightly to create soft peaks. Pipe or dollop it onto your cooled pumpkin layer for a realistic whipped cream effect.
Spritz with alcohol again to remove bubbles and set everything in place.
Optional Embellishments
- Dust with cinnamon or gold mica before it hardens for a sprinkle-on-top look
- Add a soap embed “crust” edge using a crimped mold or hand-shaping
- Use mini pie tins lined with plastic wrap for cute gifting or slice molds
- Wrap in kraft paper and tie with twine for rustic fall presentation
Storage & Shelf Life
Store your finished soaps in a cool, dry place. You can shrink wrap them or tuck them into cellophane bags to keep moisture out. If gifting, add a cheeky tag like “Smells like Grandma’s Kitchen (But Don’t Eat It!)”
Bundle them in a kraft basket with a gingham cloth and boom—instant fall spa gift.
This realistic pumpkin pie soap looks adorable and smells even better. Whether you’re stocking your fall craft fair table, making teacher gifts, or just want to bring a little seasonal joy into your shower, this project is as satisfying as the first slice of pie after Thanksgiving dinner.


Leave a Reply