• Home
  • Suggest A DIY
  • DIY Newsletter

Bath and Body

Soap Making, Oils and Recipes

  • About CraftGossip
  • Our Network
    • Bath & Body Crafts
    • Candle Making Ideas
    • Crochet Ideas
    • Cross Stitch
    • Edible Crafts
    • Felting Patterns
    • Glass Art
    • Home & Garden Ideas
    • Indie Crafts
    • Jewelry Making
    • Kids Crafts
    • Knitting Patterns
    • Lesson Plans
    • Needlework
    • Party Ideas
    • Polymer Clay
    • Quilting Ideas
    • Recycled Crafts
    • Scrapbooking
    • Sewing Patterns
    • Card Making
    • DIY Weddings
    • Not Craft Ideas
  • Giveaways
  • Roundups
  • Store
  • Search

How To Preserve Homemade Skincare Recipes Safely – A Handy Guide For DIY Beauty Makers

May 28, 2026 by Shellie Wilson Leave a Comment

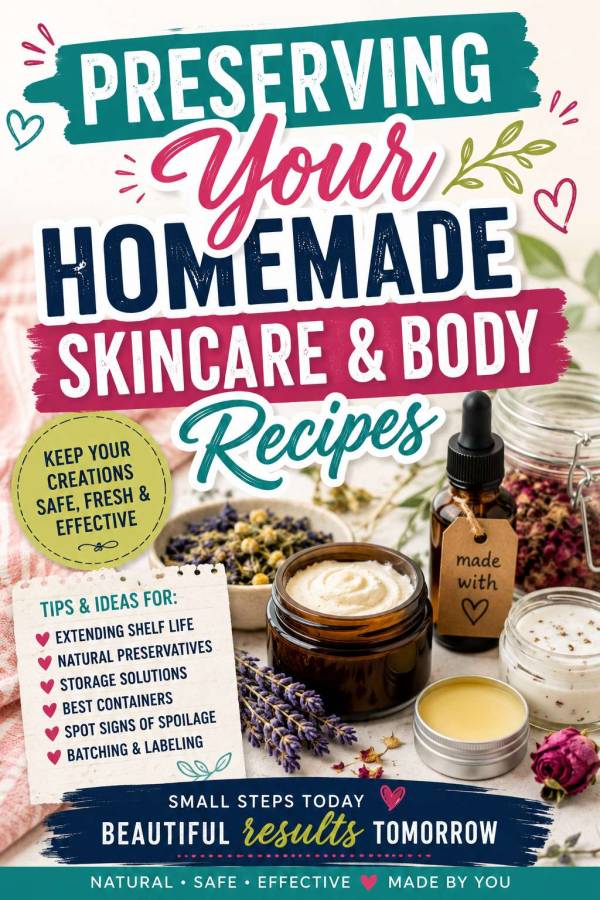
If you love making your own scrubs, creams, oils, balms, and fresh face masks, then this little guide from CraftBits is one of those practical pages worth bookmarking before your kitchen turns into a mini apothecary. And let’s be honest, once you start making homemade bath and body recipes, it is very easy to end up with half a dozen jars in the fridge and absolutely no idea which one is still safe to use.

The CraftBits guide, Preserving Your Recipes, walks through the basics of keeping homemade creams, scrubs, oils, balms, herbal infusions, and fresh masks stored properly. It covers simple but important reminders like using sterile bottles and utensils, keeping containers airtight, and understanding that different recipes have very different shelf lives. The original project explains that fresh food-based masks may only last a day or two, while treatment oils and dry scrubs can last much longer when stored correctly.

What I like about this guide is that it answers one of the most common beginner questions in DIY skincare: how long will this actually keep? It is not the glamorous part of homemade beauty making, but it is the part that matters. Nobody wants to lovingly make a rose scrub or creamy lotion only to discover it has gone strange in the back of the fridge. We have all had that one mystery jar moment, haven’t we?

This is especially useful if you are making recipes from the CraftBits Bath and Body Crafts section, because homemade skincare is not the same as store-bought skincare. Anything with water, milk, fruit, herbs, or fresh ingredients needs more care than a simple oil blend or dry salt scrub. The article also makes a good companion read for anyone trying DIY recipes like homemade body scrubs, lip balms, bath soaks, or fresh masks.

For anyone who wants to make small batches for personal use, this guide is a great starting point. For anyone planning to sell handmade bath and body products, it is also a reminder that proper cosmetic preservation is not something to guess at. You will want to research cosmetic-grade preservatives, safe formulation percentages, and local labelling rules before offering anything for sale.

A few handy supplies that make this whole process easier are small amber glass jars, pump bottles, cosmetic spatulas, waterproof labels, and date-made stickers. Amazon is a good place to grab basic storage containers and printable labels, especially if you are batch-making several recipes at once.

This is one of those practical DIY beauty resources that may not look fancy at first glance, but it can save you a lot of wasted ingredients, questionable jars, and late-night Googling.

Best for: DIY skincare beginners, handmade bath product makers, small-batch beauty crafters, and anyone who keeps homemade scrubs in the fridge and forgets when they made them.

Related Posts:

  • DIY Summer Nail Designs You’ll Want to Rock All Season Long
  • The New Menopause: Your Ultimate Guide to Navigating…
«
»

Have you read?

DIY Herbal Vapor Rub Balm – A Natural Vicks-Style Decongestant for Cold and Flu Relief

When someone in the house starts sniffling, you just know it’s going to make the rounds. That’s when I reach for this homemade herbal vapor rub—our family’s go-to chest balm for easing congestion, coughs, and that heavy-headed sick feeling.

Made with gentle yet powerful essential oils, this balm works just like the classic Vicks rub (but without the synthetic stuff). It’s safe, effective, and smells like a eucalyptus grove with a hint of grandma’s medicine chest—in the best possible way!

Whether you’re treating a toddler’s sniffles or trying to head off a man cold, this DIY vapor rub will be your winter wellness MVP.

Why You’ll Love This Natural Decongestant Balm

  • No petroleum or nasties – A clean, green homemade Vicks alternative 
  • Gentle enough for kids – With optional adjustments for littlies 
  • Nourishing balm texture – Melts into skin without being greasy 
  • Essential oils – Provide cooling, clearing, and comforting support 
  • Customizable – Make it stronger for adults or extra-gentle for babies 

Ingredients

Base:

  • 1/4 cup coconut oil (or olive oil for a softer balm) 
  • 2 tbsp shea butter or mango butter 
  • 2 tbsp beeswax pellets 

Essential Oil Blend (for adults):

  • 10 drops eucalyptus essential oil 
  • 8 drops peppermint essential oil 
  • 6 drops rosemary essential oil 
  • 4 drops tea tree essential oil 
  • 4 drops lavender essential oil 

Optional for kids under 5:
Replace eucalyptus and peppermint with fir needle and cedarwood atlas, and halve the total essential oil amount.

How to Make Your Own Vapor Rub

  1. Melt the base:
    In a double boiler (or a bowl over simmering water), gently melt the coconut oil, shea butter, and beeswax together. Stir until smooth and liquid. 
  2. Cool slightly:
    Remove from heat and let cool just a few minutes—enough that it’s no longer scalding hot but still liquid. 
  3. Add essential oils:
    Stir in your essential oil blend. Don’t add them too early or the heat will evaporate their goodness. 
  4. Pour into tins or jars:
    Carefully pour into a small glass jar or metal balm tin. Let cool completely before putting the lid on. 
  5. Label & store:
    Store in a cool place away from sunlight. Balm will keep for up to 6 months. 

How to Use Your Herbal Chest Rub

  • For chest and back: Rub a small amount onto chest, upper back, and soles of the feet during cold or flu season. 
  • For steam relief: Add a pea-sized amount to a bowl of steaming water, cover your head with a towel, and inhale. 
  • For headaches: Dab a touch on temples and neck (use caution and avoid eyes). 

Mum Tips

  • Patch test first if you’re unsure about sensitivities. 
  • Keep a tiny jar in your handbag during winter for on-the-go sniffles. 
  • For a nighttime version, add a few drops of Roman chamomile or lavender for extra sleep support. 


Leave a Reply

Your email address will not be published. Required fields are marked *

RSS More Articles

  • Pocket Emotional Support Chickens
  • All About Cross Stitch Project Bags
  • Get into the Details with the Sashiko Tee Knitting Pattern
  • How To Add In-Seam Pockets To A Dress, Skirt Or Pants
  • Wet Felted Hot Water Bottle Cover Tutorial Review – Gillian Gladrag
  • 12 Masculine Scrapbook Layout Ideas for Boys and Teens
  • Claire Easy Granny Stitch Cardigan Crochet Pattern Review
  • Easy Patriotic Mason Jar Cricut Craft for Summer Decorating
  • How To Sew A Tube Top: 10 Easy Tube Top Sewing Tutorials
  • Tropical Bird Crafts and Learning Activities

Copyright © 2026 · CraftGossip | Start Here | Contact Us | Link to Us | Your Editors | Privacy and affiliate policy