• Home
  • Suggest A Craft
  • DIY Newsletter

Bath and Body

Soap Making, Oils and Recipes

  • About CraftGossip
  • Our Network
    • Bath & Body Crafts
    • Candle Making Ideas
    • Crochet Ideas
    • Cross Stitch
    • Edible Crafts
    • Felting Patterns
    • Glass Art
    • Home & Garden Ideas
    • Indie Crafts
    • Jewelry Making
    • Kids Crafts
    • Knitting Patterns
    • Lesson Plans
    • Needlework
    • Party Ideas
    • Polymer Clay
    • Quilting Ideas
    • Recycled Crafts
    • Scrapbooking
    • Sewing Patterns
    • Card Making
    • DIY Weddings
    • Not Craft Ideas
  • Giveaways
  • Roundups
  • Store
  • Search

How To Tape Your Boobs Up So They Don’t Fall Down

September 29, 2015 by Shellie Wilson 3 Comments

How-to-tape-your-Breasts-for-a-backless-outfit

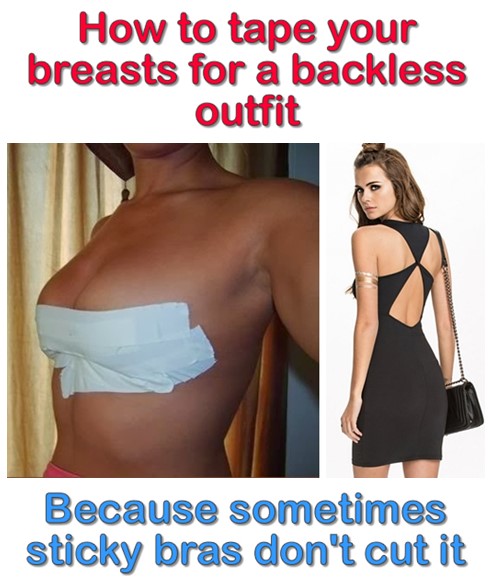
I know you are probably thinking this is the craziest idea ever. But if you have ever purchased a strapless, backless, twisted strap, crazy strap dress then you know how hard finding, not just a bra but a “reliable” bra is. Recently I thought I would purchase a single strap dress. It seemed practical at the time. I have been working out and my shoulders were looking better than normal so thought heck why not.

Then began the Bra shopping and the dread. In the end, I bought adhesive chicken fillets (off amazon) to try and lift my breasts back to a natural position (they were sitting on my knees). The chicken fillets were expensive and a one time use, which meant I couldn’t really test them until the big event. I really wished I had seen this tutorial because when I told my mother I should just duct tape them in she laughed at me.

Duct tape is great but you could use skin-coloured medical tape. At least when your top falls down it won’t look totally ridiculous.  And from personal experience I suggest popping a little cotton pad on your nipples unless you would like them ripped off when you remove the tape at the end of the night.  Good luck and may the breast lift gods be with you.

How to create your own Adhesive bra.


Related Posts:

  • DIY Summer Nail Designs You’ll Want to Rock All Season Long
  • The New Menopause: Your Ultimate Guide to Navigating…
«
»

Comments

  1. jill says

    September 29, 2015 at 3:35 pm

    O M Goodness i couldn’t stop giggling … really, you had me on my knees…. so wonder how many women will try this method .. giggle

    thanks for the smiles and giggles on this dreary damp Michigan fall afternoon …

  2. itzaclareday says

    September 30, 2015 at 5:47 pm

    Jill, you are not over 60 are you deary? I’m running to the store for tape right now! LOL

  3. Tabitha says

    September 17, 2016 at 11:55 pm

    Oh but you’re not going to show us how to do it? That’s the whole reason I clicked on this article

Have you read?

Pumpkin Pie Melt and Pour Soap: A Cozy Fall Soap Recipe That Smells Good Enough to Eat

When the leaves start crunching underfoot and pumpkin spice fills every café, it’s time to cozy up with an easy fall DIY that smells just like grandma’s dessert table—without the calories. This Pumpkin Pie Melt and Pour Soap is one of my absolute favorite seasonal recipes. It’s warm, comforting, and gives off those straight-out-of-the-oven vibes every time you lather up.

Perfect for fall craft fairs, Thanksgiving hostess gifts, or a festive bathroom refresh, this handmade soap smells divine, looks adorable, and takes less than an hour to whip up.

Why You’ll Love This Pumpkin Soap Recipe

  • Smells like real pumpkin pie (think cinnamon, nutmeg, vanilla—yes please!) 
  • Made with skin-friendly melt and pour base—no lye required 
  • Easy enough for beginners or weekend makers 
  • Customizable with layers, swirls, or “whipped cream” topping 

Ingredients & Supplies

Yields: 4–6 small bars depending on your mold size

  • 1 lb goat milk melt and pour soap base (or shea butter base) 
  • 1 tsp pumpkin pie spice (yes, the real baking blend!) 
  • ½ tsp ground cinnamon (optional for visual specks) 
  • 1 tsp vitamin E oil or sweet almond oil 
  • 1–2 tsp brown mica or orange soap-safe colorant 
  • 1 tsp vanilla extract (optional for scent depth—make sure it’s oil-based or use a fragrance oil blend) 
  • Pumpkin pie fragrance oil (skin-safe, approx. 1–2 tsp per pound of soap base) 
  • Rubbing alcohol in a spray bottle 
  • Silicone soap mold (round, square, or pie-slice shaped) 
  • Microwave-safe jug or double boiler 
  • Stirring sticks or silicone spatula 

Step-by-Step Instructions

1. Chop and Melt the Soap Base

Cut your melt and pour soap base into small cubes and place in a microwave-safe jug. Microwave in 30-second bursts, stirring between each round until fully melted. (Do not let it boil!)

2. Add Scent and Spice

Once melted, stir in your fragrance oil, pumpkin pie spice, and optional vanilla extract. Add a pinch of cinnamon if you like the flecked look.

Tip: Spray your mold lightly with rubbing alcohol before pouring to prevent bubbles.

3. Colour and Pour

Add your mica powder or orange colorant, a little at a time, until you reach your ideal pumpkiny hue. Stir well, then carefully pour the mixture into your soap molds.

Immediately spritz the tops with rubbing alcohol to remove surface bubbles.

4. Let It Set

Leave the soap undisturbed at room temperature for 2–4 hours until fully hardened. Pop the bars out of the mold once they’re firm to the touch.

Optional: If you’re feeling fancy, melt a small amount of white soap base and pipe a “whipped cream” swirl on top using a piping bag and star tip.

Tips & Variations

  • Make it two-tone: Pour half your batch in orange, then top with a creamy vanilla layer for a pie-slice look. 
  • Add oatmeal: Toss in 1 tsp of ground oats for a gentle exfoliant and rustic charm. 
  • Use pie molds: Silicone molds shaped like pie slices or tart pans give these a dessert-style finish. 
  • Gift-ready idea: Wrap in wax paper, tie with twine, and add a “Pumpkin Pie Soap” tag for instant fall gifts. 

How to Store Homemade Soap

Keep your finished soaps in an airtight container or shrink wrap them if you’re gifting. Melt and pour soap can sweat in humid climates, so cool, dry storage is best.

This DIY pumpkin spice soap recipe is everything you want from a cozy fall project—easy, fragrant, and irresistibly cute. Whether you’re new to soap making or a seasoned maker prepping for a market table, these little bars will have everyone asking, “Where’s the whipped cream?”


Leave a Reply

Your email address will not be published. Required fields are marked *

RSS More Articles

Categories

Bath And Body bath bombs Body Scrubs & Lotions Colds & Flu CraftGossip Exclusive Craft Inspirations detox DIY Recipes And Tutorials DIY Tutorials and Patterns Essential Oils And Aromatherapy facials Hair Care Makeup & Beauty Melt & Pour Soap Packaging Product Reviews Soapmaking Recipes, Products And Tutorials Style Me Quick Supply Store Specials & Discounts Wellbeing

Copyright © 2025 · CraftGossip | Start Here | Contact Us | Link to Us | Your Editors | Privacy and affiliate policy