• Home
  • Suggest A Craft
  • DIY Newsletter

Bath and Body

Soap Making, Oils and Recipes

  • About CraftGossip
  • Our Network
    • Bath & Body Crafts
    • Candle Making Ideas
    • Crochet Ideas
    • Cross Stitch
    • Edible Crafts
    • Felting Patterns
    • Glass Art
    • Home & Garden Ideas
    • Indie Crafts
    • Jewelry Making
    • Kids Crafts
    • Knitting Patterns
    • Lesson Plans
    • Needlework
    • Party Ideas
    • Polymer Clay
    • Quilting Ideas
    • Recycled Crafts
    • Scrapbooking
    • Sewing Patterns
    • Card Making
    • DIY Weddings
    • Not Craft Ideas
  • Giveaways
  • Roundups
  • Store
  • Search

Stencil 101 Review and Giveaway

April 27, 2009 by jessica neaves 17 Comments

9780811864725_norm1Stencil 101: Make Your Mark with 25 Reusable Stencils and Step-by-Step Instructions
Author: Ed Roth
Publisher: Chronicle Books

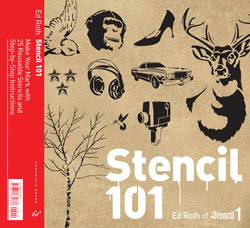
Chronicle Books has published another wonderful craft title with Stencil 101.  The author, Ed Roth, is a graphic designer based in Brooklyn, where he founded the graffiti art-inspired Stencil1 design company.  Stencil 101 is a collection of Roth’s favorite designs, from urban to delicate and feminine.

The book contains a brief history of stenciling, tips on how to stencil, and suggestions for materials based on the project you would like to make.  Projects inside include a wall, t-shirts, a dresser, a lamp shade, sneakers, a pillowcase, and a window.  The wall project is one of the best for beginners, as it is a large, flat surface, but all of the projects are easy enough even for those new to the craft.  My favorite project is a cake, using cocoa powder or sugar to “paint” with!  I also like the greeting card project, easily created using store bought blank cards.  Both are great ways to personalize a birthday, holiday, or any other celebration!  The pillowcase project is also a fun one, which can be a fun weekend DIY project to liven up your bedroom décor.

The twenty-five reusable stencils come in a wide range of designs, from swallows to an owl with a moon to a poodle and even a sumo wrestler!  After using the stencils, simply clean them off and store them in the handy pocket at the end of the book, ready for your next project.  The stencils are mostly large and would be best for bigger canvas projects, but there are a handful of smaller stencils.

The best tip in this book is to remember there are no rules to stenciling.  “If you have something to say, say it with stencils.”

And to help you say what you have on your mind, I’ll be giving a copy away to one lucky reader!  To enter, just leave a comment on this post by May 3rd and let me know which of the projects mentioned in the review you will be doing first.  The winner will be notified by email.

[Note:  Don’t worry if your comment doesn’t appear at first.  Some have to be approved due to a tricky spam filter and I am going through and approving them.]

Related Posts:

  • Cold Process Soap Recipe: Dehydrated Orange Slice Elegance
  • How To Add Rose Petals and Other Botanicals to Bath Bombs
«
»

Comments

  1. Cre8Tiva/Rebecca E. Parsons says

    April 27, 2009 at 7:24 pm

    i teach stenciling…so i do mostly furniture projects and some mixed media artworks with stencils…rebecca

  2. Corvus says

    April 27, 2009 at 7:25 pm

    Stenciling cake sounds quite interesting. I’d like to give that one a try.

  3. whimsywren says

    April 27, 2009 at 9:10 pm

    I love this book! I looked thru it at Blick Art-it is definitely on my wishlist. I think I would first try the notecard project-before tackling the bigger projects.

  4. Cindy Ericsson says

    April 28, 2009 at 3:49 am

    We have several birthdays coming up during the next few months, so I’m thinking the cake-stenciling project would be the first to master.

  5. Shelley says

    April 28, 2009 at 5:53 am

    I bought this book for my BFF for Christmas and wanted a copy for myself after looking through it! My first project, probably stenciled tees for the kiddos. 🙂

  6. Jenny Brandon says

    April 28, 2009 at 6:31 am

    Sounds like a great book. I’ve got some old windows that I’m dying to experiment with etching on. I’ve been having problems finding stencils that are both reusable and large enough to look good on the glass panes. I promise that if I win this book, I’ll use the stencils on the window and send you a picture! Thanks!

  7. dorothy l says

    April 28, 2009 at 6:50 am

    greeting card project would be the first one I would try

  8. Nova says

    April 28, 2009 at 7:09 am

    I’m really interested in doing a t-shirt.

  9. Megan Hicks says

    April 28, 2009 at 7:10 am

    I would try the pillow case project first. I am moving to a new apartment and I want nice new shiny stuff but can’t afford it so I’m trying to make my old stuff new again.

  10. Carmen says

    April 28, 2009 at 7:52 am

    I think I would do the card project first but on a scrapbook page instead. The birds sound brilliant – my partner keeps birds so do lots of pages relating to them. Second would be between the cake and the wall. I could do the cake first so I could scoff it while I was stencilling the wall maybe 😉 Lots of decorating projects being planned in our house at the mo – it’s in dire need of rejuvenation.

  11. Kriss says

    April 28, 2009 at 9:11 am

    I really like birds. I would probably stencil the swallows on my bedroom walls.

  12. Jan says

    April 28, 2009 at 10:19 am

    My first instinct is to try cards, but I’d love to try stenciling on some sneakers! How cool!

  13. Denny says

    April 28, 2009 at 1:00 pm

    I like the pillowcase idea, but I was immediately thinking art quilt, especially with the deer and the bird.

  14. Wanda says

    April 28, 2009 at 4:35 pm

    I would definitely do a wall project. What a great prize! Please enter my name in your draw.

  15. Erin says

    April 29, 2009 at 3:48 pm

    I’ve been wanting to make a pair of bold, graphic pillow cases, and it looks like this book could be the perfect resource to get me moving on that project.

  16. glamamo says

    April 30, 2009 at 1:12 pm

    This book sounds awesome. I love to be creative but I can not draw to save my life. I would love to use the stencils to decorate some of my sneakers.

  17. Shai says

    April 30, 2009 at 2:45 pm

    I think that I would start out with a cake

Have you read?

How To Use Bath Salts in the Shower Without a Bath – Relaxation, Skincare, and a DIY Salt Recipe

When we bought our house years ago, it was a display home—polished to perfection with five sparkling bathrooms and not a single bathtub in sight. I know, right? Five bathrooms, zero tubs. Not even a kiddie-sized one. It was beautiful, sure, but not exactly designed for long soaks and bubble baths.

At first, I thought I’d miss those slow, lavender-scented bath nights. But as a mum of two teenagers and a house full of fast-paced mornings, I’ve actually come to love our no-tub lifestyle. And I’ve found a way to get all the bath salt goodness—without ever needing to run a bath.

We’ve been using bath salts in the shower for years now. From sore muscles to head-clearing aromatherapy, it’s become part of my little self-care routine that fits into even the busiest of days (yes, even the “we’re-out-of-milk-and-someone-left-a-wet-towel-on-the-dog” kind of days).

So whether you’re in a rental with a standing shower or just want an easy way to pamper yourself without soaking, this is for you.

Why Use Bath Salts in the Shower?

Bath salts aren’t just for luxurious tubs and candles. They’re full of minerals (like magnesium from Epsom salt) that help:

  • Relax tense muscles

  • Soothe dry, itchy, or irritated skin

  • Exfoliate and detoxify

  • Ease congestion (especially with eucalyptus or peppermint)

  • Boost your mood through scent and steam

And you can still enjoy all of those perks—with nothing but a shower, a spoonful of salts, and a few minutes to yourself.

5 Easy Ways to Use Bath Salts in the Shower

  1. Body Scrub Method
    Mix your salts with a bit of oil (olive or sweet almond works) and gently rub onto damp skin in small circles. It buffs away dry patches and leaves your skin baby-soft. I usually do this on my arms and legs while the water heats up.
  2. Steam Sachet Method
    Scoop a few tablespoons of bath salts into a small cotton or muslin bag and hang it from the showerhead. As the hot water runs, the steam releases the essential oils—hello instant spa moment.
  3. Shower Floor Sprinkle
    Sprinkle a small amount of salts directly onto the shower floor—away from the main water stream—and let the heat from the shower activate the scent. It’s subtle but so effective.
  4. Shower Salt Bombs
    Mix your bath salts with a little coconut oil and press into silicone molds. Let them harden and pop one into the corner of the shower for a fizzy burst of eucalyptus or lavender.
  5. Washcloth Massage
    Pour salts onto a damp washcloth and gently rub it over your body. I love this one in the winter when I’m feeling dry and cranky—it’s simple but feels luxurious.

What Type of Bath Salts Work Best in the Shower?

Over the years, I’ve found that some salts work better than others for different methods:

  • Epsom Salt – Great for muscle relief and general everyday use.

  • Himalayan Salt – Gorgeous pink color and rich in minerals.

  • Dead Sea Salt – Ideal if you have skin issues like eczema or keratosis pilaris.

  • Fine Sea Salt – Melts quicker and works better for sachets or sprinkle methods.

If you’re scrubbing, go for a coarser grind. For steaming or scent, use fine salt so it dissolves easily.

My Go-To DIY Eucalyptus & Mint Shower Salt Recipe

This is the exact recipe I’ve kept in a jar next to our ensuite shower for years. It clears my sinuses, wakes me up, and makes me feel like I’ve actually done something nice for myself before 9am.

Ingredients:

  • 1 cup Epsom salts

  • ½ cup fine Himalayan pink salt

  • 1 tbsp baking soda

  • 1 tbsp carrier oil (jojoba, sweet almond, or grapeseed)

  • 15 drops eucalyptus essential oil

  • 10 drops peppermint oil

  • 5 drops lemon essential oil (optional but so fresh)

To make:

  1. In a mixing bowl, combine salts and baking soda.

  2. In a small dish, mix your oils together.

  3. Slowly pour the oil blend into your salts, stirring to distribute evenly.

  4. Store in a glass jar with a tight lid.

  5. To use: Scoop 1–2 tablespoons into a washcloth or sachet, or sprinkle onto your shower floor.

This mix is also lovely poured into small jars with a tag—great for last-minute handmade gifts.

Tips from a No-Tub Household

  • Avoid using too much oil—it’ll make your shower floor slippery.

  • Keep your salt mix in a dry, cool spot to avoid clumping.

  • Use citrus oils only in the morning unless you’re a night owl—they’re energizing!

  • If gifting, print a sweet little label and tie it with twine. Done.

So yep, no bathtub over here. Not in the master, not in the guest bathroom, not even in the laundry room. And honestly? I don’t miss it. Using bath salts in the shower has become a part of my week that I genuinely look forward to—especially in our busy, multi-bathroom house that somehow still runs out of hot water too fast.

If you’re stuck without a tub, don’t worry—you’re not missing out. With a few tweaks, some simple ingredients, and a little steam, your shower can feel just as relaxing as a long soak.

Go make yourself a jar, and let me know if it becomes your new thing too.


Leave a Reply

Your email address will not be published. Required fields are marked *

RSS More Articles

  • 12 Handmade Card Ideas Featuring Fish and Sea Creatures
  • How to Make a Hooded Cape for Kids and Adults – Easy Sewing Tutorial
  • Designer Spotlight: Murder Puffin
  • DMC Striker Embroidery Pattern – A Free Football-Themed Stitch for Sports Fans
  • Knits to Make for Your Labubu
  • Little Birds: 26 Handmade Projects to Sew, Stitch, Quilt and Love
  • Stenciling Like a Pro? You NEED These Must-Have Supplies
  • 15 Highland Cows You Can Crochet
  • Etsy Spotlight – The Thomas Boys Shirt Sewing Pattern
  • 7 FREE Back to School SVG Cut Files

Categories

Bath And Body bath bombs Body Scrubs & Lotions Colds & Flu CraftGossip Exclusive Craft Inspirations detox DIY Recipes And Tutorials DIY Tutorials and Patterns Essential Oils And Aromatherapy facials Hair Care Makeup & Beauty Melt & Pour Soap Packaging Product Reviews Soapmaking Recipes, Products And Tutorials Style Me Quick Supply Store Specials & Discounts Wellbeing

Copyright © 2025 · CraftGossip | Start Here | Contact Us | Link to Us | Your Editors | Privacy and affiliate policy