• Home
  • Suggest A Craft
  • DIY Newsletter

Bath and Body

Soap Making, Oils and Recipes

  • About CraftGossip
  • Our Network
    • Bath & Body Crafts
    • Candle Making Ideas
    • Crochet Ideas
    • Cross Stitch
    • Edible Crafts
    • Felting Patterns
    • Glass Art
    • Home & Garden Ideas
    • Indie Crafts
    • Jewelry Making
    • Kids Crafts
    • Knitting Patterns
    • Lesson Plans
    • Needlework
    • Party Ideas
    • Polymer Clay
    • Quilting Ideas
    • Recycled Crafts
    • Scrapbooking
    • Sewing Patterns
    • Card Making
    • DIY Weddings
    • Not Craft Ideas
  • Giveaways
  • Roundups
  • Store
  • Search

Tips for Organzing Your Soap Making Workshop

September 24, 2015 by Shellie Wilson Leave a Comment

soap-organization-work-shop-selling-craft

If you are a soap maker than the chances of your soap making area looking as good as these ones are pretty slim.

Soap making is at times messy (yes despite all that soap) and you need quite a lot of different products on hand. Not to mention safety gear, drying racks and labels. Being able to manage all that equipment is the key to organizing and keeping your craft area organized.

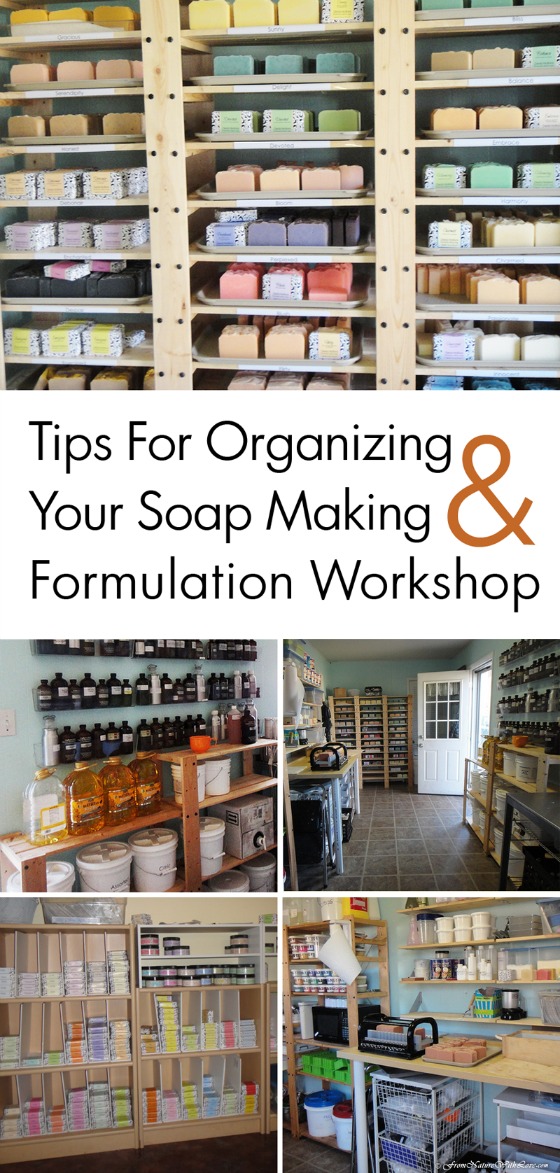
One of the most valuable lessons I have learned when organizing my own craft area is to decide on a system, it may be by color, craft type, medium or even seasonal. You can not have too many categories. You could have seasonal and then within the cupboard box, you then have Christmas, Easter etc. etc.  This soap making room has been customized to use the most common items in the room, for example, the oil shelf is the perfect size for the oil. Everything has a place and everything is more likely to be put back into its place.

Labelling everything is important too. Don’t think you will remember, trust me a month from now you will buy stock cause you can’t find it, cause you didn’t label it.

This article will help you to get organized in your workshop.

Looking for more soap organization? Check out these Soap drying racks.

Looking for more ideas on Organizing your home? Check out our Facebook Group Organize My House & Get My Sh*t Together and read some of the most popular Organization articles we have written below.

5 Tips for Organizing your Craft Room with Style

Cricut Tutorial: Fabric organizing baskets for your craft room

Tips for Craft Room Organization – Scrap Booking

Declutter and reorganize your sewing space – Sewing

Organize your sewing room – free printable checklist

10 Best Craft Room Organization Ideas Worth Stealing

20 Office & Craft Room Organization Tips – Scrap Booking

Related Posts:

  • Efficiency and Expertise: Crafting 200 Bath Bombs in…
  • Why You Can't Claim Your Product Cures Eczema,…
«
»

Have you read?

DIY Summer Nail Designs You’ll Want to Rock All Season Long

As soon as the weather heats up and the days get longer, I swap out my moody nail colors for something a little more fun, flirty, and full of sunshine. Summer is the perfect excuse to get playful with your nail designs — and this year, I’ve been experimenting at home to find a few favorites that are both easy to paint and seriously cute.

I’ve rounded up three of my go-to summer nail looks that you can totally do yourself, even if you’re not a pro. These are the styles I keep coming back to because they’re fun, eye-catching, and honestly — they just make you feel good. Whether you’re heading to the beach, a backyard BBQ, or just want to admire your nails while holding an iced latte, these are the ones to try.

Let’s dive in!

Sunset Ombre Nails

This is hands down one of the most satisfying nail designs you can do yourself. The colors melt into each other like a beach sunset, and the end result looks way more advanced than it really is.

You’ll Need:

  • A base coat

  • Three polishes (I use pink, orange, and yellow)

  • A makeup sponge

  • Top coat

  • Nail polish remover for cleanup

How to Do It:

  1. Start with a clear base coat to protect your nails.

  2. Paint horizontal stripes of your 3 colors directly onto the makeup sponge.

  3. Dab the sponge gently onto your nail, reapplying polish to the sponge as needed. Tap until the gradient blends.

  4. Clean up any excess polish around your cuticle.

  5. Apply a top coat to smooth the colors and add shine.

This design is one of those that looks good even when it’s a little messy — the top coat really pulls it all together.


 Tropical Palm Silhouettes

If you want vacation vibes without actually going anywhere, this one’s for you. The pastel base paired with simple black palm trees gives it that dreamy island feel.

You’ll Need:

  • A light pastel base polish or soft gradient background

  • Black nail art pen or thin brush with black polish

  • Top coat

How to Do It:

  1. Paint your nails with a soft pastel or ombre base.

  2. Once dry, draw a thin curved line for the palm trunk.

  3. From the top of the trunk, add small lines that fan out to mimic palm fronds.

  4. Let everything dry completely before adding a glossy top coat.

Even if your palm trees aren’t perfect, they still look awesome. Think of it like nail doodling — just more tropical.


 Watermelon French Tips

This design is so cheerful, I smile every time I see it. It’s a fruity twist on a French manicure and it’s perfect for pool parties or picnics.

You’ll Need:

  • Pink polish for the base

  • Green and white for the rind

  • Black polish for the seeds (use a dotting tool or toothpick)

  • Base and top coat

How to Do It:

  1. Paint your entire nail a soft pink.

  2. Add a green curved tip at the top edge (like a French tip).

  3. Under the green, paint a very thin white stripe.

  4. Add small black dots on the pink section to create seeds.

  5. Seal it all in with your favorite top coat.

This one is such a crowd-pleaser and looks adorable on both long and short nails.

Whether you try one of these or rotate through all three this summer, I hope these nail designs add a little color and creativity to your routine. They’re simple enough to do at home but still look like you spent time (and money!) at the salon.

Let me know which one you’re trying first — and don’t forget to tag us if you share your summer nail look!

Leave a Reply

Your email address will not be published. Required fields are marked *

RSS More Articles

  • How to Create a Photo Box Card
  • Embellish Your Knit Dishcloth with Flowers
  • 30 Brilliant Uses for Empty Pill Bottles You Probably Haven’t Tried Yet
  • Free Crochet Pattern – Emotional Support Chicken
  • Unisex Pajama Top Free Pattern
  • Back to School Cross Stitch Patterns
  • Wrap Yourself in Brilliance: Crochet Your Own Shawl or Scarf
  • 3 FREE Boho Bugs Coloring Pages and Digital Images
  • Embroidery for Mental Health: How Stitching Reduces Stress
  • Krampus Sweater Knitting Pattern

Categories

Bath And Body bath bombs Body Scrubs & Lotions Colds & Flu CraftGossip Exclusive Craft Inspirations detox DIY Recipes And Tutorials DIY Tutorials and Patterns Essential Oils And Aromatherapy facials Hair Care Makeup & Beauty Melt & Pour Soap Packaging Product Reviews Soapmaking Recipes, Products And Tutorials Style Me Quick Supply Store Specials & Discounts Wellbeing

Copyright © 2025 · CraftGossip | Start Here | Contact Us | Link to Us | Your Editors | Privacy and affiliate policy