• Home
  • Suggest A Craft
  • DIY Newsletter

Bath and Body

Soap Making, Oils and Recipes

  • About CraftGossip
  • Our Network
    • Bath & Body Crafts
    • Candle Making Ideas
    • Crochet Ideas
    • Cross Stitch
    • Edible Crafts
    • Felting Patterns
    • Glass Art
    • Home & Garden Ideas
    • Indie Crafts
    • Jewelry Making
    • Kids Crafts
    • Knitting Patterns
    • Lesson Plans
    • Needlework
    • Party Ideas
    • Polymer Clay
    • Quilting Ideas
    • Recycled Crafts
    • Scrapbooking
    • Sewing Patterns
    • Card Making
    • DIY Weddings
    • Not Craft Ideas
  • Giveaways
  • Roundups
  • Store
  • Search

Video Tutorial – How to make Gum Ball Soap

July 17, 2015 by Shellie Wilson 4 Comments

gum-drop-soap-tutorial

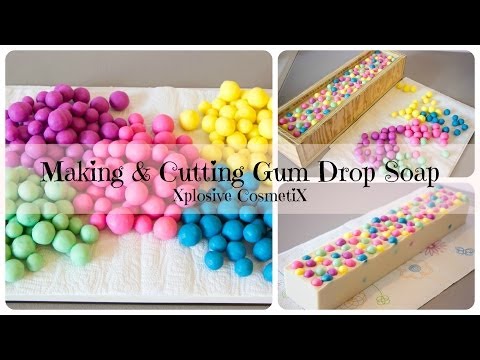
This soap making video tutorial shows you step by step how to make this adorable and fun soap.

This soap is bubblegum flavoured which is the perfect match for all the gum balls on top.

You will need to make the balls a week or so ahead of time but well worth the wait. The kids would love using this soap.

Related Posts:

  • The Stuff No One Tells You About Running A Soap Business
  • Cold Process Soap Recipe: Dehydrated Orange Slice Elegance
«
»

Comments

  1. Monica Bland says

    February 9, 2019 at 11:18 pm

    How does one make the gum balls please???

  2. Jana says

    April 3, 2020 at 8:33 pm

    disappointing it doesn’t tell you how to make the gumballs. That’s what made the soap unique.

  3. Violet madden says

    July 11, 2020 at 2:11 pm

    What are the contents in the mixture? How can we do this without information?

  4. SleepingCatHandmade says

    July 13, 2020 at 12:11 pm

    I’m hoping that’s bubblegum scented, not flavored?… this is such a cute idea though!!
    The way I make my own embed/decorations with my CP soap is I make an uncolored loaf of soap for the dough. Keep it in the mold wrapped with plastic wrap for 3 days, unmold the soap, wrap that for 3 more days (the point being that it saponifies but the water doesn’t evaporate out of the soap so it stays soft). When that process is done, split up the loaf into how ever many colors you want, mix mica colors in and roll them into balls (or other shapes), just like clay! It’s fun – and when you’re all done, just wash your hands, cause it’s only soap!
    I hope that helps! Look up Sorcery Soaps for her original soap dough ideas. She’s fantastic.

Have you read?

DIY Summer Nail Designs You’ll Want to Rock All Season Long

As soon as the weather heats up and the days get longer, I swap out my moody nail colors for something a little more fun, flirty, and full of sunshine. Summer is the perfect excuse to get playful with your nail designs — and this year, I’ve been experimenting at home to find a few favorites that are both easy to paint and seriously cute.

I’ve rounded up three of my go-to summer nail looks that you can totally do yourself, even if you’re not a pro. These are the styles I keep coming back to because they’re fun, eye-catching, and honestly — they just make you feel good. Whether you’re heading to the beach, a backyard BBQ, or just want to admire your nails while holding an iced latte, these are the ones to try.

Let’s dive in!

Sunset Ombre Nails

This is hands down one of the most satisfying nail designs you can do yourself. The colors melt into each other like a beach sunset, and the end result looks way more advanced than it really is.

You’ll Need:

  • A base coat

  • Three polishes (I use pink, orange, and yellow)

  • A makeup sponge

  • Top coat

  • Nail polish remover for cleanup

How to Do It:

  1. Start with a clear base coat to protect your nails.

  2. Paint horizontal stripes of your 3 colors directly onto the makeup sponge.

  3. Dab the sponge gently onto your nail, reapplying polish to the sponge as needed. Tap until the gradient blends.

  4. Clean up any excess polish around your cuticle.

  5. Apply a top coat to smooth the colors and add shine.

This design is one of those that looks good even when it’s a little messy — the top coat really pulls it all together.


 Tropical Palm Silhouettes

If you want vacation vibes without actually going anywhere, this one’s for you. The pastel base paired with simple black palm trees gives it that dreamy island feel.

You’ll Need:

  • A light pastel base polish or soft gradient background

  • Black nail art pen or thin brush with black polish

  • Top coat

How to Do It:

  1. Paint your nails with a soft pastel or ombre base.

  2. Once dry, draw a thin curved line for the palm trunk.

  3. From the top of the trunk, add small lines that fan out to mimic palm fronds.

  4. Let everything dry completely before adding a glossy top coat.

Even if your palm trees aren’t perfect, they still look awesome. Think of it like nail doodling — just more tropical.


 Watermelon French Tips

This design is so cheerful, I smile every time I see it. It’s a fruity twist on a French manicure and it’s perfect for pool parties or picnics.

You’ll Need:

  • Pink polish for the base

  • Green and white for the rind

  • Black polish for the seeds (use a dotting tool or toothpick)

  • Base and top coat

How to Do It:

  1. Paint your entire nail a soft pink.

  2. Add a green curved tip at the top edge (like a French tip).

  3. Under the green, paint a very thin white stripe.

  4. Add small black dots on the pink section to create seeds.

  5. Seal it all in with your favorite top coat.

This one is such a crowd-pleaser and looks adorable on both long and short nails.

Whether you try one of these or rotate through all three this summer, I hope these nail designs add a little color and creativity to your routine. They’re simple enough to do at home but still look like you spent time (and money!) at the salon.

Let me know which one you’re trying first — and don’t forget to tag us if you share your summer nail look!

Leave a Reply

Your email address will not be published. Required fields are marked *

RSS More Articles

  • Unisex Pajama Top Free Pattern
  • Back to School Cross Stitch Patterns
  • Wrap Yourself in Brilliance: Crochet Your Own Shawl or Scarf
  • 3 FREE Boho Bugs Coloring Pages and Digital Images
  • Embroidery for Mental Health: How Stitching Reduces Stress
  • Krampus Sweater Knitting Pattern
  • 12 Summer on the Water Scrapbook Layout Ideas
  • Puffin Star Quilt Pattern
  • Jumbo Yarn – Large Bag Crochet Pattern
  • Back to School Craft Ideas

Categories

Bath And Body bath bombs Body Scrubs & Lotions Colds & Flu CraftGossip Exclusive Craft Inspirations detox DIY Recipes And Tutorials DIY Tutorials and Patterns Essential Oils And Aromatherapy facials Hair Care Makeup & Beauty Melt & Pour Soap Packaging Product Reviews Soapmaking Recipes, Products And Tutorials Style Me Quick Supply Store Specials & Discounts Wellbeing

Copyright © 2025 · CraftGossip | Start Here | Contact Us | Link to Us | Your Editors | Privacy and affiliate policy