• Home
  • Suggest A Craft
  • DIY Newsletter

Bath and Body

Soap Making, Oils and Recipes

  • About CraftGossip
  • Our Network
    • Bath & Body Crafts
    • Candle Making Ideas
    • Crochet Ideas
    • Cross Stitch
    • Edible Crafts
    • Felting Patterns
    • Glass Art
    • Home & Garden Ideas
    • Indie Crafts
    • Jewelry Making
    • Kids Crafts
    • Knitting Patterns
    • Lesson Plans
    • Needlework
    • Party Ideas
    • Polymer Clay
    • Quilting Ideas
    • Recycled Crafts
    • Scrapbooking
    • Sewing Patterns
    • Card Making
    • DIY Weddings
    • Not Craft Ideas
  • Giveaways
  • Roundups
  • Store
  • Search

DIY – Bullet Proof Coffee

January 3, 2015 by Shellie Wilson 5 Comments

Bulletproof-Coffee-lululemon-blog-header

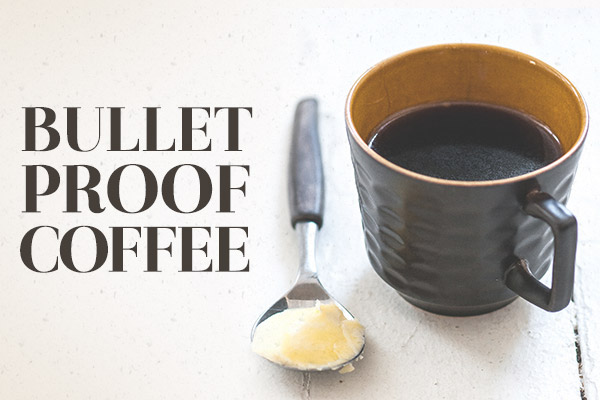
Have you heard of it ? Have you drunk it? Its the new trend that is sure to take 2015 by storm or brew in this case. Basically in my non-techincal understanding it is a shot of coffee which gives you energy (caffeine) and good fats (Coconut oil) and Butter to help make you feel full. Is this the new weight-loss magic pill like Green Coffee bean or just a healthier alternative?

At the time of writing this I have not tasted it, but I may be tempted especially around 1pm when I seem to hit “yawn o’clock”.  For the full recipe and more details check out this blog post here. I would love to hear your feedback about this drink what changes did you notice?

Josie’s Bulletproof Coffee Recipe

Ingredients:
2 shots espresso
1 cup hot water
1 tbsp Kerrygold grass-fed organic butter
1 tsp organic coconut oil

Method:
Put all ingredients into a Magic Bullet for about five seconds, whipping until frothy. (Source)

Digital Parents Blog Carnival

Digital Parents Blog Carnival
– See more at: Digital Parents

Related Posts:

  • DIY Vanilla Body Scrub
  • How Much CBD Oil Should I Take For Insomnia?
«
»

Comments

  1. catpatches says

    January 3, 2015 at 12:10 pm

    If you think about it, butter is just churned cream. So, the idea that putting a tablespoon of butter in your coffee in lieu of a tablespoon of cream and thinking this is somehow healthier is pretty silly.

  2. Krysta says

    January 3, 2015 at 3:16 pm

    My husband went Paleo a few months back and introduced me to it. I actually use regular decaf (for health reasons I can’t have caf) coffee and at a TBSN or two of butter and sugar, sometimes I add coconut oil and/or milk sometimes I dont. I found the coconut oil froths better and almond milk is my favorite additive. I have been a heavy super and cream coffee drinker for years but find I add less when go bulletproof. I actually use a wisk to froth mine, I just spin it between my palms (like making a snake out of playdoh). This works well for me, hubby prefers a blender ball.
    I find I actually have more lasting energy when it is all I have for breakfast. Keep in mind I am a breastfeeding mom of 3, so I need a LOT of energy.
    I suggest giving it a try!

  3. Krysta says

    January 3, 2015 at 3:18 pm

    Sugar and cream. And bulletproof is never good cold since the oil and butter solidify ????

  4. Hélène et Mahélia says

    January 4, 2015 at 4:33 am

    Hello ! I live in France, and I’d like to test and taste it … but, where can I find “Kerrygold grass-fed organic butter” ?? Simple non salted butter would be the same ? Thanks for your help ! xoxo

  5. Shellie Wilson says

    January 4, 2015 at 4:52 am

    I think an organic non salted butter of nay brand would give the best health benefits.

Have you read?

DIY Summer Nail Designs You’ll Want to Rock All Season Long

As soon as the weather heats up and the days get longer, I swap out my moody nail colors for something a little more fun, flirty, and full of sunshine. Summer is the perfect excuse to get playful with your nail designs — and this year, I’ve been experimenting at home to find a few favorites that are both easy to paint and seriously cute.

I’ve rounded up three of my go-to summer nail looks that you can totally do yourself, even if you’re not a pro. These are the styles I keep coming back to because they’re fun, eye-catching, and honestly — they just make you feel good. Whether you’re heading to the beach, a backyard BBQ, or just want to admire your nails while holding an iced latte, these are the ones to try.

Let’s dive in!

Sunset Ombre Nails

This is hands down one of the most satisfying nail designs you can do yourself. The colors melt into each other like a beach sunset, and the end result looks way more advanced than it really is.

You’ll Need:

  • A base coat

  • Three polishes (I use pink, orange, and yellow)

  • A makeup sponge

  • Top coat

  • Nail polish remover for cleanup

How to Do It:

  1. Start with a clear base coat to protect your nails.

  2. Paint horizontal stripes of your 3 colors directly onto the makeup sponge.

  3. Dab the sponge gently onto your nail, reapplying polish to the sponge as needed. Tap until the gradient blends.

  4. Clean up any excess polish around your cuticle.

  5. Apply a top coat to smooth the colors and add shine.

This design is one of those that looks good even when it’s a little messy — the top coat really pulls it all together.


 Tropical Palm Silhouettes

If you want vacation vibes without actually going anywhere, this one’s for you. The pastel base paired with simple black palm trees gives it that dreamy island feel.

You’ll Need:

  • A light pastel base polish or soft gradient background

  • Black nail art pen or thin brush with black polish

  • Top coat

How to Do It:

  1. Paint your nails with a soft pastel or ombre base.

  2. Once dry, draw a thin curved line for the palm trunk.

  3. From the top of the trunk, add small lines that fan out to mimic palm fronds.

  4. Let everything dry completely before adding a glossy top coat.

Even if your palm trees aren’t perfect, they still look awesome. Think of it like nail doodling — just more tropical.


 Watermelon French Tips

This design is so cheerful, I smile every time I see it. It’s a fruity twist on a French manicure and it’s perfect for pool parties or picnics.

You’ll Need:

  • Pink polish for the base

  • Green and white for the rind

  • Black polish for the seeds (use a dotting tool or toothpick)

  • Base and top coat

How to Do It:

  1. Paint your entire nail a soft pink.

  2. Add a green curved tip at the top edge (like a French tip).

  3. Under the green, paint a very thin white stripe.

  4. Add small black dots on the pink section to create seeds.

  5. Seal it all in with your favorite top coat.

This one is such a crowd-pleaser and looks adorable on both long and short nails.

Whether you try one of these or rotate through all three this summer, I hope these nail designs add a little color and creativity to your routine. They’re simple enough to do at home but still look like you spent time (and money!) at the salon.

Let me know which one you’re trying first — and don’t forget to tag us if you share your summer nail look!

Leave a Reply

Your email address will not be published. Required fields are marked *

RSS More Articles

  • Unisex Pajama Top Free Pattern
  • Back to School Cross Stitch Patterns
  • Wrap Yourself in Brilliance: Crochet Your Own Shawl or Scarf
  • 3 FREE Boho Bugs Coloring Pages and Digital Images
  • Embroidery for Mental Health: How Stitching Reduces Stress
  • Krampus Sweater Knitting Pattern
  • 12 Summer on the Water Scrapbook Layout Ideas
  • Puffin Star Quilt Pattern
  • Jumbo Yarn – Large Bag Crochet Pattern
  • Back to School Craft Ideas

Categories

Bath And Body bath bombs Body Scrubs & Lotions Colds & Flu CraftGossip Exclusive Craft Inspirations detox DIY Recipes And Tutorials DIY Tutorials and Patterns Essential Oils And Aromatherapy facials Hair Care Makeup & Beauty Melt & Pour Soap Packaging Product Reviews Soapmaking Recipes, Products And Tutorials Style Me Quick Supply Store Specials & Discounts Wellbeing

Copyright © 2025 · CraftGossip | Start Here | Contact Us | Link to Us | Your Editors | Privacy and affiliate policy