 So you’ve opened your fave mag and there is Kim Kardashian ( so over her personally ) and her amazing eye make-up. The pictures in todays magazines promise you the consumer longer lashes, which you believe because …….. well……look at that gorgeous model on the page sporting ridiculously thick and amazing lashes, it must be real right? You buy the mascara and instead of getting what you thought was coming your way you end up with clumpy goo and build-up that irritates your eyes. Wanna know a secret? THEY’RE LYING TO YOU! In the UK they passed a regulation that mascara companies have to disclose that the models are wearing falsies. But don’t get discouraged you can easily get that look for way cheaper than what it costs for a tube of mascara. Follow licensed cosmetologist Amber of WILLOWWOULD blog’s step by step tutorial to show you exactly how to put them on! It’s so easy and with a few tries you’ll be able to put them on without even thinking about it. I myself am totally hopeless when it comes to things like this I end up making a huge mess and sport a look that many think was possibly created by my 5 year old. “NOW just to clarify things I am in no way a fan of Kim Kardashian and I apologise if I have offended any of y’all by including her :)”
Comments
Have you read?
How to Make Distilled Water at Home – A Simple DIY Method
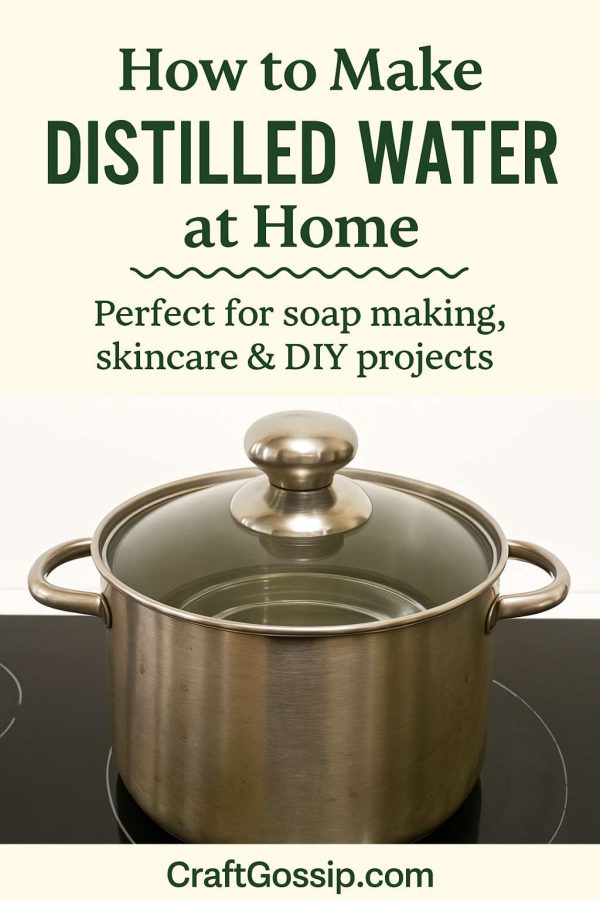
When it comes to soap-making and other skin-loving crafts, using distilled water isn’t just a fussy extra—it can actually make or break your batch. Tap water might be fine for drinking, but it contains minerals, chlorine, and trace contaminants that can mess with lye reactions in cold process soap or leave cloudy spots in melt-and-pour bars.
Distilled water is simply pure H?O. Nothing else. No minerals, no impurities, no sneaky sediment from old pipes. And the good news? You can make it yourself with tools you already have in your kitchen.
Whether you’re making natural soap, diluting essential oils, or filling a steam iron, learning how to distill your own water is a handy life skill that costs next to nothing.
Why Distilled Water Matters in Crafting
If you’re working with ingredients that require precision—like sodium hydroxide (lye) in cold process soap—distilled water is non-negotiable. The minerals in tap water can alter your soap’s texture, accelerate spoilage, and even react with lye to form unwanted residue (that dreaded white film on your bars).
Plus, if you’re creating facial sprays, toners, or bath products, distilled water gives you peace of mind that you’re not introducing hidden bacteria or heavy metals into your skincare.
What You’ll Need
- A large stainless steel pot with a domed or regular lid
- A heat-safe glass or metal bowl (that fits inside the pot without touching the bottom)
- Ice cubes
- Tap water
- Stove or heat source
- Oven mitts or tongs
- A clean glass jar or container with a lid for collecting the distilled water
Optional but helpful: a small wire rack or trivet to rest the bowl on, if it doesn’t float.
Step-by-Step Instructions to Make Distilled Water
Step 1: Add Tap Water to the Pot
Fill the large pot about halfway with regular tap water. This water will be boiled and turned into steam, which becomes your distilled water.
Step 2: Place the Collection Bowl Inside
Gently set your smaller bowl inside the pot. It should float, or if not, rest it on a small rack so it doesn’t touch the bottom. This bowl is where your clean distilled water will collect.
Step 3: Invert the Lid and Add Ice
Flip the lid upside down so the knob points down toward the center of the bowl. The lid will catch the rising steam, and the cold from the ice will help it condense into liquid. As the steam rises, it will drip down into the bowl—leaving the impurities behind.
Step 4: Turn on the Heat
Bring the water to a gentle boil. Keep the heat medium-low—you want a steady simmer, not a rapid boil, to allow for proper condensation.
Step 5: Watch and Wait
As the water steams and condenses on the lid, it will drip into your collection bowl. Keep adding ice to the top of the lid as needed. One liter of distilled water may take 30–45 minutes.
Step 6: Cool and Store
Once you’ve collected enough water, turn off the heat and allow everything to cool. Carefully remove the bowl using oven mitts or tongs. Transfer your freshly distilled water into a clean glass container with a lid. Store in a cool, dry place.
How Much Can You Make?
Depending on the size of your pot and bowl, you can expect to make 300–500ml per hour. It’s not lightning fast, but it’s perfect for small-batch crafting.
Tips and Variations
- If your lid isn’t domed, tilt it slightly toward the bowl to encourage dripping.
- For even purer results, use filtered water as your base.
- Sterilise your collecting bowl and container if you’re using the distilled water for skincare or medical use.
Is It the Same as Boiled Water?
No. Boiled water kills bacteria but still contains minerals and chemicals. Distillation removes those impurities by turning water into steam and then collecting the clean vapor.
What Can You Use Homemade Distilled Water For?
- Cold process and melt & pour soap making
- Essential oil blends and room sprays
- Facial toners and skin care products
- Herbal tinctures or infusions
- Cleaning irons, humidifiers, or CPAP machines
Once you’ve made your own distilled water, you’ll wonder why you ever bought it in a jug. It’s a simple, satisfying process that supports all your homemade projects—without the price tag or plastic waste. And it’s surprisingly relaxing to watch those little droplets fall into the bowl, knowing you’re crafting something pure from scratch.
Would you like to bundle this into your soap-making PDF guide? Or should I move ahead with the next tutorial in the soap series?
I cant seem to find the step by step instruktions on her blog. Can you help me?
Kim Kardashian, really Craft Gossip! Since she’s every where,I thought, well a least I won’t see her in my favourite craft websites! Desappointment!
It is really annoying when the link doesn’t take one directly to the post that is being referred to in the article. I hate having to scroll through the blog searching. Half the time I can’t even find it, like this one.
Ha!!!! would you believe that I don’t really like her am over her and only included her as an example of over done false eye makeup. I can assure you there will be no more posts about her 🙂 I regret editing out the bit about not really liking her in my post I did not want to offend her “likers” oh well cant please em all.
Sorry Kim, mistakes sometimes happen will fix it now so you can check it out. Thanks for letting me know 🙂
Hi Joanna
If you click on the link now it will take you straight to it. Sorry for the inconvenience
Lordamercy ladies! Nellie, I understood the whole post. No need to apologize to anyone because you didn’t say or show anything offensive. Some folks just have nothing better to do than gripe!
If you are heading over to Willow Would, rather than scrolling, you can just click on Hair Tip Tuesday and it’ll take you to it.
I didn’t mean to be rude with Nellie, and I’m sorry for that, it’s just that I’m fed up with the woman. I understand the whole post and why this woman’s picture to illustrate the article.