• Home
  • Suggest A Craft
  • DIY Newsletter

Bath and Body

Soap Making, Oils and Recipes

  • About CraftGossip
  • Our Network
    • Bath & Body Crafts
    • Candle Making Ideas
    • Crochet Ideas
    • Cross Stitch
    • Edible Crafts
    • Felting Patterns
    • Glass Art
    • Home & Garden Ideas
    • Indie Crafts
    • Jewelry Making
    • Kids Crafts
    • Knitting Patterns
    • Lesson Plans
    • Needlework
    • Party Ideas
    • Polymer Clay
    • Quilting Ideas
    • Recycled Crafts
    • Scrapbooking
    • Sewing Patterns
    • Card Making
    • DIY Weddings
    • Not Craft Ideas
  • Giveaways
  • Roundups
  • Store
  • Search

6 DIY Soaps to Make Bath Time a Treat!

June 25, 2021 by Angie McKain Leave a Comment

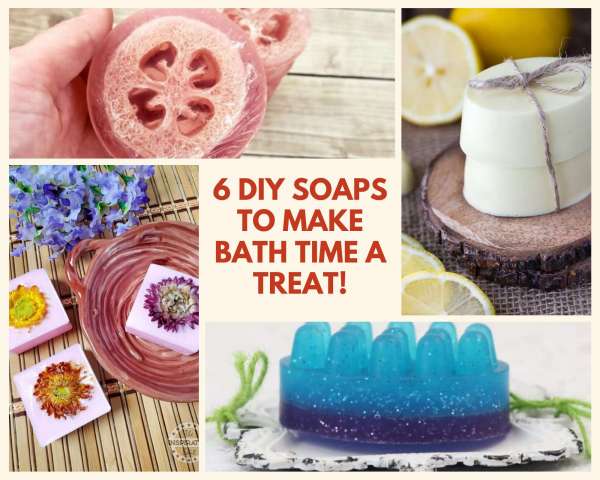
Soaps are one of the easiest and most fun DIY Bath and Body products out there! They generally take very few ingredients, and as long as you’re using melt and pour soap the process takes very little time and even less equipment. Soaps are also fun because you can add coloring, scents, glitter, flowers, herbs, and so much more to them to truly make them your own. Read on for 5 great soap recipes that are not only beautiful but will also make bath time a treat!
Making your own soaps for Christmas? Check out these Christmas soap making molds and these Christmas dessert fragrances.
6 Soap Recipes to Make Bath Time a Treat


Chrysanthemum Soap Bar

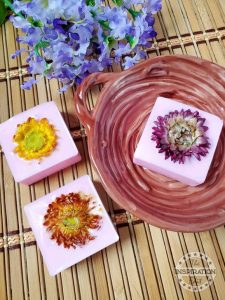
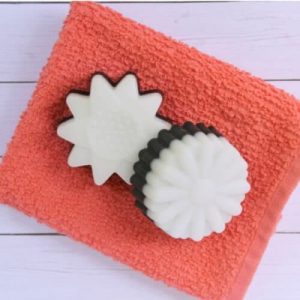
Soaps are essential for keeping us clean and healthy. However, a lot of soaps found on the market contain bad chemicals such as Dioxane, Triclosan, Formaldehyde, parabens, and more. Instead of using all these harmful chemicals, you can use homemade soaps with Chrysanthemum flowers and violet fragrance. This recipe makes a beautiful bar of soap that would also make a great gift!
Mermaid Soap
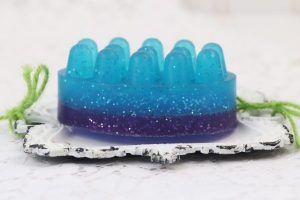
Add a little fun to bathtime with glittery mermaid soap bars – perfect for the mermaids in your life 😉
Lemon Shea Butter Soap
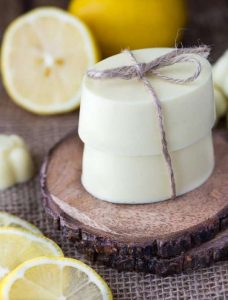
Creamy, smooth, and fresh. This beautiful DIY soap leaves skin feeling so soft and makes a lovely homemade gift. With moisturizing shea butter and the fresh scent of lemon, this soap is sure to moisturize the skin while invigorating the senses, great for a morning pick-me-up!
Oatmeal Eczema Soap
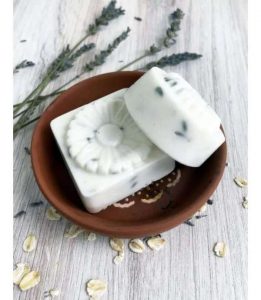
This homemade oatmeal soap is a super easy recipe to help keep your skin healthy and happy. Oatmeal is a very gentle exfoliator and helps work wonders with the inflammation and irritation that can occur with eczema or other skin sensitivities!
Loofah Soap
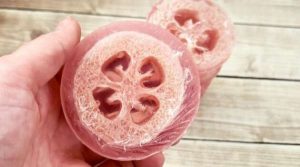
Loofah soaps let you clean and exfoliate the skin at the same time and this high-end-looking and feeling soap has both! All you need is a few simple ingredients to create this luxurious DIY soap! Make some extras and give your friends and family a beautiful DIY gift!
Charcoal Soap
Activated Charcoal Soap is a wonderful beauty care item and making your own is very easy to do. This easy DIY charcoal soap tutorial will keep you stocked up and your skin will be looking great too. This soap is full of wonderful ingredients and essential oils and the smell is fantastic. These ingredients are so soothing to the skin. Once you get the hang of making your own beauty products at home you will be hooked on it! It is actually fun to do and the results are fantastic.
If you’ve given any of these recipes a try, I’d love to hear how you liked them! Have a great weekend everyone =)
Happy Crafting!

Related Posts:

  • How To Dry Your Own Flowers For Bath And Body Recipes
  • Cold Process Soap Recipe: Dehydrated Orange Slice Elegance
«
»

Have you read?

DIY Summer Nail Designs You’ll Want to Rock All Season Long

As soon as the weather heats up and the days get longer, I swap out my moody nail colors for something a little more fun, flirty, and full of sunshine. Summer is the perfect excuse to get playful with your nail designs — and this year, I’ve been experimenting at home to find a few favorites that are both easy to paint and seriously cute.

I’ve rounded up three of my go-to summer nail looks that you can totally do yourself, even if you’re not a pro. These are the styles I keep coming back to because they’re fun, eye-catching, and honestly — they just make you feel good. Whether you’re heading to the beach, a backyard BBQ, or just want to admire your nails while holding an iced latte, these are the ones to try.

Let’s dive in!

Sunset Ombre Nails

This is hands down one of the most satisfying nail designs you can do yourself. The colors melt into each other like a beach sunset, and the end result looks way more advanced than it really is.

You’ll Need:

  • A base coat

  • Three polishes (I use pink, orange, and yellow)

  • A makeup sponge

  • Top coat

  • Nail polish remover for cleanup

How to Do It:

  1. Start with a clear base coat to protect your nails.

  2. Paint horizontal stripes of your 3 colors directly onto the makeup sponge.

  3. Dab the sponge gently onto your nail, reapplying polish to the sponge as needed. Tap until the gradient blends.

  4. Clean up any excess polish around your cuticle.

  5. Apply a top coat to smooth the colors and add shine.

This design is one of those that looks good even when it’s a little messy — the top coat really pulls it all together.


 Tropical Palm Silhouettes

If you want vacation vibes without actually going anywhere, this one’s for you. The pastel base paired with simple black palm trees gives it that dreamy island feel.

You’ll Need:

  • A light pastel base polish or soft gradient background

  • Black nail art pen or thin brush with black polish

  • Top coat

How to Do It:

  1. Paint your nails with a soft pastel or ombre base.

  2. Once dry, draw a thin curved line for the palm trunk.

  3. From the top of the trunk, add small lines that fan out to mimic palm fronds.

  4. Let everything dry completely before adding a glossy top coat.

Even if your palm trees aren’t perfect, they still look awesome. Think of it like nail doodling — just more tropical.


 Watermelon French Tips

This design is so cheerful, I smile every time I see it. It’s a fruity twist on a French manicure and it’s perfect for pool parties or picnics.

You’ll Need:

  • Pink polish for the base

  • Green and white for the rind

  • Black polish for the seeds (use a dotting tool or toothpick)

  • Base and top coat

How to Do It:

  1. Paint your entire nail a soft pink.

  2. Add a green curved tip at the top edge (like a French tip).

  3. Under the green, paint a very thin white stripe.

  4. Add small black dots on the pink section to create seeds.

  5. Seal it all in with your favorite top coat.

This one is such a crowd-pleaser and looks adorable on both long and short nails.

Whether you try one of these or rotate through all three this summer, I hope these nail designs add a little color and creativity to your routine. They’re simple enough to do at home but still look like you spent time (and money!) at the salon.

Let me know which one you’re trying first — and don’t forget to tag us if you share your summer nail look!

Leave a Reply

Your email address will not be published. Required fields are marked *

RSS More Articles

  • Wrap Yourself in Brilliance: Crochet Your Own Shawl or Scarf
  • 3 FREE Boho Bugs Coloring Pages and Digital Images
  • Embroidery for Mental Health: How Stitching Reduces Stress
  • Krampus Sweater Knitting Pattern
  • 12 Summer on the Water Scrapbook Layout Ideas
  • Puffin Star Quilt Pattern
  • Jumbo Yarn – Large Bag Pattern
  • Back to School Craft Ideas
  • The Journey Hat – Where Wild Horses and Wool Meet – Knitting Pattern
  • Cross Stitching on Wooden Blanks

Categories

Bath And Body bath bombs Body Scrubs & Lotions Colds & Flu CraftGossip Exclusive Craft Inspirations detox DIY Recipes And Tutorials DIY Tutorials and Patterns Essential Oils And Aromatherapy facials Hair Care Makeup & Beauty Melt & Pour Soap Packaging Product Reviews Soapmaking Recipes, Products And Tutorials Style Me Quick Supply Store Specials & Discounts Wellbeing

Copyright © 2025 · CraftGossip | Start Here | Contact Us | Link to Us | Your Editors | Privacy and affiliate policy