• Home
  • Suggest A Craft
  • DIY Newsletter

Bath and Body

Soap Making, Oils and Recipes

  • About CraftGossip
  • Our Network
    • Bath & Body Crafts
    • Candle Making Ideas
    • Crochet Ideas
    • Cross Stitch
    • Edible Crafts
    • Felting Patterns
    • Glass Art
    • Home & Garden Ideas
    • Indie Crafts
    • Jewelry Making
    • Kids Crafts
    • Knitting Patterns
    • Lesson Plans
    • Needlework
    • Party Ideas
    • Polymer Clay
    • Quilting Ideas
    • Recycled Crafts
    • Scrapbooking
    • Sewing Patterns
    • Card Making
    • DIY Weddings
    • Not Craft Ideas
  • Giveaways
  • Roundups
  • Store
  • Search

DIY Beach Inspired Bath Fizzies – great school holiday project

September 23, 2011 by Nellie Lee Luhrmann 1 Comment

I don’t know about you but now that the school holidays are here I am trying to find activities to do that  easily engage my 2 young fellas and does not cost the earth. Thanks to Desiree from Beyond A Garden for sharing these sea shell bath fizzies.


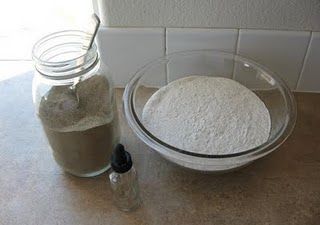
To make the bath fizzes use the following recipe: 
2 cups baking soda
1 cup citric acid
1 tablespoon of ground kelp

50 drops of a essential oil blend
Desiree used – douglas fir, spikenard, grapefruit and spearmint
Witch hazel in a small spray bottle
 To mould these fizzies you will only need  some seashells you found on the beach and 2 little helper hands
For step by step instructions on what to do next, pop on over to Beyond A Garden and have a look. Get extra creative using glitter, micas and  clays as well as other essential oils/scented oils. We went with a coconut candle and soap making soluble fragrance  that I had in my cupboard. I will cherish these for as long as they last, the fun I had with my boys making these I will cherish forever. They smell pretty good too. The boys really enjoyed making these we had lots of fun and the cleanup afterwards was very minimal.

Related Posts:

  • DIY Money Saving Bathroom And Kitchen Cleaners
  • 10 DIY Bath And Body Recipes For When You Have A Headache
«
»

Comments

  1. Jeniffer says

    September 27, 2011 at 10:07 pm

    Tried to make them at home. To be frank they are more expensive to make than to buy, do correct me if I’m wrong. But its a fabulous post and now I know where I was going wrong! I recently bought some bath body products and thats when I really discovered what Bath Fizzies can do! I hadn’t been using them otherwise! What other Bath Body products can we make at home?

Have you read?

Pumpkin Pie Melt and Pour Soap: A Cozy Fall Soap Recipe That Smells Good Enough to Eat

When the leaves start crunching underfoot and pumpkin spice fills every café, it’s time to cozy up with an easy fall DIY that smells just like grandma’s dessert table—without the calories. This Pumpkin Pie Melt and Pour Soap is one of my absolute favorite seasonal recipes. It’s warm, comforting, and gives off those straight-out-of-the-oven vibes every time you lather up.

Perfect for fall craft fairs, Thanksgiving hostess gifts, or a festive bathroom refresh, this handmade soap smells divine, looks adorable, and takes less than an hour to whip up.

Why You’ll Love This Pumpkin Soap Recipe

  • Smells like real pumpkin pie (think cinnamon, nutmeg, vanilla—yes please!) 
  • Made with skin-friendly melt and pour base—no lye required 
  • Easy enough for beginners or weekend makers 
  • Customizable with layers, swirls, or “whipped cream” topping 

Ingredients & Supplies

Yields: 4–6 small bars depending on your mold size

  • 1 lb goat milk melt and pour soap base (or shea butter base) 
  • 1 tsp pumpkin pie spice (yes, the real baking blend!) 
  • ½ tsp ground cinnamon (optional for visual specks) 
  • 1 tsp vitamin E oil or sweet almond oil 
  • 1–2 tsp brown mica or orange soap-safe colorant 
  • 1 tsp vanilla extract (optional for scent depth—make sure it’s oil-based or use a fragrance oil blend) 
  • Pumpkin pie fragrance oil (skin-safe, approx. 1–2 tsp per pound of soap base) 
  • Rubbing alcohol in a spray bottle 
  • Silicone soap mold (round, square, or pie-slice shaped) 
  • Microwave-safe jug or double boiler 
  • Stirring sticks or silicone spatula 

Step-by-Step Instructions

1. Chop and Melt the Soap Base

Cut your melt and pour soap base into small cubes and place in a microwave-safe jug. Microwave in 30-second bursts, stirring between each round until fully melted. (Do not let it boil!)

2. Add Scent and Spice

Once melted, stir in your fragrance oil, pumpkin pie spice, and optional vanilla extract. Add a pinch of cinnamon if you like the flecked look.

Tip: Spray your mold lightly with rubbing alcohol before pouring to prevent bubbles.

3. Colour and Pour

Add your mica powder or orange colorant, a little at a time, until you reach your ideal pumpkiny hue. Stir well, then carefully pour the mixture into your soap molds.

Immediately spritz the tops with rubbing alcohol to remove surface bubbles.

4. Let It Set

Leave the soap undisturbed at room temperature for 2–4 hours until fully hardened. Pop the bars out of the mold once they’re firm to the touch.

Optional: If you’re feeling fancy, melt a small amount of white soap base and pipe a “whipped cream” swirl on top using a piping bag and star tip.

Tips & Variations

  • Make it two-tone: Pour half your batch in orange, then top with a creamy vanilla layer for a pie-slice look. 
  • Add oatmeal: Toss in 1 tsp of ground oats for a gentle exfoliant and rustic charm. 
  • Use pie molds: Silicone molds shaped like pie slices or tart pans give these a dessert-style finish. 
  • Gift-ready idea: Wrap in wax paper, tie with twine, and add a “Pumpkin Pie Soap” tag for instant fall gifts. 

How to Store Homemade Soap

Keep your finished soaps in an airtight container or shrink wrap them if you’re gifting. Melt and pour soap can sweat in humid climates, so cool, dry storage is best.

This DIY pumpkin spice soap recipe is everything you want from a cozy fall project—easy, fragrant, and irresistibly cute. Whether you’re new to soap making or a seasoned maker prepping for a market table, these little bars will have everyone asking, “Where’s the whipped cream?”


Leave a Reply

Your email address will not be published. Required fields are marked *

RSS More Articles

  • Turtle Memory Game – Crochet Pattern
  • How to Make a Fall Squirrel Birthday Card
  • Create a Giant Halloween Decoration That Will Leave Everyone Spooked – DIY Big Guy Tutorial
  • Combine Knit and Crochet with this Cute Checkers Set
  • Rosh Hashanah Coloring Sheets and Other Activities for Kids
  • Cassette Tape Shaped Mini Album
  • Free Crochet Pattern – Chunky Rib Tunisian Hat and Cowl
  • What is Silver Art Clay or Precious Metal Clay (PMC) and How Do You Work With It (and Fire It!)
  • Learn How to Sew Potholders with Creativebug’s Online Class!
  • Pumpkin Pie Melt and Pour Soap: A Cozy Fall Soap Recipe That Smells Good Enough to Eat

Categories

Bath And Body bath bombs Body Scrubs & Lotions Colds & Flu CraftGossip Exclusive Craft Inspirations detox DIY Recipes And Tutorials DIY Tutorials and Patterns Essential Oils And Aromatherapy facials Hair Care Makeup & Beauty Melt & Pour Soap Packaging Product Reviews Soapmaking Recipes, Products And Tutorials Style Me Quick Supply Store Specials & Discounts Wellbeing

Copyright © 2025 · CraftGossip | Start Here | Contact Us | Link to Us | Your Editors | Privacy and affiliate policy