• Home
  • Suggest A DIY
  • DIY Newsletter

Bath and Body

Soap Making, Oils and Recipes

  • About CraftGossip
  • Our Network
    • Bath & Body Crafts
    • Candle Making Ideas
    • Crochet Ideas
    • Cross Stitch
    • Edible Crafts
    • Felting Patterns
    • Glass Art
    • Home & Garden Ideas
    • Indie Crafts
    • Jewelry Making
    • Kids Crafts
    • Knitting Patterns
    • Lesson Plans
    • Needlework
    • Party Ideas
    • Polymer Clay
    • Quilting Ideas
    • Recycled Crafts
    • Scrapbooking
    • Sewing Patterns
    • Card Making
    • DIY Weddings
    • Not Craft Ideas
  • Giveaways
  • Roundups
  • Store
  • Search

How To Spring Clean Your Pillows

January 12, 2015 by Shellie Wilson Leave a Comment

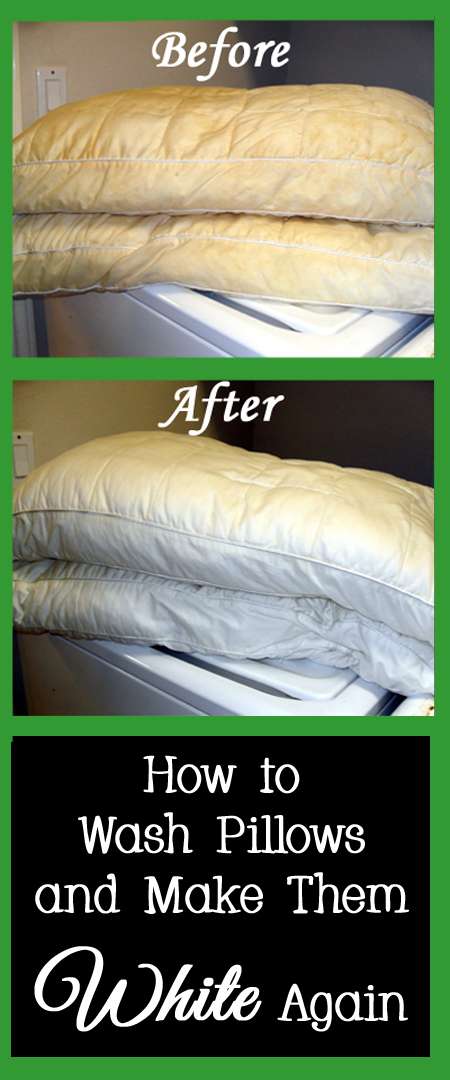
I dare you to go and look at your pillows. Depending on your level of gross-ness you either need to

1: Give them a clean using this method.  OR

2: Toss them in the bin and rush to the store for new ones.

My pillows are in pristine condition (scoff) they don’t need cleaning at all but if they did then this is worth a try.

Whilst some pillows today are affordable to simply toss out when they start fluffing themselves at night.  But some of us (not me) spend $40+ on a pillow and getting it cleaned might be more practical.

I also live the concept of using the sunshine to clean my pillows, On occasion when making the beds I put the un-washable items in the sun for some sun soak time. I think this is a good way to clean and freshen your pillows and doona quilts too.

I also use a Eucalyptus dust mite spray on items that can not be washed.

It is important to regularly clean your bed pillows to ensure you are sleeping in a healthy and hygienic environment. Not only can dirt and dust accumulate in the fabric of the pillow, but there are also all sorts of bacteria that can live in your pillow. To help you keep your pillows clean and free from bacteria, here is a guide on how to properly clean them.

The first step to cleaning your bed pillows is to understand the types of bacteria that can be present. Common bacteria that can live in your pillow include staphylococcus, streptococcus, and pseudomonas. These bacteria can cause a range of illnesses, from the common cold to more serious infections.

Once you know the type of bacteria that can be in your pillow, it is important to clean it regularly. To start, remove the pillow from the pillowcase and place it in the washing machine. Use a mild detergent and cold water, and set the machine to a gentle cycle. After the cycle has finished, hang the pillow to dry in a well-ventilated area. You can also use a dryer on a low temperature setting to speed up the drying process.

It is also important to regularly vacuum or brush your bed pillows. This will help to remove any dirt, dust, or other particles that have accumulated in the fabric. Additionally, it is a good idea to use a deodorizer or fabric refresher spray to help keep your pillows smelling fresh.

Finally, it is important to replace your bed pillows every two to three years. This will help to ensure you are sleeping on a clean pillow that is free from bacteria and other contaminants.

By following these steps, you can help to ensure your bed pillows are clean and free from bacteria. Regularly cleaning and replacing your bed pillows is an important part of maintaining a healthy and hygienic sleeping environment.

Related Posts:

  • DIY Summer Nail Designs You’ll Want to Rock All Season Long
  • The New Menopause: Your Ultimate Guide to Navigating…
«
»

Have you read?

DIY Herbal Vapor Rub Balm – A Natural Vicks-Style Decongestant for Cold and Flu Relief

When someone in the house starts sniffling, you just know it’s going to make the rounds. That’s when I reach for this homemade herbal vapor rub—our family’s go-to chest balm for easing congestion, coughs, and that heavy-headed sick feeling.

Made with gentle yet powerful essential oils, this balm works just like the classic Vicks rub (but without the synthetic stuff). It’s safe, effective, and smells like a eucalyptus grove with a hint of grandma’s medicine chest—in the best possible way!

Whether you’re treating a toddler’s sniffles or trying to head off a man cold, this DIY vapor rub will be your winter wellness MVP.

Why You’ll Love This Natural Decongestant Balm

  • No petroleum or nasties – A clean, green homemade Vicks alternative 
  • Gentle enough for kids – With optional adjustments for littlies 
  • Nourishing balm texture – Melts into skin without being greasy 
  • Essential oils – Provide cooling, clearing, and comforting support 
  • Customizable – Make it stronger for adults or extra-gentle for babies 

Ingredients

Base:

  • 1/4 cup coconut oil (or olive oil for a softer balm) 
  • 2 tbsp shea butter or mango butter 
  • 2 tbsp beeswax pellets 

Essential Oil Blend (for adults):

  • 10 drops eucalyptus essential oil 
  • 8 drops peppermint essential oil 
  • 6 drops rosemary essential oil 
  • 4 drops tea tree essential oil 
  • 4 drops lavender essential oil 

Optional for kids under 5:
Replace eucalyptus and peppermint with fir needle and cedarwood atlas, and halve the total essential oil amount.

How to Make Your Own Vapor Rub

  1. Melt the base:
    In a double boiler (or a bowl over simmering water), gently melt the coconut oil, shea butter, and beeswax together. Stir until smooth and liquid. 
  2. Cool slightly:
    Remove from heat and let cool just a few minutes—enough that it’s no longer scalding hot but still liquid. 
  3. Add essential oils:
    Stir in your essential oil blend. Don’t add them too early or the heat will evaporate their goodness. 
  4. Pour into tins or jars:
    Carefully pour into a small glass jar or metal balm tin. Let cool completely before putting the lid on. 
  5. Label & store:
    Store in a cool place away from sunlight. Balm will keep for up to 6 months. 

How to Use Your Herbal Chest Rub

  • For chest and back: Rub a small amount onto chest, upper back, and soles of the feet during cold or flu season. 
  • For steam relief: Add a pea-sized amount to a bowl of steaming water, cover your head with a towel, and inhale. 
  • For headaches: Dab a touch on temples and neck (use caution and avoid eyes). 

Mum Tips

  • Patch test first if you’re unsure about sensitivities. 
  • Keep a tiny jar in your handbag during winter for on-the-go sniffles. 
  • For a nighttime version, add a few drops of Roman chamomile or lavender for extra sleep support. 


Leave a Reply

Your email address will not be published. Required fields are marked *

RSS More Articles

  • Cross Stitch Ice Cream and Frozen Treats
  • 15 Charity Sewing Projects That Let You Sew Something Useful For A Good Cause
  • Sunflower Ribbon Embroidery Tutorials and Kits to Brighten Your Hoop
  • Decorating Mistakes That Make Your Living Room Feel Cluttered
  • Remembering Jill Smokler, Founder Of Scary Mommy
  • In the Garden Layer Cake – A Bloom-Filled Fabric Collection for Spring Sewing
  • How To Do Kitchener Stitch: A Beginner-Friendly Guide To Grafting Knitting Seamlessly
  • Pattern Review: Georgie Granny Square Bucket Hat Crochet Pattern
  • 12 Handmade Patriotic 4th of July Card Ideas
  • Shark Week Learning for Kids

Copyright © 2026 · CraftGossip | Start Here | Contact Us | Link to Us | Your Editors | Privacy and affiliate policy