• Home
  • Suggest A Craft
  • DIY Newsletter

Bath and Body

Soap Making, Oils and Recipes

  • About CraftGossip
  • Our Network
    • Bath & Body Crafts
    • Candle Making Ideas
    • Crochet Ideas
    • Cross Stitch
    • Edible Crafts
    • Felting Patterns
    • Glass Art
    • Home & Garden Ideas
    • Indie Crafts
    • Jewelry Making
    • Kids Crafts
    • Knitting Patterns
    • Lesson Plans
    • Needlework
    • Party Ideas
    • Polymer Clay
    • Quilting Ideas
    • Recycled Crafts
    • Scrapbooking
    • Sewing Patterns
    • Card Making
    • DIY Weddings
    • Not Craft Ideas
  • Giveaways
  • Roundups
  • Store
  • Search

Lush Bath Jelly Recipe

July 18, 2007 by Shellie Wilson 5 Comments

Lush is a luxurious bath and body store that will draw you in just with the aroma flowing out the door. Unfortunately Lush is not in everyone’s price range and as a result recipes are sort out all over the internet.

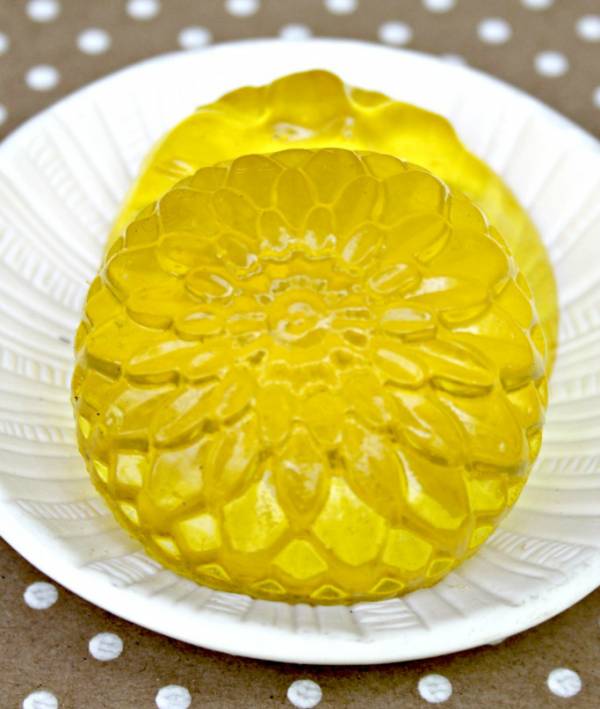
This  Lush Like Bath jelly recipe  is easy to follow and a very close match to Lush’s own jelly.

To make this Lush inspired recipe you will need:

1 packet of Unflavored gelatin 15g (1tbs)
1 tsp of Salt
1/2 cup of Liquid soap
3/4 cup of Water
Food Coloring
Fragrant oils or essential oils
Plastic storage jar with lid

Visit Craftbits.com For the Full Lush Shower/Bath Jelly Recipe.

Lush is a cosmetics giant with some interesting LUSH facts – One of Lush’s 6 co-founders, Mo Constantine, apparently invented the world’s first bath bomb in 1989.  Lush has been questioned of its overuse of glitter, which is now very unpopular with environmental groups but did you know the glitter used in Lush products are PET free – They state that they use food grade lustres and seaweed-based glitters.

There are 900 stores worldwide in 49 countries, 250 of which are in the USA, that is a lot of product to be made. Did you know all their products are handmade in Poole England?  Their products are 100% vegetarian, 85% vegan, against animal testing and completely handmade.

Lush are also pretty strict on their copyright rules, so make sure if you are making your own lush copies or hacks be sure to choose an original name and add a little touch of your own to make them unique.

Related Posts:

  • 10 DIY Bath And Body Recipes For When You Have A Headache
  • DIY Rainbow Bath Bombs
«
»

Comments

  1. Maxie19699 says

    September 29, 2008 at 12:45 pm

    Excellent recipe. The Lush jelly is a huge fad right now but quite expensive, this makes it available to everyone!! 😀

  2. KKKTS says

    June 26, 2011 at 2:17 pm

    OMG this was amazing! i will never buy lush jelly its too expensive plus thisis sooooo much fun!!! The only Problem is my jelly melts, i dont know why but do you know how to stop it, maybe more of a certain ingredient? Thanks this recipe is amazing, its nicer than my friends lush one 🙂

  3. lizzy says

    July 17, 2011 at 11:58 am

    would it work if you used flavored jello and if not why

  4. Eliza says

    April 25, 2012 at 2:48 pm

    I have yet to try it, but just the thought of making my own shower jelly scents is amazing!

Trackbacks

  1. Lush Bath Jelly Recipe says:
    September 24, 2007 at 9:48 pm

    […] continued at http://bathnbody.craftgossip.com/lush-bath-jelly-recipe/2007/07/18/ delivered by conSalsita […]

Have you read?

How to Make Your Own Lush-Inspired Massage Bar at Home

Looking to recreate the magic of a Lush massage bar at home? You’re not alone. These creamy, solid lotion bars have gained cult status for their ability to melt on skin, deliver deep moisture, and add a touch of indulgence to your daily routine. But did you know you can easily make your own version at home with natural ingredients?

Whether you’re whipping up a batch for a self-care stash, gifts for friends, or a cheeky couples’ night in, this DIY massage bar recipe is simple, budget-friendly, and completely customizable.

Let’s dive into making your very own Lush massage bar dupe—complete with skin-loving butters, essential oils, and that melt-on-contact magic.

Why You’ll Love This DIY Massage Bar

Forget flimsy lotion—this bar means business. Once you glide it across your skin, it begins to melt just slightly, releasing nourishing oils and soothing scents. No mess, no pump, no preservatives. Just pure, skin-friendly ingredients that feel like a mini spa experience.

It’s:

  • Perfect for dry, mature skin (hello elbows and heels!)

  • Travel-friendly and non-leaky

  • Great for couples’ massage or bedtime rituals

  • Free from synthetic additives or preservatives

Key Ingredients for That “Lush” Feel

Here’s what gives this DIY bar its silky, spa-like texture:

  • Cocoa Butter: The backbone of your massage bar—firm at room temp, but melts at body temperature.

  • Shea Butter: Adds creaminess and deep nourishment, especially for dry or sensitive skin.

  • Beeswax (or vegan wax alternative): Helps the bar hold its shape and adds a protective layer on the skin.

  • Sweet Almond Oil or Jojoba Oil: Lightweight carrier oils that soak in beautifully.

  • Essential Oils: Choose relaxing lavender, sensual ylang-ylang, calming chamomile, or zingy peppermint—whatever suits your mood.

  • Optional: Rose petals, gold mica, or dried herbs for a visual wow-factor.

DIY Lush Massage Bar Recipe

Makes 3–4 small bars or 1–2 large ones depending on mold size.

Ingredients:

  • ¼ cup cocoa butter

  • ¼ cup shea butter

  • 2 tbsp beeswax

  • 2 tbsp sweet almond oil (or jojoba oil)

  • 15–20 drops of essential oil (I love lavender + orange for a relaxing mix)

  • Optional: a pinch of shimmer mica powder or dried petals

Tools:

  • Silicone mold or ice cube tray

  • Heat-safe measuring cup or bowl

  • Double boiler or saucepan method

  • Stirring spoon or skewer

Instructions:

  1. Melt the base ingredients
    In a double boiler or heat-safe bowl over simmering water, combine cocoa butter, shea butter, beeswax, and sweet almond oil. Stir occasionally until completely melted and smooth.
  2. Remove from heat and add fragrance
    Take the mixture off the heat and let it cool for about 1–2 minutes (you don’t want to burn off the essential oils). Add your essential oils and mica or petals now. Stir well.
  3. Pour into molds
    Carefully pour the mixture into your silicone molds. If you’re using petals or herbs, sprinkle them in the mold first for a pretty top layer.
  4. Let set completely
    Allow the bars to cool and harden at room temperature for a few hours, or pop them into the fridge for faster setting.
  5. Pop out and store
    Once fully set, pop the bars out and store in a cool, dry place in a tin or glass jar.

How to Use Your Massage Bar

Hold the bar in your hands until it starts to melt just a little. Then glide it directly over skin—or warm it up first in your palms. Use after a shower, during a massage, or even on dry winter hands and feet before bed. A little goes a long way!

Pro tip: Keep one in your bedside drawer and another in the bathroom for everyday use.


Make It Your Own

Once you’ve made one batch, it’s hard to stop. Try these variations:

  • Calming: Chamomile + vanilla essential oil with calendula petals

  • Energizing: Citrus blend with grapefruit, bergamot + peppermint

  • Romantic: Rose absolute + ylang-ylang with dried rosebuds

You can even experiment with adding CBD oil (up to ½ tsp per batch) for a luxe therapeutic effect—just make sure it’s body-safe and legal in your area.

Once you try this Lush massage bar dupe, you’ll wonder why you ever paid retail prices. Not only are these homemade bars more affordable, but they’re also kinder to your skin—and the planet. With zero packaging waste and total ingredient control, it’s a DIY win all around.

Whether you’re soothing sore muscles, winding down for the night, or sneaking in a little self-care between loads of laundry, this bar delivers spa-day energy in the palm of your hand.


Leave a Reply

Your email address will not be published. Required fields are marked *

RSS More Articles

  • Free Crochet Pattern – Dot Baby Blanket
  • How to Make Creatine Gummies at Home – A Fun and Tasty DIY Recipe
  • 19 FREE Disney Princess Back to School Coloring Pages
  • How to Make Handmade Pottery Ceramic Wind Chimes
  • My Honest Take on Sewing the Nina Jumpsuit from Creativebug
  • 12 Road Trip Travel Scrapbook Layout Ideas
  • Use LEGOs to Build Landmarks from Around the World
  • Get Your Fruits by Knitting the Fruit Salad Vest
  • Why Do Your Kids Play with the Box? An Interview with Child Psychologist Dr. Lucy Harper
  • Ottomania- Free Crochet Pattern

Categories

Bath And Body bath bombs Body Scrubs & Lotions Colds & Flu CraftGossip Exclusive Craft Inspirations detox DIY Recipes And Tutorials DIY Tutorials and Patterns Essential Oils And Aromatherapy facials Hair Care Makeup & Beauty Melt & Pour Soap Packaging Product Reviews Soapmaking Recipes, Products And Tutorials Style Me Quick Supply Store Specials & Discounts Wellbeing

Copyright © 2025 · CraftGossip | Start Here | Contact Us | Link to Us | Your Editors | Privacy and affiliate policy