• Home
  • Suggest A Craft
  • DIY Newsletter

Bath and Body

Soap Making, Oils and Recipes

  • About CraftGossip
  • Our Network
    • Bath & Body Crafts
    • Candle Making Ideas
    • Crochet Ideas
    • Cross Stitch
    • Edible Crafts
    • Felting Patterns
    • Glass Art
    • Home & Garden Ideas
    • Indie Crafts
    • Jewelry Making
    • Kids Crafts
    • Knitting Patterns
    • Lesson Plans
    • Needlework
    • Party Ideas
    • Polymer Clay
    • Quilting Ideas
    • Recycled Crafts
    • Scrapbooking
    • Sewing Patterns
    • Card Making
    • DIY Weddings
    • Not Craft Ideas
  • Giveaways
  • Roundups
  • Store
  • Search

Natural Blackhead Removal/Remedies

May 12, 2011 by Nellie Lee Luhrmann 7 Comments

Blackhead-removal-recipe

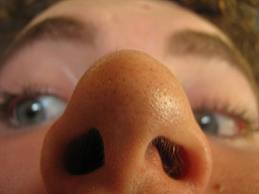
Blackheads are so annoying, we all want to get rid of them from time to time. Blackhead strips can be expensive and some extraction methods can come with adverse side effects if not done correctly. I am sharing a natural method that if used on a regular basis can keep this problem in check. I will tell you how you can prevent and get rid of blackheads with these 2 simple steps.

Firstly you have to loosen the blackheads as loosening will make the process easier/ more effective. Once loosened, blackheads tend to come out easily.

Take 400ml of water and some fresh or dried basil leaves and boil it . Once the water is boiled add 2-3 drops of one of the following essential oils which help with acne or make a blend (remember 3 drops in total only):

Lavender, Sandalwood, Teatree, Rosewood, Myrrh, Geranium, Juniper, Grapefruit, Patchouli, Cedarwood, Bergamot, Petitgrain, Lemon, Palmarosa, German Chamomile, Thyme, Yarrow or Pine. My fave is sandalwood but can be quite $$$.

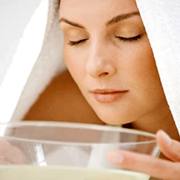
Drape a towel around your head and steam your face for a few minutes so that the pores open up. If you have sensitive skin be careful not to burn your face.

Now your blackheads are ready to be removed

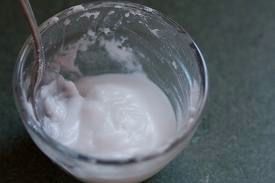
Mix 1 tablespoon of baking soda with enough water to make a paste. If you are feeling adventurous you could replace the water with lavender or witch hazel floral water. Apply paste on the blackheads and keep it  on for about a minute or so and gently scrub.

Rinse it off with tepid water and finish off this process by splashing some cold water so that the pores are then closed.

Voila blackheads gone! You can use these ingredients on a regular basis.

Bear in mind that oversteaming can lead to dry skin.

Related Posts:

  • DIY Ice Plunge Options at Home
  • DIY Money Saving Bathroom And Kitchen Cleaners
«
»

Comments

  1. Lm mora says

    May 13, 2011 at 9:33 pm

    I will try it and tell u my resolts, i loved it…

  2. mikerosss says

    May 21, 2011 at 1:53 pm

    Thank you, I have recently been searching for information about this topic for ages and yours is the best I have discovered so far.

  3. AliceJ says

    May 26, 2011 at 9:49 am

    I am 26 with pretty fair skin and I have had blackheads on my chin and nose for years, (as long as I can remember). I have read many reviews about the Shielo Complexion Scrub and I don’t think they are doing this product justice. After using Shielo’s Complexion Scrub, from their Anti-Aging category, for only 3 days, I have already seen an improvement and not just a little improvement, but a major one.

    Most of my blackheads have completely been removed. I understand it may not work for all people but I have and will continue to recommend this product to anyone who will listen. P.S. If you are gonna try it, get it online, because I paid 3 times the price when I bought it in the store.

  4. jazzy says

    March 19, 2012 at 11:38 am

    Salicylic acid will help prevent blackheads as well. I use both methods together and haven’t seen a blackhead in years.

  5. Emily says

    April 15, 2012 at 9:50 am

    Where do i find the essential oils? i keep seeing them used in so many products, but dont know where to start looking for them, or even the right ones to use

  6. behlee says

    August 13, 2012 at 3:57 pm

    i want to know if it works though

  7. Mackenzie M. says

    November 24, 2014 at 10:26 pm

    Aaaaaahhhh I have always had issues with black heads and can never figure out how to get rid of them! So annoying!! I will try this and keep my fingers crossed that it works! Thank you so much for sharing!

Have you read?

DIY Summer Nail Designs You’ll Want to Rock All Season Long

As soon as the weather heats up and the days get longer, I swap out my moody nail colors for something a little more fun, flirty, and full of sunshine. Summer is the perfect excuse to get playful with your nail designs — and this year, I’ve been experimenting at home to find a few favorites that are both easy to paint and seriously cute.

I’ve rounded up three of my go-to summer nail looks that you can totally do yourself, even if you’re not a pro. These are the styles I keep coming back to because they’re fun, eye-catching, and honestly — they just make you feel good. Whether you’re heading to the beach, a backyard BBQ, or just want to admire your nails while holding an iced latte, these are the ones to try.

Let’s dive in!

Sunset Ombre Nails

This is hands down one of the most satisfying nail designs you can do yourself. The colors melt into each other like a beach sunset, and the end result looks way more advanced than it really is.

You’ll Need:

  • A base coat

  • Three polishes (I use pink, orange, and yellow)

  • A makeup sponge

  • Top coat

  • Nail polish remover for cleanup

How to Do It:

  1. Start with a clear base coat to protect your nails.

  2. Paint horizontal stripes of your 3 colors directly onto the makeup sponge.

  3. Dab the sponge gently onto your nail, reapplying polish to the sponge as needed. Tap until the gradient blends.

  4. Clean up any excess polish around your cuticle.

  5. Apply a top coat to smooth the colors and add shine.

This design is one of those that looks good even when it’s a little messy — the top coat really pulls it all together.


 Tropical Palm Silhouettes

If you want vacation vibes without actually going anywhere, this one’s for you. The pastel base paired with simple black palm trees gives it that dreamy island feel.

You’ll Need:

  • A light pastel base polish or soft gradient background

  • Black nail art pen or thin brush with black polish

  • Top coat

How to Do It:

  1. Paint your nails with a soft pastel or ombre base.

  2. Once dry, draw a thin curved line for the palm trunk.

  3. From the top of the trunk, add small lines that fan out to mimic palm fronds.

  4. Let everything dry completely before adding a glossy top coat.

Even if your palm trees aren’t perfect, they still look awesome. Think of it like nail doodling — just more tropical.


 Watermelon French Tips

This design is so cheerful, I smile every time I see it. It’s a fruity twist on a French manicure and it’s perfect for pool parties or picnics.

You’ll Need:

  • Pink polish for the base

  • Green and white for the rind

  • Black polish for the seeds (use a dotting tool or toothpick)

  • Base and top coat

How to Do It:

  1. Paint your entire nail a soft pink.

  2. Add a green curved tip at the top edge (like a French tip).

  3. Under the green, paint a very thin white stripe.

  4. Add small black dots on the pink section to create seeds.

  5. Seal it all in with your favorite top coat.

This one is such a crowd-pleaser and looks adorable on both long and short nails.

Whether you try one of these or rotate through all three this summer, I hope these nail designs add a little color and creativity to your routine. They’re simple enough to do at home but still look like you spent time (and money!) at the salon.

Let me know which one you’re trying first — and don’t forget to tag us if you share your summer nail look!

Leave a Reply

Your email address will not be published. Required fields are marked *

RSS More Articles

  • DMC Woodland Moth Tapestry Pattern – Earthy, Elegant, and Surprisingly Relaxing
  • Learn about Comoros for Kids
  • Classic Blocks Revisited Quilt Pattern Book
  • Discover Your Unique Style with Second Chances by Macy Eleni
  • Luxe Leopard Headband- Free Crochet Pattern
  • 20+ FREE Beach Vacation Digital Stamps
  • DIY Bandana Bib Tutorial: A Stylish and Practical Accessory for Little Ones
  • Designer Spotlight: Flossy Fox Shop
  • 6 FREE Summer Printable Journaling Cards
  • Bucket Hat Knitting Patterns

Categories

Bath And Body bath bombs Body Scrubs & Lotions Colds & Flu CraftGossip Exclusive Craft Inspirations detox DIY Recipes And Tutorials DIY Tutorials and Patterns Essential Oils And Aromatherapy facials Hair Care Makeup & Beauty Melt & Pour Soap Packaging Product Reviews Soapmaking Recipes, Products And Tutorials Style Me Quick Supply Store Specials & Discounts Wellbeing

Copyright © 2025 · CraftGossip | Start Here | Contact Us | Link to Us | Your Editors | Privacy and affiliate policy