• Home
  • Suggest A DIY
  • DIY Newsletter

Bath and Body

Soap Making, Oils and Recipes

  • About CraftGossip
  • Our Network
    • Bath & Body Crafts
    • Candle Making Ideas
    • Crochet Ideas
    • Cross Stitch
    • Edible Crafts
    • Felting Patterns
    • Glass Art
    • Home & Garden Ideas
    • Indie Crafts
    • Jewelry Making
    • Kids Crafts
    • Knitting Patterns
    • Lesson Plans
    • Needlework
    • Party Ideas
    • Polymer Clay
    • Quilting Ideas
    • Recycled Crafts
    • Scrapbooking
    • Sewing Patterns
    • Card Making
    • DIY Weddings
    • Not Craft Ideas
  • Giveaways
  • Roundups
  • Store
  • Search

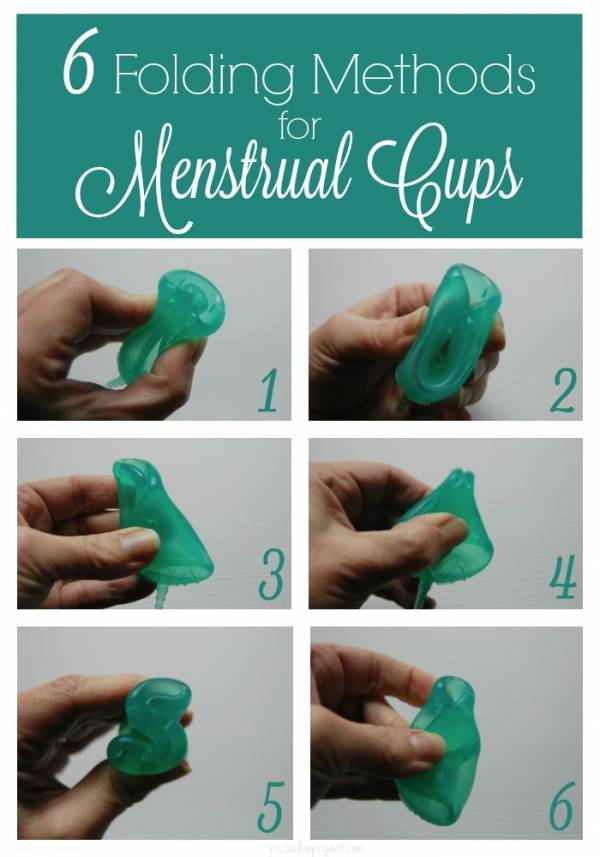
Origami Menstrual Cup – 6 Ways to fold it and use it.

April 26, 2017 by Shellie Wilson Leave a Comment

We’ve previously discussed reusable menstrual cups, and we understand that they’re not for everyone – and that’s completely okay! We’re not here to push anyone into using them. If menstrual cups aren’t your preferred option, no worries at all. However, if you do use a menstrual cup, you might appreciate a little extra help with the process, especially when it comes to getting it in place comfortably.

Getting the menstrual cup to sit properly can sometimes be tricky, and the right folding technique can make all the difference. Luckily, there are several ways to fold your cup to make the insertion process easier and more comfortable.

To help, we’ve linked to a detailed step-by-step photo guide that walks you through the different folding methods. Each folding technique can work differently depending on your body and comfort, so it’s a good idea to experiment and find the one that works best for you. This guide is designed to make your experience with the menstrual cup smoother and more straightforward, whether you’re a first-time user or someone who’s been using one for a while.

Feel free to check it out and discover the folding method that makes the process simpler and more comfortable for you!

Here is a step by step photo guide on different ways to fold it.

Is Organic Cotton Environmentally Friendly?

25+ Beauty Recipes Using Relaxing Chamomile

«
»

Have you read?

DIY Margarita Face Scrub – A Zesty Skincare Treat for Glowing Summer Skin

If your skin’s feeling dull and cranky from too much sun, sweat, or sunscreen, it might be time to give it a zesty little pick-me-up. This DIY Margarita Face Scrub is basically a cocktail for your complexion—minus the hangover. Inspired by the LUSH classic (but fresher, cheaper, and customizable), this tangy, citrus-packed sugar scrub gently exfoliates, hydrates, and leaves your face feeling oh-so-soft and radiant.

With lime zest, natural oils, a pinch of salt, and skin-loving extras like aloe vera or honey, this scrub is like a mini vacation for tired, sun-drenched skin. It’s perfect for summer, but honestly? You’ll want to make this year-round.

Why You’ll Love This Margarita Face Scrub

  • Smells like summer – Bright, fresh lime with a hint of sweetness 
  • Gentle exfoliation – Sugar buffs away dead skin without irritation 
  • Customisable texture – Go smoother or grittier depending on skin needs 
  • Hydration boost – Thanks to natural oils and optional honey or aloe 
  • Quick to make – Under 5 minutes start to finish 

Ingredients

(Makes one small jar—perfect for a weekend treat or gifting)

  • 3 tbsp fine white sugar 
  • 1 tsp sea salt (optional for a grittier feel) 
  • Zest of 1 fresh lime 
  • 2 tbsp fractionated coconut oil (or jojoba/sweet almond oil) 
  • 1 tsp honey or aloe vera gel (optional for extra hydration) 
  • 3 drops lime essential oil (or grapefruit for a twist) 
  • 1 drop peppermint essential oil (optional for a cooling tingle) 

How to Make It

  1. Zest your lime into a mixing bowl. The fresh zest adds fragrance and gentle AHAs (natural exfoliants). 
  2. Add the sugar and optional salt, and stir to combine. This will be your exfoliating base. 
  3. Pour in the oil, followed by the honey or aloe if using. Stir until everything is evenly mixed. 
  4. Add the essential oils and mix again. Adjust the scent and texture to your preference. 
  5. Scoop the scrub into a clean glass jar with a tight lid. 
  6. Store in the fridge for up to a week for maximum freshness (the lime zest is perishable). 

How to Use It

After cleansing your face, gently massage a small amount of the scrub onto damp skin using circular motions. Focus on areas prone to dullness (cheeks, chin, nose). Rinse with warm water and pat dry. Follow up with a lightweight moisturizer or face oil.

Note: Avoid open cuts and broken skin due to citrus and salt. Always patch test before trying new essential oils.

Optional Add-Ins

  • Green tea extract for antioxidants 
  • Vitamin E oil for added nourishment 
  • Coconut sugar for a softer grit 
  • Spirulina or matcha for a detoxifying boost 

Gift It!

Pop this summery scrub into a mason jar with a lime slice label and a handwritten tag:
“You’re the zest!” – and boom! You’ve got a refreshing handmade gift that feels straight out of a luxe spa.

This DIY Margarita Face Scrub is your shortcut to a spa day—without the overpriced products or chemical overload. It’s playful, effective, and perfect for anyone who wants soft, glowing skin with a side of sunshine. Just don’t actually drink it!


Leave a Reply

Your email address will not be published. Required fields are marked *

RSS More Articles

  • Halloween Sampler Cross Stitch Patterns
  • Video Ribbon Embroidery Tutorials for French Knots
  • Book Review: Knits for Little Ones
  • Book Review: Crochet Goomis – 50 Amigurumi Critters and Characters
  • 12 Halloween Quilting Patterns with a Skull Theme
  • Free Ghost Crochet Pattern: Easy No-Sew Halloween Ghost
  • Free Charity Knitting Pattern: Premature Baby Beanie
  • 10 Decorative Pie Crust Ideas That Make Homemade Pies Look Beautiful
  • Junk Journalers, You Need These 2 New Sticker Books
  • 12 Elegant Autumn Handmade Card Ideas

Copyright © 2026 · CraftGossip | Start Here | Contact Us | Link to Us | Your Editors | Privacy and affiliate policy