• Home
  • Suggest A Craft
  • DIY Newsletter

Bath and Body

Soap Making, Oils and Recipes

  • About CraftGossip
  • Our Network
    • Bath & Body Crafts
    • Candle Making Ideas
    • Crochet Ideas
    • Cross Stitch
    • Edible Crafts
    • Felting Patterns
    • Glass Art
    • Home & Garden Ideas
    • Indie Crafts
    • Jewelry Making
    • Kids Crafts
    • Knitting Patterns
    • Lesson Plans
    • Needlework
    • Party Ideas
    • Polymer Clay
    • Quilting Ideas
    • Recycled Crafts
    • Scrapbooking
    • Sewing Patterns
    • Card Making
    • DIY Weddings
    • Not Craft Ideas
  • Giveaways
  • Roundups
  • Store
  • Search

Self-Love Spell Bath Bomb: Venus Ritual for Witchcraft and Beauty Spells

August 15, 2025 by Shellie Wilson Leave a Comment

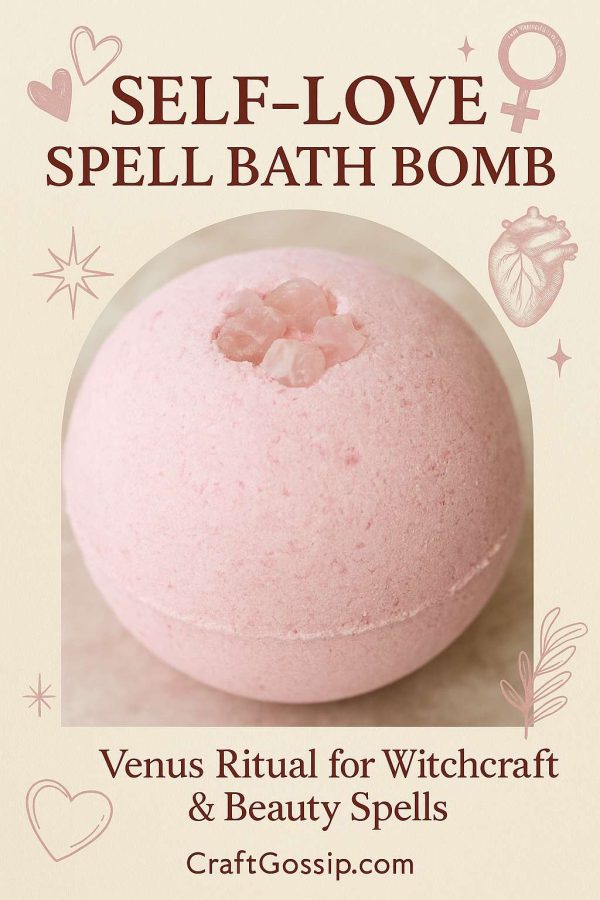
In modern witchcraft, self-love is a revolutionary act of magic. Whether you’re deep in shadow work or simply craving a moment of softness, crafting a bath ritual around self-worth is one of the most powerful spells you can cast. This Self-Love Bath Bomb Spell channels the energy of Venus, Aphrodite, and divine feminine beauty, helping you draw in love, radiance, and inner peace.

Using sacred ingredients with metaphysical correspondences like rose, vanilla, and pink Himalayan salt, this spell bath bomb turns your tub into a temple of unconditional self-devotion. This is glamour magick from the inside out.

Purpose

To open the heart, boost confidence, and draw loving energy to yourself. Best used on a Friday (Venus day) or during the waxing moon.

Scent Meaning

  • Rose: Romantic, soft, divine feminine energy
  • Vanilla: Comfort, sweetness, emotional warmth

Color & Ingredient Symbolism

  • Pink Himalayan Salt: Love, purification, emotional healing
  • Strawberry or Hibiscus Powder: Passion, sweetness, beauty
  • Rose Petals: Attraction, self-devotion
  • Pink Color: Love, compassion, Venus and Aphrodite energy

Ingredients

  • 1 cup baking soda
  • 1/2 cup citric acid
  • 1/2 cup pink Himalayan salt
  • 1 tbsp powdered strawberry or hibiscus
  • 1 tsp dried rose petals
  • 10 drops of rose essential oil
  • 5 drops vanilla oil
  • Witch hazel in a spray bottle
  • Rose quartz chip (optional)

Instructions

  1. Combine all dry ingredients in a large bowl.
  2. Mix essential oils into a small amount of melted carrier oil and stir into the bowl.
  3. Add pink mica or beetroot powder for color if desired.
  4. Spritz mixture with witch hazel until it holds together.
  5. Press into molds, adding rose quartz to the center if using.
  6. Let set and dry for 24 hours.

Ritual Use

Light a pink candle. Drop the bath bomb into warm water. As it fizzes, speak the following:

“I am worthy. I am love. I am enough.”

Ritual Instructions

  1. Cleanse your space using rose, lavender, or sandalwood incense.
  2. Light a pink candle and place a mirror beside the bath.
  3. Gently speak or chant affirmations into the water.
  4. Gaze into the mirror and say your name with love.
  5. After the bath, write a letter to yourself as if you were your own soulmate.

Self-love spells are not vanity—they’re soul nourishment. By setting time aside to bathe in sacred energy, you’re reminding your heart of its inherent worth. Keep a journal nearby, and write any insights that surface. This witchcraft beauty ritual is more than skincare—it’s sacred spellwork for your soul.

Use this bath bomb any time you feel disconnected, unloved, or in need of a magical reset. The more you love yourself, the more the universe responds in kind.

SEO Keywords: self-love spell bath bomb, Venus ritual, witchcraft bath bomb, love spell bath, glamour magick, divine feminine spell, beauty witch spell, rose quartz bath spell

Related Posts:

  • DIY Aphrodisiac Rose Petal Shower Steamers
  • The Green Witch's Herb and Plant Encyclopedia: 150…
«

Have you read?

How to Make Distilled Water at Home – A Simple DIY Method

When it comes to soap-making and other skin-loving crafts, using distilled water isn’t just a fussy extra—it can actually make or break your batch. Tap water might be fine for drinking, but it contains minerals, chlorine, and trace contaminants that can mess with lye reactions in cold process soap or leave cloudy spots in melt-and-pour bars.

Distilled water is simply pure H?O. Nothing else. No minerals, no impurities, no sneaky sediment from old pipes. And the good news? You can make it yourself with tools you already have in your kitchen.

Whether you’re making natural soap, diluting essential oils, or filling a steam iron, learning how to distill your own water is a handy life skill that costs next to nothing.

Why Distilled Water Matters in Crafting

If you’re working with ingredients that require precision—like sodium hydroxide (lye) in cold process soap—distilled water is non-negotiable. The minerals in tap water can alter your soap’s texture, accelerate spoilage, and even react with lye to form unwanted residue (that dreaded white film on your bars).

Plus, if you’re creating facial sprays, toners, or bath products, distilled water gives you peace of mind that you’re not introducing hidden bacteria or heavy metals into your skincare.

What You’ll Need

  • A large stainless steel pot with a domed or regular lid

  • A heat-safe glass or metal bowl (that fits inside the pot without touching the bottom)

  • Ice cubes

  • Tap water

  • Stove or heat source

  • Oven mitts or tongs

  • A clean glass jar or container with a lid for collecting the distilled water

Optional but helpful: a small wire rack or trivet to rest the bowl on, if it doesn’t float.

Step-by-Step Instructions to Make Distilled Water

Step 1: Add Tap Water to the Pot

Fill the large pot about halfway with regular tap water. This water will be boiled and turned into steam, which becomes your distilled water.

Step 2: Place the Collection Bowl Inside

Gently set your smaller bowl inside the pot. It should float, or if not, rest it on a small rack so it doesn’t touch the bottom. This bowl is where your clean distilled water will collect.

Step 3: Invert the Lid and Add Ice

Flip the lid upside down so the knob points down toward the center of the bowl. The lid will catch the rising steam, and the cold from the ice will help it condense into liquid. As the steam rises, it will drip down into the bowl—leaving the impurities behind.

Step 4: Turn on the Heat

Bring the water to a gentle boil. Keep the heat medium-low—you want a steady simmer, not a rapid boil, to allow for proper condensation.

Step 5: Watch and Wait

As the water steams and condenses on the lid, it will drip into your collection bowl. Keep adding ice to the top of the lid as needed. One liter of distilled water may take 30–45 minutes.

Step 6: Cool and Store

Once you’ve collected enough water, turn off the heat and allow everything to cool. Carefully remove the bowl using oven mitts or tongs. Transfer your freshly distilled water into a clean glass container with a lid. Store in a cool, dry place.

How Much Can You Make?

Depending on the size of your pot and bowl, you can expect to make 300–500ml per hour. It’s not lightning fast, but it’s perfect for small-batch crafting.

Tips and Variations

  • If your lid isn’t domed, tilt it slightly toward the bowl to encourage dripping.

  • For even purer results, use filtered water as your base.

  • Sterilise your collecting bowl and container if you’re using the distilled water for skincare or medical use.

Is It the Same as Boiled Water?

No. Boiled water kills bacteria but still contains minerals and chemicals. Distillation removes those impurities by turning water into steam and then collecting the clean vapor.

What Can You Use Homemade Distilled Water For?

  • Cold process and melt & pour soap making

  • Essential oil blends and room sprays

  • Facial toners and skin care products

  • Herbal tinctures or infusions

  • Cleaning irons, humidifiers, or CPAP machines

Once you’ve made your own distilled water, you’ll wonder why you ever bought it in a jug. It’s a simple, satisfying process that supports all your homemade projects—without the price tag or plastic waste. And it’s surprisingly relaxing to watch those little droplets fall into the bowl, knowing you’re crafting something pure from scratch.

Would you like to bundle this into your soap-making PDF guide? Or should I move ahead with the next tutorial in the soap series?


Leave a Reply

Your email address will not be published. Required fields are marked *

RSS More Articles

  • Free Crochet Pattern One Hour Slippers – Quick, Cozy and Perfect for Gifting
  • Craft the Ultimate Multitasking Messenger Bag
  • Self-Love Spell Bath Bomb: Venus Ritual for Witchcraft and Beauty Spells
  • These Viral Whiskey Cocktails Are All You Need This Fall
  • Build a Paper City with Free Printables
  • Crochet Pattern Review: Pullover Crochet Pattern by Lion Brand
  • How to Make Textured Wall Art: Easy DIY Canvas Art
  • DIY Mason Jar Lid Sunflowers with Rustic Stems – Upcycled Farmhouse Decor
  • 8 FREE Printable Thank You Teacher Cards
  • Pencil Bookmark Cross Stitch Pattern

Categories

Bath And Body bath bombs Body Scrubs & Lotions Colds & Flu CraftGossip Exclusive Craft Inspirations detox DIY Recipes And Tutorials DIY Tutorials and Patterns Essential Oils And Aromatherapy facials Hair Care Makeup & Beauty Melt & Pour Soap Packaging Product Reviews Soapmaking Recipes, Products And Tutorials Style Me Quick Supply Store Specials & Discounts Wellbeing

Copyright © 2025 · CraftGossip | Start Here | Contact Us | Link to Us | Your Editors | Privacy and affiliate policy