• Home
  • Suggest A Craft
  • DIY Newsletter

Bath and Body

Soap Making, Oils and Recipes

  • About CraftGossip
  • Our Network
    • Bath & Body Crafts
    • Candle Making Ideas
    • Crochet Ideas
    • Cross Stitch
    • Edible Crafts
    • Felting Patterns
    • Glass Art
    • Home & Garden Ideas
    • Indie Crafts
    • Jewelry Making
    • Kids Crafts
    • Knitting Patterns
    • Lesson Plans
    • Needlework
    • Party Ideas
    • Polymer Clay
    • Quilting Ideas
    • Recycled Crafts
    • Scrapbooking
    • Sewing Patterns
    • Card Making
    • DIY Weddings
    • Not Craft Ideas
  • Giveaways
  • Roundups
  • Store
  • Search

Soapylove Boxed Gift Set Giveaway

February 12, 2011 by Nellie Lee Luhrmann 101 Comments

Soapylove was started in 2006  by  Debbie Chialtas. Debbie discovered glycerin soap crafting whilst pregnant with her son. The beautiful colors, designs, and shapes that are possible with “melt and pour” sparked her creative passion. She loved being able to create something super special, completely usable, and totally adorable! ( And she has )

Opening a shop on Etsy to offload some of the heaps of soaps she was making. To her delight, Soapylove was a hit!  Soapyloves Soapy Pops were featured on the Etsy homepage quite a few times resulting in  wholesale inquiries.

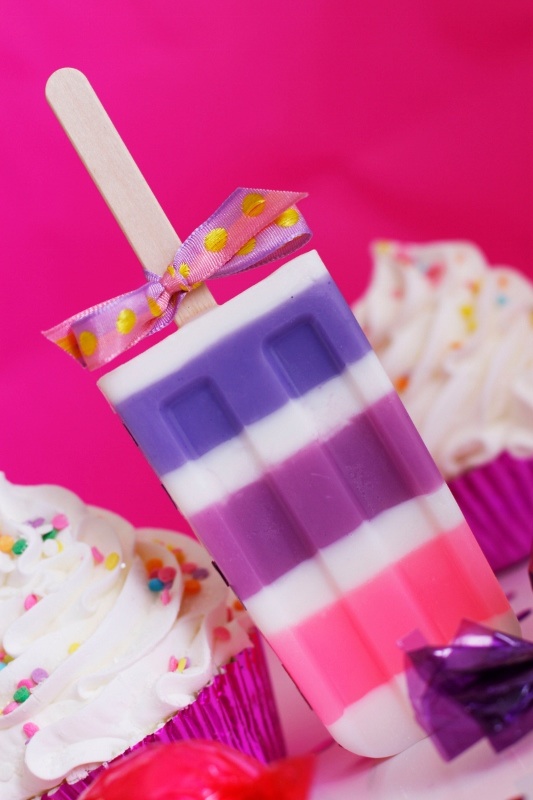
Soapylove has since grown quite a bit  You can now find Soapy Pops in stores all over the world and they are still made completely by hand in San Diego, with the best ingredients.

In addition to offering her collection of  Soapy Pops, Debbie also LOVES to teach others how to make glycerin soaps. Check out the Soapmakers page  here and you’ll find  eZines, The Soapylove Book, a line of fabulous supplies produced by Bramble Berry, as well as her current class schedule. Pop over to Debbies blog to read her latest soapy endeavors, or join the Soapylove Facebook fan page to get daily updates!

Whether you’re a Soapy Pop fan or a glycerin soap crafter (or both!) you’re bound to find something  to tickle your fancy

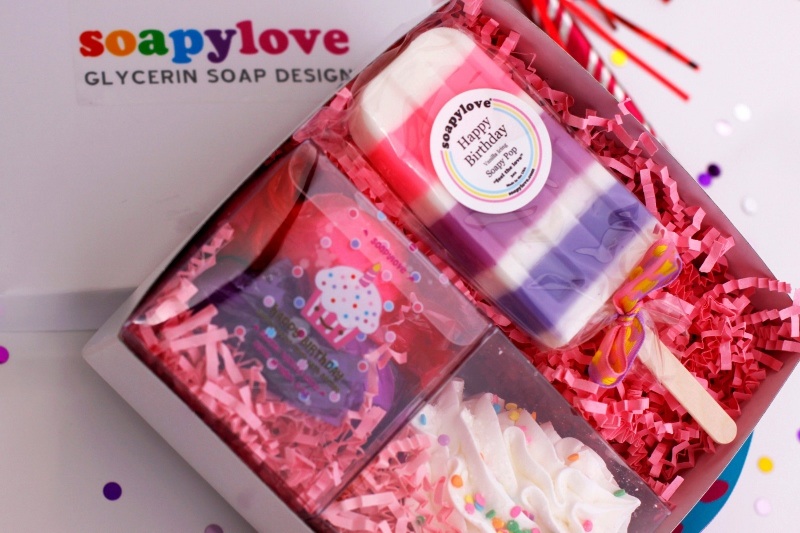
Help us celebrate  SOAPYLOVES 5TH  ANNIVERSARY coinciding with  the launch of her new  “Cupcake Bath Bombs”,  “Super Fizzie Mini Bath Bombs” and “Boxed Gift Sets”

SOAPY LOVE is giving ONE LUCKY READER a chance to win a free  Gift Box Set  of there choice . For your chance to be win all you have to do is comment below and tell me in 25 words or less which of the gift boxes you like most & why.  For up to date info on Soapylove be sure to join SoapyClub or just click here

Winner to be announced MONDAY 14TH MARCH

Related Posts:

  • Efficiency and Expertise: Crafting 200 Bath Bombs in…
  • Homemade Mulled Wine Soap Recipe Just In Time For…
«
»

Trackbacks

  1. Soapylove Re Draw · Bath and Body | CraftGossip.com says:
    May 4, 2011 at 9:02 pm

    […] weeks ago I announced a winner for the Soapy Love give away……………. Sadly for them they have not claimed there prize and luckily […]

Have you read?

DIY Summer Nail Designs You’ll Want to Rock All Season Long

As soon as the weather heats up and the days get longer, I swap out my moody nail colors for something a little more fun, flirty, and full of sunshine. Summer is the perfect excuse to get playful with your nail designs — and this year, I’ve been experimenting at home to find a few favorites that are both easy to paint and seriously cute.

I’ve rounded up three of my go-to summer nail looks that you can totally do yourself, even if you’re not a pro. These are the styles I keep coming back to because they’re fun, eye-catching, and honestly — they just make you feel good. Whether you’re heading to the beach, a backyard BBQ, or just want to admire your nails while holding an iced latte, these are the ones to try.

Let’s dive in!

Sunset Ombre Nails

This is hands down one of the most satisfying nail designs you can do yourself. The colors melt into each other like a beach sunset, and the end result looks way more advanced than it really is.

You’ll Need:

  • A base coat

  • Three polishes (I use pink, orange, and yellow)

  • A makeup sponge

  • Top coat

  • Nail polish remover for cleanup

How to Do It:

  1. Start with a clear base coat to protect your nails.

  2. Paint horizontal stripes of your 3 colors directly onto the makeup sponge.

  3. Dab the sponge gently onto your nail, reapplying polish to the sponge as needed. Tap until the gradient blends.

  4. Clean up any excess polish around your cuticle.

  5. Apply a top coat to smooth the colors and add shine.

This design is one of those that looks good even when it’s a little messy — the top coat really pulls it all together.


 Tropical Palm Silhouettes

If you want vacation vibes without actually going anywhere, this one’s for you. The pastel base paired with simple black palm trees gives it that dreamy island feel.

You’ll Need:

  • A light pastel base polish or soft gradient background

  • Black nail art pen or thin brush with black polish

  • Top coat

How to Do It:

  1. Paint your nails with a soft pastel or ombre base.

  2. Once dry, draw a thin curved line for the palm trunk.

  3. From the top of the trunk, add small lines that fan out to mimic palm fronds.

  4. Let everything dry completely before adding a glossy top coat.

Even if your palm trees aren’t perfect, they still look awesome. Think of it like nail doodling — just more tropical.


 Watermelon French Tips

This design is so cheerful, I smile every time I see it. It’s a fruity twist on a French manicure and it’s perfect for pool parties or picnics.

You’ll Need:

  • Pink polish for the base

  • Green and white for the rind

  • Black polish for the seeds (use a dotting tool or toothpick)

  • Base and top coat

How to Do It:

  1. Paint your entire nail a soft pink.

  2. Add a green curved tip at the top edge (like a French tip).

  3. Under the green, paint a very thin white stripe.

  4. Add small black dots on the pink section to create seeds.

  5. Seal it all in with your favorite top coat.

This one is such a crowd-pleaser and looks adorable on both long and short nails.

Whether you try one of these or rotate through all three this summer, I hope these nail designs add a little color and creativity to your routine. They’re simple enough to do at home but still look like you spent time (and money!) at the salon.

Let me know which one you’re trying first — and don’t forget to tag us if you share your summer nail look!

Leave a Reply

Your email address will not be published. Required fields are marked *

RSS More Articles

  • How to Create a Photo Box Card
  • Embellish Your Knit Dishcloth with Flowers
  • 30 Brilliant Uses for Empty Pill Bottles You Probably Haven’t Tried Yet
  • Free Crochet Pattern – Emotional Support Chicken
  • Unisex Pajama Top Free Pattern
  • Back to School Cross Stitch Patterns
  • Wrap Yourself in Brilliance: Crochet Your Own Shawl or Scarf
  • 3 FREE Boho Bugs Coloring Pages and Digital Images
  • Embroidery for Mental Health: How Stitching Reduces Stress
  • Krampus Sweater Knitting Pattern

Categories

Bath And Body bath bombs Body Scrubs & Lotions Colds & Flu CraftGossip Exclusive Craft Inspirations detox DIY Recipes And Tutorials DIY Tutorials and Patterns Essential Oils And Aromatherapy facials Hair Care Makeup & Beauty Melt & Pour Soap Packaging Product Reviews Soapmaking Recipes, Products And Tutorials Style Me Quick Supply Store Specials & Discounts Wellbeing

Copyright © 2025 · CraftGossip | Start Here | Contact Us | Link to Us | Your Editors | Privacy and affiliate policy