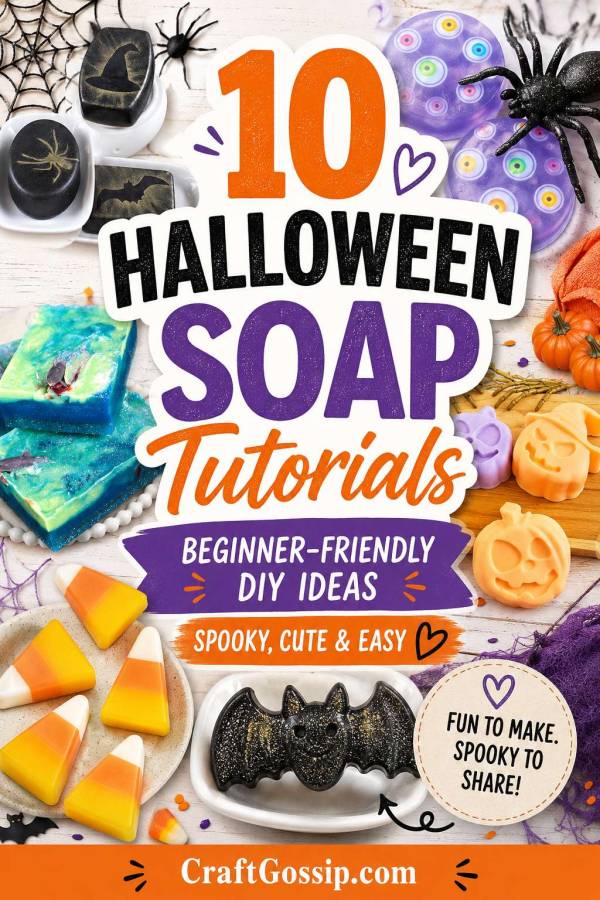
Halloween crafting does not always need to involve yards of fake cobweb, glitter in places glitter should never be, or another pumpkin decoration that needs to be stored for eleven months of the year. Sometimes the best Halloween projects are the useful ones, and these beginner-friendly Halloween soap making tutorials are wonderfully practical while still being delightfully spooky.
Homemade Halloween soap is particularly lovely for anyone who enjoys making small gifts. A few ghost soaps tucked into a cellophane bag can become a teacher gift, a Halloween party favor, a non-candy trick-or-treat surprise or a cheerful little addition to the guest bathroom. They are also far easier to make than they look.
Most of the Halloween soap recipes below use the melt-and-pour method. That means the soap base has already been made for you, so there is no measuring or handling lye and no long curing period. You simply chop the soap base, melt it gently, add soap-safe color and fragrance, and pour it into a mold.
It is rather like melting chocolate, except nobody should lick the spoon.
Easy Halloween Soap Making for Beginners
Before beginning, gather a heatproof measuring jug, a silicone soap mold, a sharp knife, soap-safe colorant and a spray bottle filled with rubbing alcohol. The alcohol is optional, but a light spritz over freshly poured soap helps remove those little bubbles sitting on the surface.
Always choose fragrance oils, essential oils, colorants and glitter specifically approved for use in soap and on skin. Ordinary craft glitter, candle fragrance and food coloring may look tempting in the cupboard, but they are not suitable substitutes.
These Halloween soap making tutorials range from incredibly simple embedded-toy soaps to layered candy corn bars and realistic pumpkin pie slices. Start with whichever project makes you smile—the soap does not need to look shop-perfect to be useful, giftable and enormous fun to make.
Spooky Spider Soap for Halloween
This wonderfully creepy CraftGossip project suspends plastic spiders inside clear soap, making it an excellent first melt-and-pour soap tutorial. The finished soaps work beautifully as Halloween party favors, non-candy treats or encouragement for children who suddenly become much more interested in washing their hands when a spider is involved.
Clear Bug Soap for Kids
This easy CraftBits tutorial uses clear glycerin soap and small plastic bug toys to create soaps with a surprise trapped inside. There are very few steps, and the soaps can be made in a basic oval mold, so it is a good choice for beginners making Halloween crafts with children.
Pumpkin Pie Slice Soap
Homemade Pumpkin Pie Slice Soap
These pumpkin pie soaps look impressively detailed, but they are made with beginner-friendly melt-and-pour soap base. The separate crust, pumpkin filling and optional whipped-soap topping make the finished slices look good enough to eat—although you may need to add a “soap, not dessert” tag for particularly enthusiastic family members.
Jack-O’-Lantern Melt-and-Pour Soap Bars
DIY Halloween Melt-and-Pour Soap Bars
Pumpkin-shaped molds do most of the decorative work in this easy Halloween soap recipe. The tutorial includes orange and purple soap variations as well as several seasonal essential-oil blend ideas, making it useful when you want your soaps to smell as autumnal as they look.
Apple Jack-O’-Lantern Soap
Jack-O’-Lantern Vanilla Apple Soap Bars
These bright orange jack-o’-lantern soaps combine a classic Halloween pumpkin shape with a warm vanilla-apple fragrance. This is a cheerful choice for Halloween gift baskets and market stalls, and it is simple enough to make in batches once you have your mold prepared.
Candy Corn Layered Soap
Candy corn divides people into two camps, but even those who would never willingly eat it must admit that the yellow, orange and white layers make a cracking little soap. This beginner tutorial explains how to pour the separate layers, cut the finished loaf into triangles and round the edges to create that familiar candy shape.
Glittery Halloween Bat Soap
These dark, shimmery bat soaps are ideal when you prefer your Halloween crafts slightly gothic rather than pumpkin-orange and cutesy. The tutorial uses melt-and-pour soap, a Halloween mold and skin-safe biodegradable glitter to create dramatic little soaps without requiring advanced soap-making skills.
Hats, Bats and Spiders Soap
This project begins with simple black-and-white melt-and-pour bars and adds sparkly Halloween silhouettes to the surface. It is a clever option when you cannot find a detailed Halloween soap mold, because the witch hats, bats and spiders are added decoratively after the soap bars have set.
Googly-Eye Halloween Soap
DIY Halloween Soap With Googly Eyes
Googly eyes have the remarkable ability to make almost anything look ridiculous, including a perfectly respectable bar of soap. These colorful Halloween soaps are playful, easy to customize and particularly well suited to children’s party favors or spooky bathroom decorations.
Bloody Shark Attack Soap
This dramatic soap uses contrasting white and red melt-and-pour layers to create a wonderfully gruesome shark-attack effect. It is a fun alternative to the usual pumpkins and ghosts, especially for older children, teenagers or anyone whose preferred Halloween decorating style leans more toward monster movie than friendly farmhouse pumpkin.
Simple Halloween Soap Making Tips
Melt soap base slowly in short microwave bursts, stirring between each one. Overheating can make the soap rubbery, encourage bubbles and weaken the fragrance.
When creating layered soap, allow the first layer to become firm enough to support the next one but not completely cold. Spritz the surface lightly with rubbing alcohol before pouring the next layer, as this helps the layers stick together.
Small silicone baking molds can sometimes be used for melt-and-pour soap, but once a mold has been used with fragrance and soap colorants, I prefer to keep it for crafting rather than return it to the kitchen.
Wrap finished melt-and-pour soaps once they are completely cool. Glycerin soap can attract moisture from the air, creating harmless little beads of “glycerin dew” on the surface. Plastic wrap, shrink wrap or a tightly sealed cellophane bag helps keep each bar looking fresh until Halloween.
Halloween Soap Gift Ideas
A single handmade soap can be tied with black twine and a small paper tag for an inexpensive teacher or neighbor gift. For party favors, place mini soaps in clear bags and add labels such as “Wash Away the Cobwebs,” “Monster Scrub” or “For Frightfully Clean Hands.”
You could also create a Halloween bathroom gift set by pairing one of these soaps with homemade bath salts, a small washcloth and a spooky candle. It is a thoughtful alternative to another bowl of sweets and, unlike the Halloween chocolate hidden in my cupboard, it has a reasonable chance of surviving until the end of October.
Whether you choose a spider trapped in clear glycerin, a glittery black bat or a tiny slice of pumpkin pie, these beginner Halloween soap making tutorials prove that useful crafts can still have plenty of personality. Start with a simple melt-and-pour project, embrace the occasional wonky layer, and remember that handmade Halloween soap is allowed to look handmade—that is half its charm.
Leave a Reply