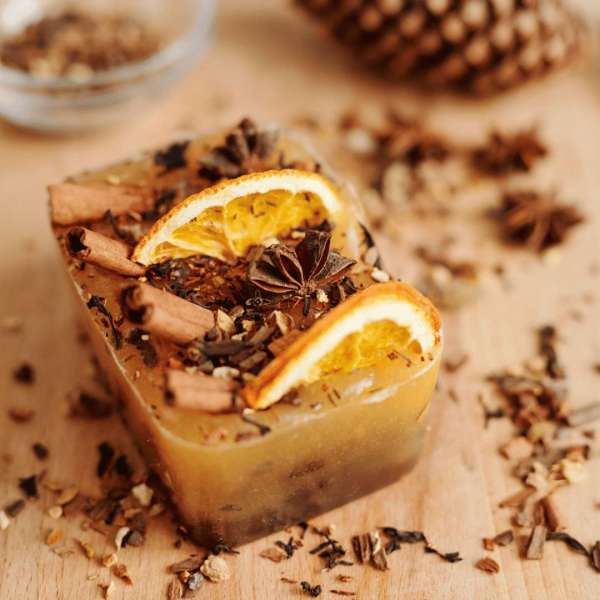
Indulge in the cozy essence of the holiday season with your very own Mulled Wine Soap. This handmade creation captures the rich aromas of cinnamon, orange, and star anise, evoking memories of fireside gatherings and festive celebrations. Using a clear melt and pour soap base, you’ll be able to showcase the natural beauty of the ingredients while infusing your soap with the comforting scents of mulled wine.
Ingredients:
1 lb clear melt and pour soap base
1 teaspoon dried cinnamon sticks
1 teaspoon dried orange peel pieces
3-4 whole star anise
10-15 drops of cinnamon essential oil
5-8 drops sweet orange essential oil
Soap-safe colorant (optional, for a warm hue)
Soap mold
Heat-safe measuring cup or bowl
Wooden stirring stick
Spray bottle with rubbing alcohol (to prevent air bubbles)
Knife or soap cutter
Instructions:
Step 1: Preparing Your Workspace
Ensure your workspace is clean and organized. Set up all your ingredients, utensils, and equipment within easy reach.
Step 2: Preparing the Dried Ingredients
Gently break the dried cinnamon sticks into smaller pieces using your hands or a mortar and pestle. You want the pieces to be roughly the same size for even distribution in the soap.
Similarly, break the dried orange peel pieces into smaller bits.
Step 3: Melt the Soap Base
Cut the clear melt and pour soap base into small cubes for easier melting.
Place the soap cubes in a heat-safe measuring cup or bowl.
Microwave the soap in 20-30 second intervals, stirring between each interval until fully melted.
Step 4: Adding Essential Oils and Colorant
Once the soap base is melted, add 10-15 drops of cinnamon essential oil and 5-8 drops of sweet orange essential oil. Adjust the number of drops based on your preference for fragrance strength.
If desired, add a soap-safe colorant to achieve a warm hue reminiscent of mulled wine. Mix well to ensure even color distribution.
Step 5: Assembling the Soap
Place the dried cinnamon stick pieces and dried orange peel pieces into the soap mold. Distribute them evenly to create a visually appealing design.
Carefully pour the scented and colored soap base into the mold, covering the dried ingredients. To avoid air bubbles, you can lightly spray the surface with rubbing alcohol.
Step 6: Decorating with Star Anise
Before the soap sets completely, gently press the whole star anise onto the surface of the soap. You can arrange them in a decorative pattern.
Allow the soap to cool and harden completely. This typically takes a few hours.
Step 7: Unmolding and Cutting
Once the soap has completely hardened, carefully unmold it by gently pushing on the edges of the mold.
Place the soap on a cutting surface and use a knife or soap cutter to slice it into desired shapes. You can cut them into bars or any other shape you prefer.
Step 8: Curing
Place the cut soap bars on a drying rack or parchment paper and let them cure for about 1-2 weeks. This allows any excess moisture to evaporate, resulting in a harder and longer-lasting bar.
Your handmade Mulled Wine Soap is now ready to bring the warmth and comfort of the holidays to your daily routine. With its aromatic blend of cinnamon, orange, and star anise, this soap not only cleanses but also indulges your senses in the spirit of the season. Enjoy the process of creating a festive treat for yourself or to give as a thoughtful, handmade gift to your loved ones.
Here are some suggestions for gift wrapping –
1. Rustic Elegance:
Wrap your Mulled Wine Soaps in brown kraft paper or tissue paper. Tie them with a natural twine or raffia ribbon for a rustic touch. Add a sprig of dried orange slices or a small cinnamon stick for an extra festive element. You can also attach a handwritten gift tag with a warm holiday message.
2. Festive Pouches:
Place each soap in a small fabric drawstring pouch in a rich, deep red or burgundy color. The pouches can be adorned with gold or silver accents to add a touch of elegance. Tie the pouch closed with a coordinating ribbon or cord and attach a small star anise or cinnamon stick to the knot.
3. Winter Wonderland:
Wrap the soaps in white tissue paper and tie them with a silver or icy blue ribbon. Create a small winter scene on top by attaching a miniature pinecone, a tiny faux snowflake, and a sprig of artificial evergreen. This combination will evoke the magic of a snowy winter day.
4. Shimmer and Shine:
Wrap the soaps in gold or silver metallic paper to add a touch of luxury. Use a satin ribbon in a complementary color and tie a bow on top. Glue on a small decorative snowflake or star ornament to give the package a festive and glamorous feel.
5. Vintage Charm:
Wrap the soaps in vintage-inspired patterned paper, such as damask or toile. Tie them with a lace ribbon or a piece of vintage lace trim. Attach a vintage-style key charm or a small antique-looking ornament for a nostalgic touch.
6. Nature’s Bounty:
Place the soaps in a small wooden crate or box lined with natural shredded paper or straw. Tie the crate with a jute ribbon or twine and tuck in a sprig of dried orange slices, a cinnamon stick, and a few star anise. This presentation showcases the organic and warm nature of the Mulled Wine Soap.
7. Cellophane Gift Bag:
Place the soap in a clear cellophane gift bag and tie it closed with a satin ribbon in a deep red or burgundy hue. Add a small gift tag with a cozy holiday greeting. The transparent bag allows the recipient to see the beautiful soap inside.
No matter which gift wrapping style you choose, each one will accentuate the festive spirit and thoughtful nature of your handmade Mulled Wine Soaps. Tailor your presentation to the recipient’s preferences and the occasion, and your beautifully wrapped soaps will surely bring joy and appreciation.


Leave a Reply