Bath bombs are one of those crafts that look ridiculously easy in a thirty-second video.
Mix the powders, spray in a little liquid, press everything into a shiny metal mould and reveal a perfect pastel sphere.
In reality, one half often stays inside the mould while the other half falls onto the bench in pieces. Then the next bath bomb expands overnight and develops a strange bumpy waistline.
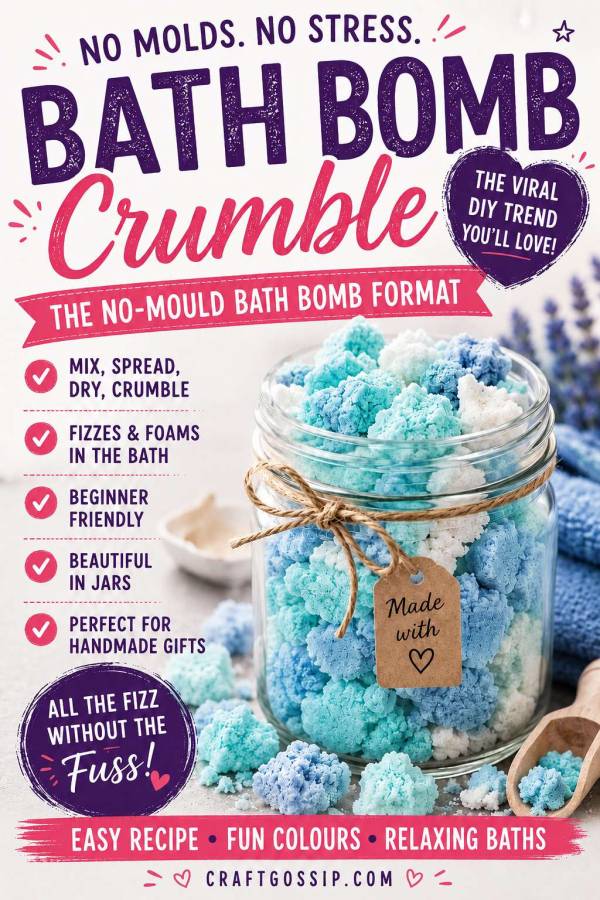
This is why bath bomb crumble is such a clever alternative.
Instead of pressing the mixture into moulds, you spread it onto baking paper, allow it to foam and dry, then break the hardened slab into colourful fizzy chunks.
The finished crumble is stored in jars and scooped directly into warm bathwater.
It gives you all the fizzing fun of traditional bath bombs without the tapping, cracking, sticking and muttering.
What Is Bath Bomb Crumble?
Bath bomb crumble is a scoopable bath product made using many of the same ingredients found in a traditional bath bomb.
Baking soda and citric acid create the fizzing reaction, while a mild liquid surfactant adds foam and helps the mixture expand while drying.
Once the mixture has formed a brittle slab, it is broken into irregular pieces.
You may also see this trend called:
- Bath bomb brittle
- Fizzy bath crumble
- Foaming bath rocks
- Scoopable bath fizz
- Crushed bath bombs
- Bath bomb bark
It is different from ordinary bath dust because the mixture is deliberately dried into pieces rather than left as loose powder.
Bath & Body CraftGossip has shared plenty of traditional bath bomb ideas over the years, including these fun Pokémon Go bath bombs and cosy gingerbread cookie bath bombs. Bath bomb crumble is a much less fussy option when the shape is not part of the design.
Why This No-Mould Bath Bomb Format Works
Bath bomb crumble is particularly useful for beginners because imperfect pieces are exactly what you are aiming for.
There are no seams to hide and no pressure to produce identical spheres.
It is also a handy option when:
- You do not own bath bomb moulds
- Your bath bombs keep cracking
- You live in a humid climate
- You want to make several colours at once
- You need adjustable bath portions
- You are making inexpensive handmade gifts
- You have leftover bath bomb mixture
The finished crumble looks especially pretty layered inside clear jars, and recipients can use a small scoop or a generous handful depending on the size of the bath.
Foaming Bath Bomb Crumble Recipe
This recipe makes approximately two medium jars.
Ingredients
- 300 g baking soda
- 150 g citric acid
- 40 g kaolin clay
- 40 g cocamidopropyl betaine
- 10 g Polysorbate 80
- Up to 5 g skin-safe fragrance oil
- Cosmetic bath colourant, as required
You Will Also Need
- Digital scale
- Large mixing bowl
- Fine sieve
- Whisk
- Silicone spatula
- Gloves
- Dust mask
- Smaller bowls for separate colours
- Baking tray
- Baking paper, wax paper or silicone mat
- Airtight jars
- Small cosmetic scoop
Cocamidopropyl betaine is a mild liquid surfactant often used in foaming bath and body products.
Polysorbate 80 helps oil, fragrance and colour disperse more evenly in the bathwater and may help reduce colour clinging to the tub.
Specialist cosmetic suppliers are generally the best place to find these ingredients. Amazon can be useful for digital scales, wide cosmetic jars, scoops and other basic equipment when you only need small quantities.
Important Bath Bomb Safety Tips
Work in a dry, well-ventilated area.
Wear a dust mask while handling fine powders and avoid breathing in baking soda, citric acid, clay or powdered colourants.
Use only cosmetic-grade fragrance and colour approved for bath products.
A fragrance intended for candles or diffusers is not automatically suitable for skin.
Check the supplier’s recommended usage level for your particular fragrance rather than adding fragrance by guesswork.
Avoid ordinary food colouring, craft glitter and non-cosmetic pigments. These can stain the bath, irritate the skin or create a mess you will regret later.
How to Make Bath Bomb Crumble
Step 1: Prepare the Tray
Line a large baking tray with wax paper, baking paper or a silicone mat.
Leave room around the edges because the mixture may puff up and spread.
Step 2: Sift the Powders
Sift the baking soda, citric acid and kaolin clay into a large mixing bowl.
Whisk thoroughly to remove lumps and distribute the ingredients evenly.
This step might feel fussy, but little clumps have a habit of surviving every stage of the project and appearing right in the middle of the finished batch.
Step 3: Divide the Mixture
For a two-colour crumble, divide the dry mixture between two bowls.
Leave one portion white or add different bath-safe colours to each bowl.
Good combinations include:
- Blush pink and cream
- Lavender and lilac
- Aqua and white
- Orange and purple
- Peach and pale yellow
- Green and pink
Keep the colours soft until you have tested them in water.
Step 4: Mix the Liquid Ingredients
Combine the cocamidopropyl betaine, Polysorbate 80 and fragrance oil in a small jug.
Stir gently so you do not produce a jug full of foam before it reaches the dry ingredients.
Step 5: Combine the Wet and Dry Ingredients
Pour the liquid mixture into the dry ingredients.
Mix promptly using a silicone spatula or gloved hands.
The mixture may begin foaming and expanding. That is expected with this bath bomb crumble method.
The texture should be damp, soft and slightly sticky.
Once everything is evenly mixed, stop working it. Overmixing can use up too much of the fizz before the crumble reaches the bathtub.
Step 6: Add the Colour
Add a small amount of cosmetic bath colourant to each portion.
Mix until the colour is even.
Remember that wet bath colour often looks much stronger than it did in the bowl.
Step 7: Spread the Mixture
Transfer the mixture to the prepared tray immediately.
Spread it into a rough layer approximately 1–2 cm thick.
Do not attempt to make the surface perfectly smooth. Uneven ridges create those lovely rustic chunks once the slab is broken apart.
For marbled bath crumble, place alternating spoonfuls of different colours onto the tray and lightly swirl the edges together.
Step 8: Allow It to Expand
Leave the tray somewhere dry.
The mixture may puff, foam and develop a wonderfully uneven surface.
Resist the urge to flatten it.
That strange airy texture is what makes the finished slab easy to break into crumble.
Step 9: Dry for 24–48 Hours
Let the mixture dry completely.
This generally takes between 24 and 48 hours, but humid weather may extend the drying time.
Do not place the tray in a hot oven. Heat can affect fragrance and cause unpredictable reactions.
The slab should feel firm and dry through the centre before it is packaged.
Step 10: Break It Into Crumble
Lift the dry slab from the paper and break it apart using clean, dry hands.
Keep a mixture of large chunks, smaller rocks, crumbs and powder.
These different textures look much prettier in a jar than perfectly uniform pieces.
If it all turns into powder, call it bath bomb dust and carry on. Crafting is often just naming the result confidently.
Step 11: Fill the Jars
Transfer the bath bomb crumble into clean, completely dry airtight jars.
Add a small scoop and close the lid immediately.
Store the jars away from steam and humidity.
How to Use Bath Bomb Crumble
Add approximately 2–4 tablespoons to a warm bath.
The crumble will fizz and foam as it dissolves.
Begin with a smaller amount until you have tested the fragrance and colour strength.
Stir the bathwater gently to help distribute the ingredients.
Take care when stepping into and out of the tub, as bath products may make the surface slippery.
Rinse the bathtub after use.
Pink Lemonade Bath Crumble
Divide the mixture into pale pink and soft yellow portions.
Use a bath-safe pink lemonade or citrus fragrance oil.
Once the slabs are dry, layer the two colours loosely in clear jars.
Do not add real lemon juice. It will activate the citric acid and leave you with one very enthusiastic tray of fizz.
Lavender Moon Bath Crumble
Colour half the mixture pale lavender and leave half white.
Use a skin-safe lavender fragrance or properly diluted lavender essential oil.
Package the crumble with a purple or silver-grey label.
Loose lavender flowers look charming but tend to float around the bath and gather in the drain. A pretty fragrance gives you the lavender mood without requiring plumbing negotiations afterwards.
Mermaid Lagoon Bath Crumble
Create separate aqua, blue and pale purple portions.
Use a tropical, coconut or ocean fragrance approved for bath products.
A tiny amount of biodegradable cosmetic glitter can be added when the supplier confirms it is suitable for bathwater.
Ordinary craft glitter should stay at the craft table.
Witch’s Bath Brew
For a Halloween version, make purple, green and orange crumble.
Layer the colours in clear jars and label them Witch’s Bath Brew.
Pair the crumble with these Halloween cauldron and jack-o’-lantern bath bombs for a spooky handmade spa gift.
Troubleshooting Bath Bomb Crumble
It Fizzed Too Much While Mixing
The room may have been humid, or the mixture may have been worked for too long.
Mix quickly and transfer it to the tray as soon as the ingredients are combined.
Some controlled foaming is normal.
It Expanded Over the Tray
The mixture was spread too thickly or too close to the edge.
Use a larger tray or divide the next batch between two trays.
Any escaped pieces can still be collected and packaged once dry.
The Crumble Will Not Harden
It probably needs more drying time.
Move the tray to a drier room with gentle air circulation.
Check the centre of a thicker section before packaging.
The Finished Crumble Does Not Fizz Much
Too much of the reaction may have occurred before the product dried.
Humidity, excess liquid and prolonged mixing can all weaken the finished fizz.
The Colour Left a Ring Around the Bath
Use less colour and confirm that it is designed for bath products.
Polysorbate 80 can help disperse oil and colour, but it cannot rescue an entire spoonful of intensely pigmented mica.
Always test a small portion in a white basin first.
The Crumble Became Soft in the Jar
Moisture has entered the container.
Use an airtight jar, keep it away from steam and include a dry scoop.
For more information on contamination and product storage, read our guide to preserving homemade skincare recipes safely.
Bath Bomb Crumble Gift Ideas
Package the crumble in:
- Wide plastic cosmetic jars
- Clear apothecary jars
- Resealable pouches
- Small screw-top tins
- Test-tube-style favour containers
- Layered spa gift jars
Plastic jars can be safer than glass in a bathroom, particularly when handled with wet hands.
Add a scoop, waterproof label and ribbon.
Suggested label text:
Foaming Bath Bomb Crumble
Add 2–4 tablespoons to warm bathwater. Keep dry between uses. External use only. Take care, as the bath may become slippery.
Include the ingredient list, fragrance name, date made and any warnings required for your chosen ingredients.
Bath bomb crumble takes one of the most frustrating bath and body crafts and turns the failure point into the feature.
There is no perfect sphere to protect. No careful unmoulding. No heartbreak when the surface cracks.
You spread it out, let it rise, dry it and then deliberately break the whole thing apart.
Honestly, there is something rather satisfying about that.
Leave a Reply